Selection and preparation of turnips for storage
As a rule, early turnip varieties are harvested as they ripen and eaten fresh during the summer. For storage, choose late varieties that are optimal for storage.
Late turnips are harvested strictly before the onset of frost. The best time to collect root vegetables is the end of September and October. If the crop is heavily retained in the soil, there is a risk of softening, loss of taste and further poor storage.
Observing the appearance of the vegetable above the ground will help determine whether turnips are ready for harvest. When the root crop is ready for harvest, it appears in the garden bed, so pulling it out is not difficult.
If the soil is dry and hard, dig up turnips with a pitchfork or shovel, carefully selecting the root crops from the ground. The tops are immediately cut off with a sharp knife, leaving no more than 1 cm of greenery, and the petiole that was in the ground is trimmed by 2-3 cm.
The fruits are briefly laid out to dry in the fresh air, choosing a well-ventilated, shaded place for this. If they lie under the scorching sun, they will quickly wilt.
If you leave turnips to dry in the garden along with herbs, the nutrients and vitamins will go into the tops.
After this, the turnips are sorted. Sides cut off with a tool or damaged skin are a sign of rejection of turnips for long-term storage due to the high probability of rotting. Small and medium-sized specimens are selected from whole root vegetables. Large ones are susceptible to spoilage from the inside and are unsuitable for storage; they can be eaten immediately after collection.
Rules for storing turnips for the winter in an apartment or cellar, how to freeze a vegetable
Turnip is a healthy vegetable that is grown throughout Russia. Turnips used to be the main dish from which almost everything was prepared. But over time, the popularity of this vegetable faded. And it’s a shame, because the plant is rich in nutrients. Turnips can also be stored for the winter.
When to harvest turnips?
Root crops intended for storage for the winter should be one of the last to be collected. The most acceptable harvest dates are the end of September or the end of October. The plant has a long growing season, so the roots take a long time to ripen. It takes at least three months for the vegetable to fully ripen.
Selection of root vegetables suitable for storage
Only ripe and healthy root vegetables are suitable for winter storage. The peel should show no signs of damage by insects or rodents. You can harvest fruits of any shape for the winter. The main thing is that they are whole. If there are black spots or any other damage on the peel, then they are not suitable for winter storage.
Conditions for storing turnips
To preserve root vegetables throughout the winter, you need to think about storage conditions in advance. Turnips do not absorb foreign odors, so they can be stored with other vegetables. To extend the shelf life, you need to sprinkle the fruits with chalk.
It is advisable to store the harvest in a cool room (refrigerator or cellar). It is not advisable to cut off all the tops. You need to leave 2-3 cm. Before harvesting fruits for the winter, it is not recommended to wash them.
Ways to store turnips
In order to preserve root vegetables for the winter, there are many ways. Each of them has its own characteristics. Vegetables are stored both fresh and cooked.
How to keep turnips fresh?
Preserving turnips fresh is a little more difficult than preserving them cooked. But preserving the taste of the vegetable is quite possible. To do this, you need to comply with the storage conditions of root crops.
At home
It is not difficult to store vegetables in a city apartment. Before storage, the tops of the fruits are cut off and the soil is cleared from them by hand. After this, the harvest is placed in a plastic bag. It is not recommended to tie the bag. Or you need to make small holes in it so that water does not accumulate. If this is not done, the fruits will become moldy.
But under such conditions, the crop is stored for no more than two weeks. In addition, you can store the harvest in wooden boxes filled with sand and straw. It is important to ensure that the humidity in the room is high. Otherwise, the turnip peel will begin to dry out.
Harvesting and processing of root crops
It is not necessary to store turnips fresh. There are other ways to preserve a tasty vegetable for the winter. The fruits are canned, dried and frozen.
Features of storing turnips
Turnips, although they are classified as vegetables, differ from other crops in their storage methods. She has her own characteristics in this matter:
- Root vegetables can be kept in the same place with other products: they do not absorb foreign odors.
- Turnips store better if you cut the tail into ⅔ parts.
- Before storing the crop, it is better not to wash it, otherwise it will begin to rot.
- The storage location should be dry, dark and cool.
- Specimens without damage, smooth and with thick skin are best stored.
- Late ripening varieties last longer. Early ripening ones are intended for quick consumption.
You can learn about the beneficial properties of turnips from the video below:
How to store turnips at home
Unfortunately, most people around us know about turnips only thanks to a famous fairy tale. But in vain, because until it was replaced by potatoes, turnips were considered one of the staple foods of the Slavic peoples, especially in rural areas. Turnips do not last long, but if certain conditions are met, long shelf life can be achieved. We will talk about how to preserve turnips for the winter at home in this article.
Turnips are stored in different ways: fresh, frozen, dried, canned, pickled.
Preparing root vegetables for storage
Careful preparation of fruits for long-term storage makes it possible to gently introduce the vegetable into a stage of natural dormancy, thanks to which it can maintain its freshness throughout the winter. In addition, only in this case is it possible to rid the root crop of non-viable residues, in which, as is known, fungi and other pests of fruit crops actively multiply.
The procedure consists of sequentially performing the following steps:
- Clean the fruits from soil residues and other contaminants using a soft brush or towel.
- Carefully inspect the turnips - fruits with damage, rotten areas and signs of infection or pests are subject to rejection.
- Cut the green mass with a sharp knife so that a small stump about 1 cm high remains in its place.
- Carefully remove the side roots; if necessary, remove the central root, leaving a tail of about 5–7 cm.
Important! If you harvest turnips from your own plot, the fruits must be dried after harvesting. To do this, they are transferred to a dry, warm and well-ventilated room and kept for several days.
How to properly prepare turnips for storage
The main aspect for long-term storage is proper harvesting and the chosen time:
- a ripe vegetable should be 5 cm in diameter and slightly rise above the ground;
- unripe root vegetables can be eaten, but they are not suitable for long-term storage;
- An overripe turnip acquires hard, low-juiciness pulp.
Important! The harvested crop cannot be kept in the sun, as it will dry out and the pulp will lose its juiciness.
If brine was purchased in a store, then you need to make the right choice:
- A ripe vegetable should appear weighty, which means there are no voids.
- The root vegetable is yellow and white. When choosing a yellow variety, the pulp will be juicy and fleshy, but the dietary fiber will be coarse. White varieties have a mild aroma, but the pulp has soft, not hard fibers that are quickly absorbed by the body. White varieties are recommended for use in preparing baby food.
- When choosing root vegetables, it is better to give preference to small fruits, since the pulp of large root vegetables has a bitter taste.
- A high-quality product must have a smooth peel, free from rot and mechanical damage.
Before storage, the vegetable is thoroughly washed, dried under a canopy in the open air and immersed in paraffin or wax for 1-2 seconds. The wax shell will increase the shelf life up to 6 months. To prevent rotting of the top, turnips are dusted with chalk before storage.
There are several storage options and you can choose the method you like best if you wish. Each method differs in timing and location.
How to prepare white radish?
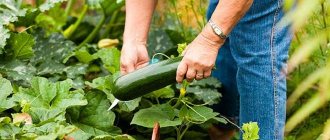
If the root crop is grown on a personal plot, it is important to harvest the crop on time. You need to dig up vegetables for long-term storage in mid-September, in dry weather.
The root crop should dry in a dry, ventilated place. 2-3 days outdoors in sunny, cool weather is enough. After drying, the vegetables need to be sorted, leaving only strong, smooth fruits. Vegetables that are damaged, irregular in shape, or discolored are set aside for use as food immediately after harvest. The next stage is cleaning the surface from dirt. Radishes should not be washed with water. The fruit is cleaned with a soft cloth from excess soil or a special brush with soft bristles. Do not damage the skin.
Preparing root vegetables for winter storage
After the harvest is harvested, the vegetable should be prepared for winter storage. The tops of the fruit are carefully cut off almost completely, leaving only 1-2 cm of the tail. The pulp must not be damaged, as such a specimen will not be stored and will quickly rot. Clean vegetables are stored for storage. The soil is washed off them and then wiped. Root vegetables should not be allowed to dry in the sun, as they will become flabby and spoil. It is best to dry vegetables in a shaded place in the fresh air.
Before sending to the cellar, the fruits are checked for spoiled specimens, since turnips should be stored intact for the winter. Specimens with cut skin, rotten and spoiled by pests are thrown away or eaten immediately. Good root vegetables are processed for long-term storage.
Chalk will help protect turnips from pests. It needs to be crushed into powder and grated on the root vegetables. Preserves vegetables and onion peel solution. Root crops are sprayed with it. A clay solution is suitable for root crops that are exposed. Clay will protect vegetables not only from pests, but also from the negative effects of external factors. If unprocessed specimens are stored for 1 to 3 months, then with processing the shelf life can increase to six months.
Recycling options for the winter
To preserve turnips throughout the winter, you can use the freezer or make preparations from the root vegetable.
Freezing
To begin with, the fruits should be washed and peeled. Then cut into 2 centimeter cubes and boil in boiling water for 5-6 minutes. Then immediately place the product in ice or cold water. Strain through a sieve, separate into portions and freeze.
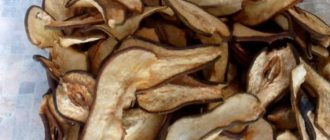
Drying
Properly prepared fruits can be stored for six months. To do this, washed root vegetables should be peeled and cut into pieces 5-6 millimeters in size. Pour boiling water over and leave to dry. Place in one layer on the oven rack and dry for 8-10 hours. The temperature should be 70 degrees.
Marinated with apples
For this recipe, you need to take 1 kilogram of green apples and turnips, 250 grams of sugar, 1 liter of water, 50 grams of salt, 1 small spoon of cinnamon and half a glass of apple cider vinegar. Vegetables should be washed and placed in prepared containers. Add spices and sugar to the water and boil. Add vinegar at the end. Cool the marinade and pour it over the apples and turnips. Place in a warm place and place a weight on top. After a couple of weeks, the product can be consumed.
Canned with beets
This recipe requires 1 kilogram of turnips, 1 beetroot, 150 milliliters of vinegar, 6 cloves of garlic, 1.5 liters of water and 5 tablespoons of salt. The turnips need to be washed well, cut into pieces and sprinkled with 3 tablespoons of salt. Leave for 4 hours. After salting is complete, rinse the slices under running water and transfer to sterile jars. It is also recommended to add garlic and beets to them. Bring water to a boil, add vinegar and salt. Pour the resulting mixture over the vegetables and cover with lids.
Salty
To prepare this preparation, you need to take 1 kilogram of turnips, 500 grams of coarse salt, 200 grams of caraway seeds and 5 cabbage leaves. Vegetables should be washed, peeled and cut into circles. In a separate container, mix cumin with salt. Place the root vegetables in a container, sprinkling with salt and cumin. Pour boiled water, cover with cabbage leaves and place the weight. Place in the refrigerator for a couple of weeks.
Methods and terms of storing fresh turnips
To extend the shelf life of the root vegetable, it is placed in special conditions under which it feels acceptable and retains its beneficial qualities.
In the cellar
Happy owners of a cellar can extend the storage of turnips to 5-6 months. In the underground in winter, the temperature is kept within the range of about 1-3 degrees, the humidity is no more than 90-95% (in glazed unheated balconies and basements of apartment buildings similar wintering conditions are possible).
There are several ways to winterize root crops:
- Place in a single layer on wire racks . Turnips are covered with spruce branches to protect them from rodents.
- Place in cardboard or wooden boxes . Pour 2-3 cm of sand onto the bottom and lay out a layer of vegetables so that they do not touch each other. Cover with sand and add root vegetables again. The top layer should be sandy and completely cover the crop.
- Place in tarred barrels . The bottom layer is made of peat chips, followed by turnips and sprinkled with peat.
When storing in a cellar, there are a number of conditions that must be taken into account when placing the crop. Contact proximity is fraught with the spread of rotting if at least one root crop is exposed to it. It is necessary to lay out the harvest, taking into account the fact that periodically you will have to sort through and inspect the vegetables in order to discard spoiled fruits. In severe winters, the bed is covered with old blankets to prevent freezing.
In a refrigerator
Early and late varieties of turnips are stored in the refrigerator. Regardless of the variety and ripening time, turnips will last up to 1 month at a temperature of 1-2 degrees.
Before placing the fruits in the vegetable compartment, they are washed, dried and wrapped in protective material:
- cling film;
- plastic bag;
- newspaper or paper.
This packaging method will prevent the spread of rot throughout the entire crop, even if one of the roots begins to deteriorate.
Periodically, the fruits are checked for integrity and questionable specimens are removed from the general container.
In the freezer
In severely frozen conditions, the root vegetable remains suitable for consumption until spring after harvest. The fruits are prepared as follows:
- Wash and peel.
- Cut into cubes or bars 1-2 cm.
- Place the cubes in boiling water for 4-5 minutes.
- Transfer the blanched pieces into ice water.
- Place on a sieve and leave to drain.
- Pack in bags and place in the freezer.
In the freezer, turnips must be laid out in portions - re-freezing this semi-finished product is excluded.
Harvesting and processing of root crops
It is not necessary to store turnips fresh. There are other ways to preserve a tasty vegetable for the winter. The fruits are canned, dried and frozen.
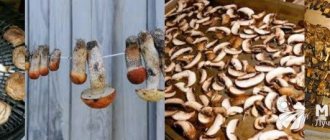
Drying
Another way to preserve vegetables for the winter is to dry them. You can dry it in the sun, in an electric dryer or oven. The easiest way to dry vegetables is in an electric dryer. But if you don’t have an electric dryer at hand, then an oven will do.
See also
How to grow an artichoke in the open ground at the dacha from seeds, care at homeRead
Method for preparing dried turnips in the oven:
- The turnips need to be washed and cut into slices.
- After this, put it in boiling water for a few seconds.
- Drain in a colander and let all the water drain.
- Then the workpiece is transferred to a towel to allow the turnip to dry.
- After this, the circles are laid out in one layer on a wire rack and placed in the oven.
- The oven temperature is set to 70 degrees.
- Dry the fruits for ten hours, periodically checking them and, if necessary, shifting or turning over.
The disadvantage of this method is its duration. To dry the fruits, you need to stay at home all day and constantly monitor the oven.
Freezing
The easiest way to preserve your harvest for the winter, while still keeping the root vegetables fresh, is to freeze them in the freezer. In home urban conditions, this method is most preferable. The turnips are washed and cut into cubes. After this, the root vegetables need to be dried. The workpiece is laid out on a towel in one layer. You need to wait until all the water on the surface of the peel evaporates. Then they are transferred to plastic bags. In this form they are sent to the freezer.
You can store the frozen product for a long time. But it is still recommended to use the fruits faster. If they sit for a long time, they will lose all taste and aroma.
Conservation
Some summer residents prefer to preserve vegetables for the winter. There are many recipes for canned turnips. It is canned alone or other vegetables are added. For example, you can marinate turnips with apples.
Ingredients:
- 2 kg turnips.
- Several medium apples.
- 2 liters of water.
- 200 ml apple cider vinegar.
- 1.5 tbsp. l. fine table salt.
- 200 ml sugar.
- Spices to taste.
Wash the turnips and apples. Cut into cubes and place tightly in a jar. To prepare the marinade, you need to boil water, add salt, spices and sugar. Stir until the crystals dissolve. When the water has cooled and becomes warm, add vinegar. Pour cold brine over vegetables. A weight is placed on top to prevent the fruits from floating.
Features of freezing fruits and vegetables
Turnips suitable for freezing are fresh, young, healthy, with unstemmed roots, uniform in shape and color. Quick-frozen turnips differ little from fresh ones. It is not recommended to freeze old, firm, fibrous turnips with a strong odor.
Turnips arriving for freezing are sorted, washed thoroughly, the root lobe is cut off, water is removed from the surface of the fruit and frozen in bulk.
Turnip has the following chemical composition: 9.83% dry matter, including: 2.53% sugars, 1.75% nitrogenous substances, 1.24% fiber, 0.75% ash, 8-20 mg% vitamin C, 0.19 mg% carotene, 0.06 mg% vitamin B1 and 0.2 mg% vitamin B2. Weight of 1 m3 of turnip is 500-520 kg.
Quick-frozen turnips can be used to prepare various culinary products, for example, stewed turnips, stuffed with meat or rice with mushrooms, in milk sauce, baked with eggs, etc.
Onions are divided according to taste - hot, semi-sharp and sweet; according to the size of the bulbs - large, medium and small; in shape - flat, round and elongated; by color - yellow, red, purple and white.
For freezing vegetable mixtures, mainly hot and semi-sharp varieties of onions are used. Sweet onions can be frozen for later use in salads and side dishes. Onions arriving for freezing must be mature, healthy, whole and dry, with oval-shaped bulbs measuring at least 3 cm and other shapes at least 4 cm (largest diameter). After preliminary sorting, the onions are cleaned of outer leaves, root lobes and necks and sent for washing. Then the onion is cut into circles 3-5 mm thick or chopped into noodles 3-4 mm wide and blanched in boiling water or steam for 2-3 minutes.
After cooling and removing moisture, the onions are mixed with other vegetables, packaged in boxes or formed into blocks and sent for freezing.
You can freeze onions separately from other vegetables in boxes or in bulk, followed by packaging in appropriate containers. The following varieties are recommended for freezing: Krasnodarsky, Strigunovsky, Odessky yellow, Bessonovsky, Arzamassky, etc.
Onions of pungent taste contain 15% dry substances, including: 5-13% Sugars (mainly sucrose), 0.1% acids (mainly citric), 2.5% nitrogenous substances, 0.6% fiber, 10 mg% vitamin B1, 0.02 mg% vitamin B2, 6 mg% vitamin C and hundredths of a percent of essential oils.
Sweet onions contain 10% dry matter, 6-7% sugars, 0.4% acids, 1.7% nitrogenous substances, 6 mg% vitamin C, 0.06 mg% vitamin B1, 0.02 mg% vitamin B2 and traces of essential oils. Weight of 1 m3 of onion is 550-600 kg.
Sweet corn is frozen without filling and with filling with whole grains, crushed grains and on the cob. A solution containing 2% table salt and 6.5% sugar is used as filling.
For freezing, corn cobs are removed at the milk stage (at an earlier stage of maturity than for canning). At the milk stage of maturity, an ear of sweet corn consists of 30-40% outer leaves and threads (shell), 30-40% core and 25-35% grains. At milk maturity, when the grains are crushed, milky white juice flows out of them. Freezing corn at the pre-milk stage produces a watery product, while using overripe corn (milky-waxy stage) results in a product with a high starch content and poor taste.
The duration of the milk stage of maturity in sweet corn in the southern regions lasts about 2 days, in the northern regions - 5-6 days. With an appropriate selection of sweet corn varieties with different ripening periods, as well as a stepped sowing schedule, the duration of the ripening season can be extended to 40 days.
Corn supplied for freezing should be sweet, juicy, with a delicate texture and pleasant taste. Corn removed from the cobs must be delivered to freezing shops no later than 6 hours after removal, then it must be immediately carefully sorted, quickly prepared for freezing and immediately frozen, since 24 hours after harvesting the sugar content in sweet corn at room temperature decreases by 50%. When stored refrigerated (with crushed ice), the sugar content is reduced by 50% in just 72 hours.
At modern large enterprises, the duration of the process of receiving raw materials before sending frozen corn for storage takes only 23-30 minutes, including from unloading raw materials to freezing in a tunnel freezer 10 minutes and freezing 11 minutes.
Corn cobs arriving for freezing are cleaned of leaf wrappers and the silky threads underneath them using peeling machines and the stalk is cut off. For final cleaning, the cobs are washed in a conical drum washing machine with jets of cold water under a pressure of 2-3 atm and viewed on a conveyor belt, carefully cutting off damaged areas of the cobs and discarding unsuitable specimens. Then the grains are cut from the cobs using special machines.
The cut grains are fed by an inspection conveyor into a flotation-type washing machine, in which the grains sink to the bottom, and lightweight debris floats to the surface and is automatically removed. Then the grain is fed into the blanching department using a hydraulic conveyor. The duration of all these operations is about 3 minutes. Blanch the grains with live steam for a time sufficient to inactivate the peroxidase enzyme (2-2.5 minutes).
Blanched grains are cooled in cold water, moisture is removed and sent to the quick-freezing compartment for bulk freezing; the freezing process lasts 11-15 minutes.
Frozen corn is packaged using packaging machines for retail trade in small cardboard boxes (200-500 g) or for catering establishments in cardboard containers with a capacity of up to 23 kg. Packaged corn is sent for storage in refrigerated chambers at a temperature of -20° C and below.
When freezing corn on the cob, leaves and silken threads are removed, washed, subjected to secondary inspection and sorting, blanched, cooled, moisture removed, wrapped in cellophane or plastic film, one or two cobs at a time, placed in cardboard boxes or only wrapped in film material and sent for freezing.
When freezing with pouring, corn on the cob is blanched in boiling water for no more than 4 minutes, regardless of the size of the cobs. When freezing without filling, the corn on the cob is blanched using live steam for 7-8 minutes and immediately cooled with cold water. Under-blanched corn on the cob may acquire an off-taste and odor during storage.
The most suitable varieties of corn for freezing on the cob are those that have small cobs, densely filled with even rows of grains of yellow, golden or light orange color, with kernels that do not darken when stored frozen.
Sweet corn grains at the stage of milk maturity contain 32-25% dry matter, including: 18-20% carbohydrates (of which 3.5-6% sugars), 3-4% nitrogenous substances, about 1% fat, 0 .5% ash, 11.6-13.7 mg% vitamin C, 0.16 mg% thiamine, 0.11-0.12 mg% riboflavin.
The following varieties of corn are suitable for freezing: Early Golden, Kuban Canning, Incomparable, Award, Amber, Golden Evergreen, Golden Bentham eight-row, Super Early Bentham, Early Evergreen No. 18 and 19, Golden Leonarda, Early Leonarda, etc.
According to current technical conditions, cobs of corn frozen on the cob must be of a regular cylindrical or slightly cone-shaped shape, undamaged, at least 15 cm long. Their color is golden yellow, light yellow or white. Grains at the stage of milk maturity should not be damaged. No more than 2% of the cob surface is allowed that is not filled with grains.
Sweet corn grains must have grains in the milk stage of maturity, uniform in color. The presence of threads, particles of leaf cover and cores of cobs is not allowed. The presence of up to 8% of grains of non-uniform color is allowed.
Mushrooms are frozen dry or in a 2% solution of table salt. Particularly good results are obtained when freezing champignons.
Fresh, whole and strong mushrooms are suitable for freezing, picked a few hours before they arrive in the workshop. Whole mushrooms or caps are frozen: small ones - whole, large ones - cut into slices. Old mushrooms should not be frozen, as they sometimes contain harmful organic compounds.
It is recommended to freeze young mushrooms whose caps are 20-30 mm in size. When collecting and cleaning, do not damage the mushrooms, since in places where they are broken or cut, their color changes and blue spots appear. Storage of fresh mushrooms in the workshop is allowed at a temperature of 0° C for no more than 2-3 hours.
Before freezing, mushrooms are sorted by size and quality, and then washed in running cold water. For this purpose it is better to use a conveyor washing machine. Mushrooms are blanched in boiling water or steam. Keep small and chopped mushrooms in boiling water for 2 minutes, and larger ones (whole or with caps) for about 4 minutes. After this, the mushrooms are immediately cooled, moisture is removed from them and packed in cardboard boxes with airtight packaging material or in glass jars, into which a cold 2% solution of table salt is added, sealed under vacuum and sent for freezing. The best results are obtained by freezing mushrooms and filling them with brine.
Mushrooms must be frozen in quick freezers at low temperatures. It is recommended to store frozen mushrooms at a temperature no higher than -20° C. Freezing mushroom mixtures is prohibited.
Mushrooms contain on average 13-6% dry matter, including: from 1 to 4% proteins (proteins, albumin, globulin, myosin and vittelin), which represent the most valuable nutritional part of mushrooms, 0.23-0.83% fat , 0.04-0.6% carbohydrates and 0.5-2% ash.
Mushrooms contain small amounts of vitamin C, B vitamins, carotene, vitamins D and PP.
Frozen mushrooms can be used to prepare various first and second courses and side dishes.
- Back
Other vegetable preparation options
After storing the selected vegetables, damaged root vegetables remain that need to be processed. Thrifty housewives cut off unsuitable areas and cut vegetables into pieces.
Freezing
Can you freeze turnip chunks? Yes, this method allows you to preserve the beneficial properties and taste of root vegetables.
Two ways to prepare vegetables for storage in the freezer:
- With preliminary blanching . The turnips are washed, peeled, cut into cubes, bars or circles. Blanch - immerse in boiling water for 1 minute. Then immerse in cold water (add pieces of ice). Place in a colander to drain the remaining water. Transfer the pieces into plastic bags and put them in the freezer.
- No blanching . Washed, peeled, chopped vegetables are packaged and placed in the freezer.
What does blanching do:
- vegetables remain elastic and retain color;
- eliminates excess bitterness;
- destroys bacteria.
Drying
Dried turnips will not lose their beneficial properties for six months . Medium and small sized root vegetables are used for drying.
Advice. It is better to dry boiled turnips - then they will retain their taste and color.
Drying stages:
- The washed root vegetable is cleaned.
- Cut into circles no more than 5 mm thick.
- Blanch for a few seconds. Dry at room temperature.
- Place in an electric dryer for 5-6 hours at a temperature of +60°C. Stir occasionally. The door is not closed completely for the first 15 minutes.
You can dry vegetables in a conventional oven if the regulator allows you to set the desired temperature.
Take note:
Conservation
Turnips are pickled and salted in combination with other vegetables and fruits.
Recipe with bell peppers and carrots
Ingredients (per 0.5 l jar):
- large turnip - 1 pc.;
- large carrots - 1 pc.;
- bell red pepper - 3 pcs.;
- medium-sized onions - 4 pcs.;
- garlic - 4 large cloves;
- coarse salt - 1 tsp;
- sugar - 1 tsp;
- vinegar 9% - 1 tbsp. l.;
- bay leaf - 2 pcs.;
- boiling water.
Cooking steps:
- Boil turnips and carrots until tender. Peel and cut into cubes.
- Bell peppers are blanched for 2 minutes. Remove seeds and stalk. Cut into cubes.
- Onions and garlic are peeled. The onion is cut into half rings, the garlic is passed through a press or grated on a fine grater.
- Glass jars are sterilized. The lids are boiling. Place bay leaves on the bottom and pour in vinegar.
- Chopped vegetables are placed in jars. Cover with sugar. Fill with boiling water to the top. Cover with metal lids.
- Place a towel on the bottom of a large wide pan and carefully place the jars.
- Sterilize jars with a volume of 0.5 liters for 15 minutes, 30 minutes for 1 liter jars.
- They're rolling up. Turn it upside down to check the quality of the twist. Leave to cool.
- When completely cooled, the workpiece is stored in a dark, cool place.
Chemical composition, application and benefits of turnips
Regular turnips contain a very valuable set of substances beneficial to human health. It contains nitrogenous substances, fats, calcium, mineral salts, vitamins A, C and B, sugars, vitamin PP.
This invaluable root vegetable has long saved peasants from diseases of the blood and bones, rickets. Decoctions from it acted as an excellent expectorant for bronchitis. Turnip infusions are a good and safe diuretic.
Turnips were truly an irreplaceable product - they ate them raw, boiled, and baked. Due to the fact that it was stored well and for a long time, practically without losing its beneficial properties and vitamins, it was consumed in winter as a vitamin-rich vegetable. Children were fed turnip puree literally from the age of one! Even the saying was “simpler than a steamed turnip,” and even now it is often used, wanting to emphasize the simplicity of something. This indicates the great popularity of turnips in Russia.
But for the Slavs this vegetable was not just a food product and a source of vitamins, it was also a real healing agent!
The juice from it acted as an effective painkiller; for example, a gauze swab dipped in turnip juice and applied to a sore tooth helped a lot with toothache. It was also known as a sedative, promoting normal heart function, dissolving stones in the bladder and kidneys. The juice has long been used to treat rheumatism and sore joints.
Here is the main list of the healing properties of this miracle root vegetable:
- Essential oils of turnips help get rid of a runny nose, so it is useful to breathe with turnips, just like onions, cutting a chunk into small pieces.
- Doctors recommend eating baked or steamed turnips for those who suffer from obesity.
- Turnip dishes effectively normalize blood sugar levels, so people suffering from diabetes should definitely include them in their diet.
- Turnip pieces perfectly heal wounds and stop bleeding.
- In absolutely any form (raw, boiled, baked), turnips perfectly heal the intestines.
- Boiled and finely mashed turnips successfully treat gout, salt deposits and polyneuritis.
- Rinsing the mouth with a warm decoction of the root vegetable is an excellent remedy for toothache.
By the way, to the delight of those young ladies who are watching their waistlines, we inform you that turnip is a completely dietary vegetable; one hundred grams of turnip pulp contains only thirty calories. There are even diets that include eating turnip dishes.
Useful cooking tips
There are several secrets to cooking turnip dishes that you should take note:
- To prevent raw turnips from becoming bitter, they must be scalded with boiling water before use.
- Turnips go well with many foods - from herbs, garlic and mustard seeds to dried apricots and raisins.
- In its raw form, this product is excellent for making salads.
- This root vegetable can be stuffed with a variety of fillings, including sweet ones. First you need to boil it until half cooked, then cut off the top, take out the core, put the filling there, cover with the cut part and send it to ripen in the oven.
- Turnips with honey are not only a tasty delicacy, but also an effective cure for colds.
Find out more about the features of using turnips with honey for coughs, and whether you can eat turnips raw.
So, now you know how not to be left without vitamins in winter. Follow the basic rules for processing turnips for long-term storage and choose the option that is most suitable for you - both in complexity and taste.
Cellar storage: pros and cons
Our primitive ancestors came up with the idea of preserving the fruits of plants fresh in deep holes dug in the ground, but they thought of adapting a specially built underground room for this not so long ago - in the 17th century. Cellar, basement, basement - storage spaces are very convenient. In hot weather it is always cool there, and in cold weather it is not cold, but fresh.
“Dungeons” have not only advantages, but also disadvantages. And, unfortunately, not all of them can be safely avoided with the help of modern building materials and high-quality waterproofing. The underground conditions themselves are such that in basements and cellars, as a rule, there is a high level of humidity, and mold easily develops in damp conditions. In turn, the atmosphere of rotting attracts harmful insects, which strive to feast on spoiled potatoes or softened zucchini. And now the entire crop that you have been growing for so long and painstakingly is under threat.
Such a “scenario” is completely unacceptable for a thrifty and zealous owner who takes care of his harvest not only during its growth and ripening, but also after harvesting.
During cultivation, for one reason or another, an average of 10 to 12% of the crop dies. The loss of vegetables and fruits during storage increases three times and reaches as much as 30%.
Therefore, growing it correctly is still half the battle, but preserving it correctly is already a task for the advanced.
How to store turnips in the refrigerator
With this storage method, root vegetables will not be able to last long, remaining tasty and juicy. How to store turnips in the refrigerator:
- Wash the root vegetables, dry them and place them in the vegetable compartment. There they can be stored for up to 30 days.
- Another option is to freeze. Peel the turnips, cut into small cubes and place in portions into bags. Place in the freezer. Vegetables can be stored there for 2–3 months.
Choose a convenient method and enjoy delicious root vegetables all winter long.
How to store carrots in the cellar in winter?
It is best to store carrots by covering them with dry sand. Carrots, despite all their hardness, are a very delicate vegetable. Since it does not have a thick skin, it reacts quite negatively to the most minimal temperature fluctuations. The optimal option for storing this root vegetable is a temperature of +1 and almost 90% air humidity in the room.
It is clear that it is almost impossible to create such conditions in the basement where, in addition to carrots, other vegetables will be stored, it would be better if you try to make a kind of protective shell for it.
Carrots can be stored in:
Sawdust. They will create a layer that will restrain the flow of air to the root crop, and also protect it from cold and temperature fluctuations.
Pesce. In this case, sand is also used as a layer, but the vegetables are laid in a completely different way. Carrots are placed in rows, forming a pyramid. Each individual row is covered with sand (the layer must be at least 1 cm) and sprinkled with a little water
With this storage method, it is extremely important to ensure that the vegetables do not touch each other.
Clay. It is diluted with water to the consistency of thick sour cream, and then the root vegetable is dipped into the resulting slurry for a couple of seconds, the protective shell is allowed to dry and the whole thing is placed in a basket or wooden box.