Hello everyone, Olga is with you as always, perhaps you will need information on storing food and various things and I will tell you about Is it possible to freeze oysters? How to properly freeze oysters. Maybe some details may differ, as was the case with you. Attention, always read the instructions of the things you buy for cleaning the house or the chemicals that help to store them. I answer the simplest questions. Write your questions/wishes and secrets in the comments, and together we will improve and supplement the quality of the material provided.
Can you freeze oysters?
Can you freeze oysters in the shell?
Is it possible to freeze cooked oysters?
Can you freeze oysters without the shell?
How to properly freeze oysters?
Do you use expired food for cooking at home?
Yes, the main thing is to process it if it is meat or expired kefir for pancakes.
27.04%
No, it is very dangerous and not useful.
37.6%
If the products have fungus or mold, then we throw them away; if they are a couple of days past their expiration date, we use them for food, even without heat or other treatment.
35.36%
Voted: 1694
Oysters breed from May to August. During the breeding season, it is better not to eat them; they are tasteless at this time. According to an old rule, you can only eat oysters during those months. which have the letter “R” in their name.
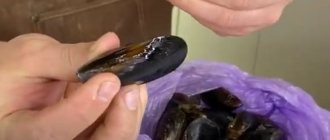
If you want to buy live oysters, you need to buy them only in shells that are closed. They are usually heavy; with any touch, the oyster closes in the shell.
You can freeze oysters, but follow the rules. If the oyster is in the shell, then you can freeze it for no more than three hours, and if without shells, then they can be stored in the freezer for up to three months.
But you will need to use oysters for food immediately after defrosting; they cannot lie down after defrosting.
Can be stored without freezing. To do this, oysters in closed shells can be covered with a wet towel and placed in the refrigerator. Oysters can be stored this way for up to 1.5 months.
Live oysters should not be stored in plastic bags or containers; they need air to breathe.
You can freeze oysters, but follow the rules. If the oyster is in the shell, then you can freeze it for no more than three hours, and if without shells, then they can be stored in the freezer for up to three months.
Cooking oysters
Oysters belong to French cuisine, and true gourmets believe that they should only be eaten raw. The shell is opened, the muscle is cut, the clam is sprinkled with lemon juice and a piece of the ocean is drunk.
There are several important rules:
- Only completely closed shells can be eaten. If the valves are even slightly open, the shellfish must be thrown out to avoid poisoning.
- Frozen oysters must be thawed in advance without using a microwave oven.
- It is very easy to spoil tender meat, so it should not be overheated, otherwise it will become tough.
Advice: “Don’t expect the oyster to squeak when you add lemon juice. This is nothing more than a fiction. A live shellfish from a lemon begins to shrink and may release air bubbles.”
If you don’t like the idea of eating raw meat, then you can choose literally any cooking method. They are fried, baked in the oven, boiled, each time getting completely different tastes. This seafood can be used as an appetizer and as a main dish. The best dressings are lemon juice and white wine.
Grilled
The preparation time depends only on how long the fire will take to build. The seafood itself takes 7-10 minutes to cook.
There are two ways to grill clams. The first way is to cook in a shell. The second is to open the shell and cook on one half of the shell. For both options, you need to rinse the sinks thoroughly. The clams are then placed on the barbecue grill and covered with a large lid. Grilled oysters should open up in their shells. Cook for up to 10 minutes.
Various sauces go well with fried seafood. You should choose creamy garlic or regular soy sauce.
Frying
Fried oysters are perfect as an appetizer, so it's worth making a sauce that brings out the delicate oceanic flavor. Seafood is usually deep-fried, or you can add a large amount of vegetable oil to a saucepan or frying pan.
- Oysters 12 pcs
- Sunflower oil 200-300 ml
- Breadcrumbs 100 gr
- Chicken egg 2 pcs
- Instead of crackers, you can use wheat and corn flour 50-100 g
- Salt and pepper to taste
Tip: Place the fried pieces of meat on a paper towel to remove excess oil.
Cooking
Boiled oysters will appeal to those who do not want to eat a living creature. This cooking option will preserve the unique taste and texture of the seafood. To do this you need:
- Wash the shells and carefully remove the meat.
- Pour the oyster juice into a saucepan and add a little water or white wine.
- Bring the liquid to a boil, you can add a small pinch of salt.
- Throw the oyster meat into boiling water and cook for literally 1-2 minutes.
There is another fairly popular way to cook oysters at home while maintaining their texture - making soup.
Cooking time: 20 minutes.
Number of servings: 6.
The finished dish contains: proteins - 89, fats - 77, carbohydrates -126, calories - 1636.
- Peeled shrimp – 100 gr.;
- Oysters – 6 pcs.;
- Onion – 1 pc.;
- Garlic – 1 pc.;
- Potatoes optional – 3 pcs.;
- Flour – 2 tbsp. l.;
- White wine – 200 ml;
- Cream – 200 ml;
- Water or broth – 500 ml;
- Greens - optional.
- Finely chop the onion and garlic. Fry them in butter until transparent.
- Wash the oysters, open them and remove the meat. Pour the juice into a separate bowl.
- Add flour to the onion in the pan and mix well. Add wine and evaporate all alcohol.
- Add cream and mix well for about 5 minutes.
- Prepare the broth and bring it to a boil (you can use fish or chicken). Add the contents of the pan to the pan.
- Add peeled shrimp, oysters and their juice. Cook for about 3-5 minutes.
- Add greens if desired. Serve hot.
If you add potatoes, you get a more familiar soup. Without potatoes there will be a delicate creamy soup. There is no need to use pre-cooked shrimp; they may become tough due to repeated boiling.
Tip: “Rye bread croutons go great with creamy soup.”
Baking
Preparation time: 15 min.
Cooking time: 20 minutes.
Number of servings: 4.
The finished dish contains: proteins - 65, fats - 73, carbohydrates -28, calories - 1033.
- Oysters – 12 pcs.;
- Cheese – 60 gr.;
- Butter – 50 gr.;
- Dill – 2-3 sprigs;
- Garlic – 1-2 cloves;
- Salt and pepper to taste.
- Salt for the baking sheet - as much as needed.
You can simply bake with butter and cheese. This article offers a recipe for oysters with cream sauce and dill. To do this you need:
- Cut the butter into cubes, and chop the dill and garlic.
- Add ingredients, including salt and pepper, to a blender and blend until smooth.
- Grate the cheese on the finest grater to form cobwebs.
- Oysters must be washed with a brush and separated from the shell.
- Sprinkle a generous amount of salt onto a baking sheet so that the shells are stable on the surface.
- Pour the sauce over the meat and sprinkle cheese on top.
- Bake at 200° for 15-20 minutes.
The cheese should melt and acquire a golden hue. Serve the oyster dish hot.
For a couple
Preparation time: 10 min.
Cooking time: 10 minutes.
Number of servings: 4.
The finished dish contains: proteins - 49, fats -14, carbohydrates - 21, calories - 406.
- Oysters – 12 pcs.;
- Water – 100-200 ml;
- White wine – 100-200 ml;
- Light beer – 100-200 ml. (optional).
There are two recipes for this dish: with and without beer. In both cases, the result is a bright and interesting taste.
- Wash the shells with a brush and carefully open them.
- Pour water, wine and beer into a shallow pan.
- Bring water to a boil.
- Place a steaming sieve on the pan and place the shellfish in one half of the shell on it and cook for up to 10 minutes.
The shellfish will be saturated with the aroma of beer and wine. Serve the dish with lemon juice.
Marinated in buttermilk
Buttermilk will make the dish tender and juicy and add a pleasant milky taste.
Preparation time: 30-40 min.
Cooking time: 10 minutes.
Number of servings: 4.
The finished dish contains: proteins - 72, fats - 50, carbohydrates - 95, calories - 1112.7.
- Oysters – 12 pcs.;
- Buttermilk – 300 ml;
- Breadcrumbs – 100 gr.;
- Salt – 1 tsp;
- Ground black and red pepper – 1 tsp.
- Vegetable oil (any odorless) – 2-3 tbsp. l.
- Wash and clean the shells thoroughly, remove the meat from the shells and rinse it again.
- Mix a glass of buttermilk with spices and 0.5 tsp. salt. Leave to marinate for 30-40 minutes.
- Remove the shellfish and roll each piece in breadcrumbs mixed with 0.5 tsp. ground pepper and 0.5 tsp. salt.
- Fry the shellfish in vegetable oil for 1 minute on each side. You should not hold it longer, otherwise they will become tough.
The dish can be eaten hot or cold.
Tip: “This dish goes especially well with tartar sauce and marinara.”
Smoking
Preparation time: 1-2 hours.
Cooking time: 10 minutes.
Smoking the tender oyster meat only takes 10 minutes, but the preparation process takes much longer. Marinade required:
- Clean and open the sinks. Pour the oyster sauce into a deep plate and place the oyster meat there.
- Add lime and lemon juice, chili, chopped garlic, olive oil to the oyster sauce. Leave to marinate for 1-2 hours.
After marinating, send the seafood to the smokehouse for 10 minutes and cook at a temperature of 90°.
Smoked oysters are great for light salads. Marinade should be used as a dressing.
Mastic toppers
Today I’m telling you and showing you how to make beautiful, spectacular, and incredibly time- and labor-saving fondant toppers for a children’s cake! At the same time, we’ll learn how to work with sugar and wafer paper, the topic is interesting, the material has great potential, but we’ve never written anything about it, we need to improve!
We recommend reading: Is it harmful for gladioli to cut flowers?
I will demonstrate it using the example of a children's cake with Fixies. I recently had a story with him that is probably familiar to every home pastry chef. Nine in the evening, the doorbell rings - neighbors. Cake for tomorrow. To kid. With the Fixies! “He’s asking very much - he really wants it - it’s a birthday - how would it be without a cake - help me out!” The situation, frankly speaking, is not pleasant, and the most reasonable thing is to refuse, but how? After all, people are not completely strangers. And Fiksikov, meanwhile, wants almost everyone. In general, in such cases, if you can’t refuse, and you don’t know how to draw, the only way out is printing on sugar or wafer paper and mastic toppers. Well, don’t sculpt the whole company, really?
The only condition is the opportunity to make this same sugar or waffle picture somewhere. To print, you need a printer, and not necessarily a special confectionery one (I’m not even sure that such exist), but filled with cartridges with food coloring. The service of printing on edible paper is provided by some confectionery stores, as well as private confectioners at home, those who have purchased a printer and cartridges. So that the paint does not dry out and the printer serves for a long time and properly, you need to print pictures at least once a day, which is why almost everyone who has this printer does not refuse those who want to make sugar pictures. You just need to find a person who lives near you, write to him, agree on a price, send him the file in a jeep and agree on a time when you can pick up the finished picture.
You can print with food dyes on both sugar and wafer paper. Sugar is denser, the image on it is brighter, but it is usually a little more expensive. What to use is up to you.
Here is my sugar picture.
You see, it is packed in a zip bag (in this form, including a large thick envelope, the store where I print gives the pictures to clients is very thoughtful and pleasant). If you are not going to use the picture right away, store it in a ziplock bag: it will not allow air to pass through, and your picture will retain its inherent slight flexibility. From a long stay in the open air, sugar pictures dry out, become brittle and brittle. But this, by the way, does not threaten the waffle, but it is brittle in itself.
Let me show you the sugar picture closer. It is slightly rough, and the print is quite bright. The paper itself is glued to a thick film.
Here you can roughly understand the thickness.
So, let's make a topper for a children's cake!
...along the contour, with a slight indentation, however, as you like.
Take a piece of mastic, which dries quickly. This could be gelatin mastic (but it is not at all tasty, in my opinion, and becomes very hard; I decided that if children decide to chew on the topper, it could simply be dangerous for their teeth)) or purchased mastic like Vizyon or “Top -product”, to which you can add SMS (powder, sold in confectionery stores) to speed up drying. However, if you have time, you can do without SMS, it will just take longer to dry.
I have here white vanilla mastic “Top Product”, probably the most budget-friendly one today, but very good.
I added a pinch of SMS.
Kneaded it. Rolled it into a ball and flattened it slightly.
Rolled it out to a thickness of 5 mm (it can be thinner, depending on how thick your skewers are).
I attached a picture. I drew a stack around the outline.
Cut it out. This must be done very carefully!
I inserted the skewer a few cm deep so that it would hold well. The thickness of the skewer must be completely immersed in the mastic! In other words, when rolling out the mastic, take into account the thickness of the skewer.
Lubricate the mastic with a thin layer of decorgel (can be replaced with honey diluted in water), very lightly and evenly.
We remove the film from the picture.
Carefully glue the image to the mastic.
Our topper is ready!
Let it dry and you can add it to the cake!
Drying time depends on many factors: mastic, topper size, room humidity. This little Nolik made from Top Product mastic with the addition of SMS dried in at most an hour.
And here is the whole bunch. Bright and beautiful! And most importantly - quickly, if there is somewhere to print the picture.
A solution for those who need everything at once for a 1 kg cake)
Here are our fondant toppers on the cake.
Well, the whole cake.
The cake has a minimalist design. The only decorations are toppers made of mastic and screws, also made of mastic. It was an urgent cake, as you understand, so I had to do everything very quickly and a silicone mold from the CakeUp store literally saved me in that situation. I simply sprinkled it with cornstarch, took small pieces of mastic, painted them in the desired colors, filled the recesses with them, ran a knife along the surface of the mold, holding it flat and cutting off the excess mastic, and took out the parts!
We recommend reading: Summer Honey Mushrooms How to Preserve for the Winter
If you have time, you can let them dry a little or freeze them in the freezer, they will come out even better. But even so, in a hurry the result is excellent!
The mold with numbers, by the way, is also from the same store. And the stand))) In short, I have a lot of everything from there) But what can you do if the things are really worthwhile!
We work with waffle paper in the same way. Well, or almost: the image on it is not as bright as on sugar paper, so you can often find a recommendation to cover it with decor gel on top. This way it will indeed become much brighter, but it will acquire a gloss, and not everyone likes it. The waffle also comes in waves more often, but I think it's a matter of practice.
The cake has a minimalist design. The only decorations are toppers made of mastic and screws, also made of mastic. It was an urgent cake, as you understand, so I had to do everything very quickly and a silicone mold from the CakeUp store literally saved me in that situation. I simply sprinkled it with cornstarch, took small pieces of mastic, painted them in the desired colors, filled the recesses with them, ran a knife along the surface of the mold, holding it flat and cutting off the excess mastic, and took out the parts!
How to eat oysters
Oysters are considered restaurant food. In establishments they are always fresh, neatly cut. It is quite difficult to buy live seafood on your own - they are usually sold frozen.
“If the oyster has been frozen, then it cannot be eaten raw! You definitely need to prepare it at home.”
At the restaurant
Restaurants never serve oysters after defrosting - only live ones. They are cleaned in advance, the shell is opened, the muscle is cut off and placed on a large dish with ice. Guests are served lemon wedges and should also order a glass of white wine or champagne. Raw oysters can be eaten in two ways:
- The meat is swallowed whole directly from the shell, and the juice is drunk.
- The meat is pricked with a fork and the juice is drunk from the shell.
In both cases, the meat is not chewed or cut into small pieces.
At home
Wash store-bought oysters right before eating, otherwise fresh water will spoil the taste. The sinks are usually washed with a brush to remove all dirt, sand and even algae. Then gloves are put on and the shells are opened with a knife. It is worth taking a thick, strong knife, because the shell is very dense and strongly compressed. The meat is pryed with a knife and the muscle that holds the shell flaps is cut. There is no need to drain the juice. The meat is sprinkled with lemon and you can start eating.
How to properly store oysters
It is considered correct to buy shellfish immediately before serving, but if you will be eating oysters later, you should know how to store them after purchase. If there are grains of sand and algae left on the shells, you can clean them with an old toothbrush, but real gourmets say that it is better to serve them unwashed - this way the naturalness of the delicacy is preserved.
The best option for storing live shellfish is regular ice. Freeze ice packs for cocktails in advance and place them in a separate bowl. Place oysters on top and store in the refrigerator for 3-6 hours. Ice will not melt quickly if you set the temperature in the chamber to +2°C. If you periodically change the ice, the shelf life of oysters will increase to 5-7 days.
If you can't make ice, you can wrap the clams in a towel soaked in ice water. The period for which oysters are stored in the refrigerator in this form before serving is no more than 3 days at a temperature not exceeding +3°C.
You can also place the oysters on something frozen from the freezer, such as a piece of meat. In the refrigerator, at a temperature no higher than +5°C, the meat will defrost for a long time and you can thus store the oysters fresh and very cold for up to 2 days, after which you can make ice and continue storage using one of the methods described above.
The methods can be combined - oysters will be stored even better on ice, in a towel or frozen, as it is important to keep them as cold as possible.
All of the above methods for keeping oysters fresh are suitable for closed shellfish. Remember that a live oyster is opened immediately before consumption, and an uneaten one is not stored in the shell.
Important: You should periodically check for open shells among the oysters. No matter how correct the storage period and conditions are, it is difficult not to avoid the fact that individual mollusks may die. Storing live oysters in a bag is strictly prohibited - they must have constant access to fresh air, otherwise all the shellfish will quickly deteriorate and the shells will open. This is the most important point about how to store oysters in their shells, which should always be remembered.
Therefore, you should carefully go through all the shells and throw away the open ones. It is strictly forbidden to eat dead shellfish to avoid severe poisoning. The storage conditions for oysters cannot be changed, since they remain alive for a long time only at low temperatures. Therefore, they should be stored in only one chosen way - either in the refrigerator or in the freezer, which we will discuss below.
It is best to store oysters in the refrigerator on the top shelf, and choose the storage method yourself. Although these mollusks live in warm waters, they need to be stored fresh only at a temperature no higher than +3°C and no longer than 7 days. But another storage method cannot be ruled out.
STEP-BY-STEP COOKING RECIPE
Oysters are usually served with brown bread, butter, lemon halves and a sauce consisting of wine vinegar with chopped shallots. You can optionally drizzle the oyster swimming in its own juice with lemon or vinegar or do not drizzle it with anything, enjoying its true taste. Then you should turn it towards you with the wide end and swallow it along with the liquid, although you can chew it. This depends not only on the preferences of the eater, but also on the size of the oyster. By the way, if you have doubts about the freshness of the product, squeeze a little lemon juice onto the oyster - it should shrink a little.
It is easy to determine the suitability of an oyster: as long as the shell is tightly closed, the mollusk is alive. Of course, this has nothing to do with frozen oysters, but they don't even deserve a mention here. If our ancestors indulged in oysters from Flensburg - the northernmost city in Germany, located on the shores of the Baltic Sea, which is also quite far from Russia - now we have the opportunity to get them directly from the oyster capital of the world: the town of Cancale, on the coast of Brittany. This tiny place is famous for its oyster harvest and even has an Oyster Museum. But if you can skip visiting the museum, then you should definitely walk along the oyster trays placed right on the seashore. The seller will open the sea catch especially for you and pour a glass of cool white wine. The oysters themselves are very diverse. They are distinguished depending on the place of extraction, variety and size. And to find your favorites, you'll likely have to taste them all.
For most people, oysters are an unusual, if not completely unfamiliar, food, so the question of how to cook oysters interests many. Of course, everyone knows that this delicacy is eaten raw. But without the risk of contracting an infection, you can only eat raw oysters that have just been caught, and even then, not in all waters of the world’s oceans and not in every season of the year. And there is no question of eating raw shellfish purchased in our supermarkets, especially if the product is sold frozen. So for safety, oysters will have to be heat treated before consumption. This, of course, is not as aristocratic as swallowing live shellfish, but no less tasty and healthy.
How to choose the freshest oysters
These mollusks are classified as delicacies, as they are obtained from the sea, and such work is not cheap. Of course, the freshest oysters are those that were caught in front of you, at an oyster farm, and served with a glass of champagne and half a lemon.
It takes at least a day, maybe more, for an oyster to travel from where it was caught to the supermarket. Therefore, it would be useful to know what to look for when choosing in order to bring home a truly fresh delicacy.
It is best to buy oysters in specialized fish stores, if only because they are not considered daily consumption goods and can sit in a regular supermarket for weeks. There are general tips that will help you choose the most delicious and fresh oysters:
- the oyster shell must be closed - this is a sign that the mollusk is alive;
- the surface of the sink should be damp and have grains of sand;
- open the shell slightly - a live oyster will quickly close it;
- if the shell is slightly open, this is a sign that the oyster is not alive;
- oysters can be sold fresh and without shells, in which case they are in a container with marinade;
- if you knock the shells against each other, a sound will appear, like when tapping stones, this is a sign of living oysters;
- the most delicious shellfish are the smallest in size;
- the average size of mollusks is from 5 to 15 centimeters;
- the body of a good oyster is always transparent;
- during the active breeding season (summer), mollusks are not very tasty;
- The packaging must contain information about where the oysters were caught and when.
But since many of our sellers have long learned to deceive the buyer, you should know how to determine that an oyster has already spoiled. This is important not only from the point of view of saving money, but also because seafood poisoning is one of the most serious. For security purposes about your wallet and health, you should know:
- You should absolutely not buy oysters with their shells slightly open;
- good shellfish are not sold in containers, but exclusively on ice;
- if the body of the mollusk is cloudy or white, this is a sign of spoilage.
You can also find oysters on sale that unscrupulous sellers “helped” close again. To do this, they use a special solution that holds the doors together. You can check this like this: the surface of the sink will be dry, but if it is wet and you are not sure, it is better not to buy an expensive delicacy in markets and other untested places. Juice flows out of an already opened oyster; you can check this by weighing the shell, but the difference is insignificant and is not noticeable to the buyer.
How to cook frozen oysters?
Frozen oysters must be thawed before cooking. If you want to defrost the oysters in advance, then place them in the refrigerator, and if just before cooking, leave them at room temperature. Thawed shellfish should be carefully inspected and washed.
Preparing to cook
If you find shells with cracks or slightly open, throw them away mercilessly, even after heat treatment they can cause poisoning. Wash the shells with a brush under running water; this should be done immediately before cooking. Never wash oysters in advance; fresh tap water, penetrating inside, will hopelessly ruin the taste of the mollusk.
How to cook oysters, you must decide in advance. All cooking methods can be divided into 3 types:
- The shells are opened and the oysters are removed and cooked without the shells. In these cases, the finished dish can be served on the shell halves, or separately.
- The shells are opened, the upper parts are thrown out, and the lower parts with meat are cooked like small saucers.
- The entire shells are heat treated.
With any of these methods, it is necessary to remember that inside the shells there is, in addition to meat, liquid that needs to be preserved, either by draining, or by cooking so that it does not leak out. To do this, when cooking, the oysters should lie horizontally, flat side up. To give shells stability, salt is usually added underneath them.
When opening the sink, wear gloves or wrap it in a tissue to protect your fingers from cuts from the sharp edges of the valves. Turn the clam with the flat part up, keeping it strictly horizontal. It is better to open the shells with a special oyster knife, but you can get by with a regular one with a short blade. Its end must be inserted into the recess between the doors, turning it like a key in a lock. Then slide the knife inward, separating the clam from the top flap, go along the edge and turn the blade to open the shell. Make sure no shell fragments get inside.
Baked oysters
Oysters baked in the oven are very tasty; we will describe step by step how to properly prepare this dish at home.
To prepare them you will need:
- 7-10 oysters;
- Dry white wine – 0.5 cups;
- Onions, preferably red – 2 large pieces;
- Lemon – 1 pc.;
- Butter – 100 g;
- Hard cheese – 150 g;
- Seasonings to taste.
Chop the onion and saute it in butter. When the onion begins to turn golden, add wine and simmer until the mixture thickens. Grate the cheese.
Shuck the oysters as described above. Sprinkle salt on a baking sheet to hold the shells horizontal and place the halves on the baking sheet. Preheat the oven to 200°C and place the baking tray with oysters in it for 10 minutes. After taking out the baking sheet and waiting for the shells to cool a little, we perform the following manipulations with each of them:
- remove the oyster meat onto a plate;
- put onion stewed in wine on the bottom of the shell;
- return the meat to it;
- squeeze a little lemon juice onto it;
- sprinkle grated cheese on top;
- add spices if desired.
Pour the remaining oil into the pan into the shells and return the pan to the preheated oven for 5 minutes until a cheese crust forms. Place on a plate and serve hot.
How to store cooked oysters
Ready-made shellfish in the marinade can be stored in the refrigerator, in a glass container, for up to 7 days at a temperature no higher than +7°C. To do this, you need to boil them and put them in a clean, dry jar, pour in olive oil and close the lid tightly. This is the best way to store already cooked seafood.
Ready-made salads with oysters do not have a long shelf life, and the period for which they can be stored is up to 6 hours from the moment of preparation, at a temperature not exceeding +7°C.
See also:
Other site materials
How to store corn Well, who doesn’t love juicy corn?! It is often bought for future use and stored at home. We recommend reading the article on corn storage
How to preserve salmon The storage of red fish must be approached with complete seriousness and responsibility. We will tell you all the secrets of this process
How long does black caviar last in the refrigerator? Is there any caviar left after the holidays? This rarely happens, so it would be a shame if it gets damaged...
Comments:
How to cook oysters in shells at home?
In addition to baking in the oven, oysters can be fried, grilled or steamed. Let's look at how steamed oysters are prepared.
Steaming
Prepare the shells as described above, without opening them, and place them horizontally on the steamer rack. If you don't have this device, you can use a wide saucepan and place a colander in it. Pour no more than a liter of water into the container, adding half a glass of wine for flavor. After boiling, cover the container with a lid to allow the oysters to steam thoroughly. Steam the product for about 10 minutes.
After cooking, the oysters should open. Those that have not opened are stale and should be thrown away. The meat of the rest can be served with sauces, both hot and cold, and can also be used to prepare various dishes. There are many delicious dishes that contain oysters; recipes with photos of these dishes can be found in our article.
Gorloder: boiled recipe, canning
For preservation, you can use the following recipe.
Interesting: How to salt lard in the freezer
- tomatoes - two and a half kilograms;
- apples - half a kilo;
- sweet pepper - half a kilo;
- garlic – one hundred and twenty grams;
- dill - fifty grams;
- vinegar - two large spoons;
- hot pepper – one hundred grams;
- parsley - fifty grams;
- sunflower oil - one glass;
- black pepper and salt to taste.
- Sterilize and heat the container before storing.
- Wash vegetables under running water.
- Remove seeds and core from peppers and apples.
- Cut the tomatoes into cubes.
- Grind the remaining ingredients in a blender or meat grinder.
Pour the resulting mass into a container, add vinegar, spices and vegetable oil. Place the pan over medium heat and cook for at least 2 hours. Dill and parsley can also be ground in a blender or finely chopped, then added to the sauce before the end of cooking.
The hot seasoning is poured into jars and rolled up.
Jars can be stored in a pantry or basement.
Grilled oysters
To cook oysters, you can use a charcoal or gas grill. Once the grill has reached the desired temperature, place the oysters on the grill. They can be prepared either whole or in halves. Read above about how to properly prepare oysters for cooking.
You can determine the freshness and suitability of oysters for food by the following criteria:
- When opening a fresh shell, resistance should be felt; raw shells, slightly opened or easily opened, can cause poisoning.
- When heated, fresh oysters open; if the shellfish do not open during cooking, they are unusable and should be thrown away.
Cooking time for grilled oysters is 10 minutes. Serve the cooked clams hot with sauce or use for later cooking. The sauce is traditionally made with onions and paprika sautéed in butter with lemon juice, olive oil or yogurt with garlic and herbs, but you can use any other sauce to your liking.
How to store shucked oysters
Like any other shellfish, oysters can be stored cleaned. If you are not serving them the traditional way, you can carefully remove the oysters from their shells along with their juices.
After this, you need to put them in a container and put it on ice or wrap it in a towel dipped in ice water.
The shelf life of oysters without shell is short and lasts up to 3 days.
Carefully check the appearance of the shellfish - if they turn white, it means it’s time to throw them away; eating such oysters is strictly prohibited.
However, gourmets claim that the taste deteriorates after just 6 hours, so it is better to freeze cleaned and uneaten oysters.
Fried oysters
The most common way to cook oysters is to fry them in batter. Although this dish does not pretend to be particularly sophisticated, it turns out very tasty.
We don’t need shells to prepare them, so we separate the oyster meat from them, sprinkle with lemon juice and start preparing the batter.
For the batter, take 2 raw eggs for every 350 g of oyster meat and beat them. Then mix the beaten eggs with flour to the consistency of pancake batter, adding salt and pepper to the resulting batter.
Preheat a deep fryer or frying pan with refined vegetable oil to approximately 190°C. Dip the oysters in the batter and fry them until golden brown. Place fried clams on a platter, sprinkle with herbs and serve hot.
Traditionally fried oysters
Since ancient times, oysters have been prepared by laying them on a hot sheet of iron. This traditional method can be used in natural conditions.
Light a fire and wait until the coals burn out. Place bricks around the edges of the fire and place a sheet of iron on them. In the absence of an iron sheet, you can use a steel grid with not too large cells.
When the steel surface is so hot that a drop falling on it sizzles, place the oysters in one layer and cover them on top with a wet natural cloth. Traditionally, burlap was used for this, but you can take any unnecessary clean item made of cotton or linen. After 8-10 minutes, the clams will be ready, remove them into sheets and lay out the next batch. Wet the dried cloth again and cover the shells.
Those oysters that remain closed after cooking are spoiled and cannot be eaten. Serve the rest while they are hot; this delicacy will seem especially tasty in nature.
How to store canned oysters
Like many other seafood, these shellfish are sold ready-to-eat. They taste like mussels, and you can use them in recipes in the same way as their less expensive relatives.
The terms and conditions for storing canned oysters are indicated on the can, so they must be followed strictly. The place where to properly store closed jars of oysters is a pantry or a shelf in a kitchen cabinet; the shelf life is about 6 months, at a temperature not exceeding +20°C, or as specified by the manufacturer.
It is important, after opening the tin, to transfer the oysters into a glass container and ensure that they are covered with brine.
You can also store canned oysters in the freezer; to do this, they need to be transferred to a plastic container. Store for 3 months at a temperature of 18°C...-21°C.
The period for which opened canned oysters can be stored at home is no longer than 36 hours at a temperature not exceeding +7°C.
Photo and video
There are a lot of videos on the Internet on how to cook oysters at home. Residents of various countries share delicious recipes for preparing oysters. Here is an interesting recipe from France.
Oysters in champagne
Open the oysters, placing the halves horizontally on a baking sheet, and add to each shell:
- 1.5 tsp. dry champagne (brut);
- A little bit of shallot each (anything else won’t do);
- A little dry Provençal herbs;
- Some breadcrumbs;
- Top with grated cheese.
Pour a little champagne into the bottom of the baking sheet and place in an oven preheated to 200°C for 10 minutes, then switch the oven to the grill function for another 5 minutes.
Oysters are a rare guest in our house. Some people don’t understand their taste at all. But real connoisseurs of the taste of the sea, iodine with sourness and exotics will not skimp on the pleasure of eating an oyster. This shellfish was once brought to the Russian table by Peter the Great, and since then it has been one of the most expensive and refined dishes adopted from French cuisine.
There are several ways to cook oysters. Raw seafood is considered the ideal dish. The sink is opened using a special table knife, the valves are lifted, and the fastening muscle is cut off. A live oyster is sprinkled with lemon juice and swallowed without chewing.
Cooking using heat treatment occurs in different ways, but it is important to strictly follow the recipe. It is very easy to spoil a shellfish. The jelly-like product is fried, boiled, steamed, or baked in the oven. There are many recipes; the seafood delicacy is combined only with certain products, for example, vegetables and onions.
Seafood's constant friend is lemon juice. For cooking, you can use either fresh or frozen store-bought product.
Choosing a seafood delicacy
The taste of oysters is influenced by the time they were caught and their habitat. The tastier ones are those that live in the Northern Seas and are caught in winter.
Choose shells without damage or stains of unclear origin; good mollusks have closed shells.
The impact of two shells should resemble the sound of hitting stones.
The correct packaging is bags containing a small amount of shells or seaweed wrap.
Clean meat without casing is sold in a special marinade.
The body of the mollusk is transparent, white or cloudy, which means that the mollusk is dead and should not be eaten.
Move the flaps slightly, the live oyster will immediately slam them shut.
Clams in shells defrost at room temperature, but are not stored for a long time, so they must be cooked immediately after opening. Frozen product in shells should be stored for no more than three days, clean meat with juice - up to three months at sub-zero temperatures.
You can cook oysters at home that have been frozen by any means that involve heat treatment. Bake, boil, fry, etc. One of the most famous recipes is called “Rider Angels”.
The seafood meat is taken out, peppered, wrapped in a slice of bacon and fried in a frying pan or grill.
How to eat oysters
Squeeze lemon onto the body of the clam. With your left hand we take the flap with the contents, with your right hand we take a special fork with short and wide teeth. You pick up the contents with the device and put it in your mouth. If you don’t know how to eat oysters correctly or don’t know how to use a fork, you can suck the fish delicacy carefully from the sharp side of the sash. Enjoy the unique taste of the shellfish by holding it in your mouth and then swallow it without chewing. Wash it down with the juice left in the sink.
How to steam oysters
The shells are brushed to remove dirt, and undamaged whole specimens are taken. The result depends on the taste of the steam. It is not water that is poured into the container, but a combination of beer and wine. This steam soaks the transparent meat. The seafood is cooked in a regular colander over boiling liquid under a closed lid. Cooking time – 5-10 minutes. Readiness is determined by the open doors.
Oysters are fried in a frying pan in oil along with bell pepper strips and onion rings. Spicy lovers can add a crushed clove of garlic. 7 minutes is enough. Don't forget to add lemon sourness.
If you want a pure taste, fry without vegetables, in batter. Dip each clam into the egg mixture, sprinkle with flour and deep-fry. This dish is best eaten hot.
You can also fry the delicacy on the grill. Either remove the seafood meat immediately or fry it directly in the casing. To add seasonings, you need to open the shell. This recipe requires garlic butter and soy sauce. It will take no more than 7-10 minutes. The juice will boil and the meat will shrink a little.
Popular recipes include California Baked Oysters, Seafood Chowder, and Honey Fried Shallots. There are many original recipes with this product; each chef prepares oysters with his own twist.
Baked oysters
- 7 shells
- Red salad onion – 1 pc.
- Butter – 120 g
- Goat or sheep cheese – 120 g
- Dry white wine – 320 ml
- Leek stalk
- Lemon juice - tbsp.
How to prepare a delicacy? We boil the contents of the shells in wine, remove the meat, and clean the hard shell itself from dirt.
Sauté both types of onions with a piece of butter and evaporate with a small amount of the remaining wine.
Place stewed vegetables in half of the oyster shell, like in a boat, and place the oyster on top. Grate the cheese shavings on top, sprinkle with lemon and place in the oven until the cheese floats.