Sunny hello friends! Denis Povaga writes. And today in the issue there is an amazing recipe for pilaf, which was not prepared by me, but by kind guests from Uzbekistan who are building a house (a few photos at the very end). More precisely, they are already doing the cladding, and everything will be ready by winter. I would like to tell you more about what new things have happened in life. But in order not to delay the process, I’ll tell you as the article progresses. Now, look at what kind of pilaf was prepared, and what awaits you as a result of repeating the simple recipe. And the most attentive ones will get a joke.
Of course, I asked all the secrets that you need to know step by step. And every step, I attach a photo so that you get the same thing - real Uzbek pilaf, and upon completion, watch the VIDEO and write your opinion...
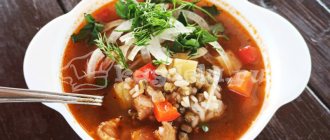
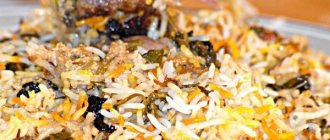
Crumbly, incredibly fragrant! Ah... Just repeat it, and then say thank you. These guys know a lot about their national dishes, and although they said that everyone cooks differently in their homeland, there is still a basis, so to speak - a classic recipe that should be followed. And this is exactly what I wanted to find out not from the Internet, but from the original source. People who are at ease with dishes in a cauldron know all the secrets of real pilaf. Get ready, this is a very tasty article...
On my blog, there is another delicious recipe called shavlya in Uzbek cooking recipe, see the link. With pilaf, these dishes are very similar, only Shavlya, unlike pilaf, is not crumbly. In simple words, when your pilaf doesn’t work out, you get Shavlya. But it also needs to be prepared correctly. It's easy to prepare and it turns out very tasty!
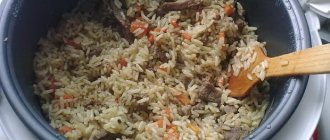
There are moments that we simply don’t know about when we cook pilaf at home in a frying pan or in a slow cooker (although the latter won’t even come close to producing the correct pilaf recipe). And the cooking process, one way or another, is different for everyone.
There is nothing superfluous in the recipe below. Absolutely! The basis is and remains - onions, carrots, rice, meat. All! You may ask... What about seasonings? Imagine - ZERO seasoning! And the taste of the pilaf is 10 out of 10. Although I admit, there was still only one seasoning – cumin. But as I was told, perfect pilaf is obtained even without it. And I managed to try both options to make sure of this.
Ingredients:
- Onions – 2 medium
- Meat – 350 gr.
- Carrots – 350 gr.
- Rice - a pack (if white - preferably Adriatic; but better red - Devzira). In the recipe below, white Krasnodar.
- Salt (to taste)
- Seasonings – cumin (optional)
It all didn’t fit in my head until I saw the whole cooking process and tried the result. This means we can use seasonings for pilaf, which include peppers, barberries, turmeric for color, and spices. And here the guys take simple ingredients (onions, carrots, rice, meat) and cook a real masterpiece. Nothing extra! A classic that I really wanted to know. But knowing it, you can always add a hint of the desired seasoning to ultimately develop your own unique pilaf recipe.
An anecdote on the topic of pilaf: Two chefs in Uzbekistan had an argument. One says to the other - you can cook pilaf from an equal number of ingredients, 1 kg each. everyone? The second one answers - of course I can! -Fine. The first one gradually gives him 1 kg. onions, he fries them. Then 1 kg. meat, he fries it. Then 1kg. carrots, he fries them. Everything is going well!.. Then 1 kg. rice Everything is fine... The pilaf is almost ready. And in the end, it brings 1 kg. salt. In general, the first one lost the bet)) A-ha-ha...
– Farhat told me this. He says they have such an anecdote in their homeland. I laughed and decided to tell you
How to cook real Uzbek pilaf at home
We chop wood for a cauldron and light a fire. During the cooking process, it is important to maintain the desired temperature. Therefore, small firewood should always be nearby so that the fire is at the same level.
Let's start preparing the so-called zirvak (the basis of any pilaf)
Zirvak - can be called a thick gravy, but more correctly a pillow of vegetables with meat, poured with boiled water, and then rice is placed on the zirvak (see step 6). In simple words, this is the basis of the pilaf, and pre-washed rice is then poured onto the finished zirvak. And the preparation of pilaf continues. We prepare Zirvak from steps 1 to 5. The recipe includes step-by-step photos. Therefore, you can't go wrong! Just repeat...
Uzbek-style pilaf - step-by-step recipe:
Step 1. Pour oil into a cauldron (120 grams), heat it up so that there is a slight bubbling and send the onion “feathers” for frying. Not much onion. Literally 2 medium onions. Here's what happened...
As I was told, they cut the onion in different ways - some make it large and add a lot, while others follow the recipe differently so that the onion does not interrupt the main taste of the pilaf. The thing is that onions contain sugar, and when there is a lot of it, it will affect the taste of the pilaf.
At the same time, onions play a very important role in the recipe for real Uzbek pilaf. They don’t just brown it, they fry it until it’s black. This process is called onion caramelization. The bottom line is that the onions are fried longer than usual, and then they begin to darken. At this stage, sugar is released from the onion, which subsequently colors both the meat and the zirvak as a whole, resulting in a rich color. But the main thing for which all this is done is so that white rice acquires a golden color. Bright pilaf! So the first question is: is turmeric needed here? This seasoning is not included in the recipe.
I intentionally included 3 photos to see at what stage the onion begins to darken. It may seem like he's burnt, but everything is going according to plan...
The process of cooking the onions took literally 10 minutes. Your time may vary, it all depends on the cauldron and temperature.
From the photo you can see that the temperature in the first two stages (step 1 and step 2) is quite intense. And the oil is bubbling with the onions. High heat is needed during these two stages! Afterwards, turn down the heat a little, adjusting the ash pan or removing one or two pieces of wood to reduce the heat. The main cooking is already at moderate heat, but still bubbling. See step by step photos below...
Step 2. Send the meat. Pilaf is prepared either from lamb or beef. Our recipe calls for beef, cut into 2 cm pieces.
Beef pilaf
The meat is quite fatty, and this can be seen in the photo below. In combination with onions, the aroma is unique. During the cooking process, you can see that not only does the meat cook and change color naturally, but the onions also turn it brown.
The pieces of meat are quite large, and it takes time to cook them. Fry the meat for literally 10 minutes more...
Step 3. Salt the meat with onions. Here I noticed at that moment that salt was added not to taste, but more than normal (a handful). And thus, the meat turned out to be clearly over-salted (although I can’t say for sure). But later the dish was no longer salted. This was the only time, the essence of which was to add a little more than the norm, so that in the future the rice would still absorb the excess salt, and the taste would become more even in salt. This is what happened as a result of the finished pilaf. As for the salt, everything was perfect! But I would probably divide the salting process into 2 stages, and would not add more than normal at the meat stage, but half at once and half at the rice stage. In general, this moment remains a mystery to me. Because I didn’t taste every stage of preparation. And Heitbek (that’s the name of the guest from Uzbekistan who prepared the pilaf) tried the whole process. And it’s clear that he knows the exact proportions by eye.
Step 4. Send carrot strips (a handful for two hands). It is difficult to write in grams the exact number of carrots and other ingredients, since the dish is prepared over a fire, so to speak, in nature... Although at home, I was embarrassed to take out the scales so as not to interfere with the process. Still, I’m more of a photographer here than a cook! Prepared by professionals. I just find out all the secrets for you...
I noticed a certain technique in which they are in no hurry to immediately mix the ingredients. Starting with the onion - it was carefully sent into the cauldron, then the meat, and then the carrots... Each ingredient first gets used to the temperature regime or something... There is no unnecessary fuss here. And the carrots are first steamed with aromas from below, and after a minute or two, mix:
After 5-7 minutes, everything plays with new colors and aromas. Look what happens:
At this stage, you can add cumin (a pinch) rubbed in the palm of your hand to release the aromas. Also, many people add turmeric, barberry, chili pepper, and saffron. You can get by with just cumin. It will turn out delicious! Here it’s a matter of taste, and the very zest of how every chef cooks. Everyone has their own recipe for pilaf.
Bukhara with carrots and dried fruits
This recipe option can be used as a dinner or Sunday breakfast.
Due to the presence of a large amount of dried fruits, this dish has great nutritional value in terms of micro- and macroelements.
In addition, the appearance of such a dish is very attractive, as can be seen in the photo.
To cook Bukhara pilaf at home, prepare the following components:
- Long grain rice – 300 g.
- Carrots – 1 medium root vegetable.
- 1 large handful of light or dark raisins to choose from.
- Dried smoked prunes and dried apricots - 1 large handful each.
- Onion heads – 1 pc. small size.
- Salt and ground black pepper - to taste.
- Dried barberry berries – 2 tsp.
- Zira – a couple of pinches.
- Tasteless and odorless vegetable oil - 0.15 liters.
KBJU:
- Calorie content – 136 kcal.
- Proteins – 2.5 g.
- Fats – 3.5 g.
- Carbohydrates – 14 g.
Step-by-step recipe for Bukhara pilaf:
- Peel the onion, removing all the husks and, chopping it, send it to fry in a cauldron in preheated fat. This can be done in aluminum or cast iron. At the final stage of frying the vegetable, add spices. Thanks to this sequence, they open up, releasing the aromatic composition into the dish.
- Clean rice is added to the cooking container
- Pour in enough liquid.
- Warm up on low heat for a little more than 10 minutes.
- Add peeled and chopped dried fruits. To prevent them from sticking out when cooking at home, it is better to select a larger cauldron, given that the components will swell as they absorb moisture.
- After about 5-10 minutes from such a bookmark, this simple and tasty pilaf will be ready. Add salt on top of the rice.
Pilaf over a fire in a cauldron in Uzbek style. The right recipe
By the way! Many recipes for Uzbek pilaf are prepared with yellow carrots. It is also cut coarsely, but the taste is said to be more aromatic. I haven’t tried the yellow version, but I can say with confidence that today’s recipe deserves the attention of each of you!
Step 5. Add boiled water
The fifth step in preparing pilaf is to add the required amount of water. The amount of water depends primarily on the number of ingredients, the main one of which is rice. This means that the amount of water for our zirvak will depend on the amount of rice...
How much water should I add to pilaf if a pack of rice is 800 grams?
Pilaf is prepared in a cauldron with a whole pack of rice. But if you cook at home and repeat the recipe in a smaller frying pan, then depending on the amount of rice, the ratio of rice and water, it is 1 to 2. That is, for 1 glass of rice, add 2 glasses of water. In our case, 1.6 liters of water were used.
Important! Please note that it is not always possible to accurately fill the required amount of water at this stage. Because some of the water may boil away... Therefore, it will not be a big problem if you are preparing pilaf for the first time, and add a little less water at this stage (for example, 1 liter), and then add a little more water when you send the rice to the zirvak.
It also happens that different rice is prepared differently. Therefore, it was decided to divide the addition of water into 2 stages. In the first stage, add more water for the zirvak (1.4 liters), and then, if there is not enough water, add a little more (literally a glass per cauldron). This method is more for beginners. Of course, experienced chefs try to add the amount of water in one step. But I will repeat! This is not a critical point. We are not preparing borscht so that the taste of the broth will be reflected. Here, adding water will help the rice cook to the desired state. It is much worse if the opposite happens - raw rice or porridge. Therefore, be careful with water, especially if you are cooking for the first time.
All this can be done by eye, which is what was done. In nature, we will not weigh the exact amount of meat, onions, and carrots down to the gram. Yes, and rice comes in different quality. Therefore, displacement is often also done by eye. It's more important to feel the dish here. And if difficulties arise, look at the step-by-step photos, because your phone is always at hand.
The aroma of zirvak is simply amazing. It doesn't boil much, but it bubbles. Let it simmer for just 10 minutes. It all depends on the cuts of meat. They should not only be ready at this stage, but also become softer. The recipe uses beef. But if you cook homemade pilaf, then everyone makes it their own way. And even calling it non-Uzbek, you can add pork or chicken to pilaf. This means you can speed up the cooking process. After all, chicken is more tender than beef. This one is simple.
By the way! At this point it's time to start rinsing the rice (see next step).
Description of preparation:
It’s not for nothing that pilaf is so popular.
The combination of vegetables, meat and rice is an incredibly good idea! Traditionally, it is cooked in a cauldron, but any other thick-bottomed dish or multicooker, for example, will do. As for spices, you can use ready-made sets of seasonings for pilaf or get by with the minimum. Be sure to add the whole garlic; its aroma is an integral part of the dish. Purpose: For lunch / For dinner Main ingredient: Meat / Cereals / Rice Dish: Hot dishes / Pilaf Geography of cuisine: Uzbek / Eastern
Uzbek pilaf in a cauldron over a fire - the easiest way for beginners
I would also like to say something about the amount of water for the zirvak. After all, we initially took the amount of onions, meat, and carrots so that it was in the right ratio for a pack of rice. And of course, it won’t be a big mistake if you add a little more or less of this or that ingredient. But we stick to the recipe. And a very simple point with water at this stage - you can add enough of it so that all the ingredients are literally hidden in the water. I think it was worth writing about this and taking this nuance into account. This way there won't be too much water. After all, the zirvak will turn out to be rich, thick, and golden in color. And its role is to transfer all the flavors to the rice. See more...
Step 6. It's time for rice
Here they told me for a long time that they did not find such rice as in their homeland in Uzbekistan in our area. But we have two types of rice that are closest in composition and suitable for pilaf:
Adriatic and the second Devzira.
Devzira is already red rice, and they say it is from it that a truly luxurious and correct pilaf is obtained. They promised to find him upon completion of construction. They will treat you to pilaf with exactly that rice. I'll write about how delicious it is later. I am 100% sure of this.
If you don’t look for a long time, there is good rice like this - Krasnodar. This is what is used in the recipe. My next pilaf recipes will definitely be with rice - Adriatic or Devzira. Just curious to feel the difference. Probably with the second, there is a certain secret in the preparation. Therefore, we are in no hurry to cook with red. After all, this pilaf recipe is prepared with white rice.
First, the rice must be washed in running water from a cold mine. Of course it's a joke. Where will we find him? Just rinse in a bowl with plain tap water. The rice was washed for literally 3-5 minutes until the water became clear. Next, drain the water and the rice turns out clean like this:
Step 7. Place the rice in the cauldron
Gradually distribute the rice evenly throughout the entire part of the cauldron, placing the rice on the side without stirring...
This is where the real shamanism with a spoon began... The spoon made holes in the rice all the way to the bottom, all over the area. Thus, the rice does not stick together and is evenly enveloped in zirvak... The process lasted literally 5 minutes. The rice was not stirred!
The process continued as the rice swelled...
It was noticeable how the rice swells and absorbs water. The rice does not need to be fully cooked at this stage. Literally 50%. Be sure to taste it!
Step 8. Check the readiness of the rice and the amount of water...
After a while, some of the water evaporates, is absorbed, and the bubbling process is noticeable along the edges of the cauldron. The temperature regime from step 3 to step 8 is approximately the same. Keep the fire at the same level so that there is a slight bubbling. We use a slotted spoon to check along the edges so that the rice does not burn in the cauldron, and this further envelops it in the zirvak. That is, we pierce the edges not with a spoon, but with a slotted spoon along the walls of the cauldron, as if separating the rice from the cast-iron cauldron, so that the edges do not stick. But don't mix! In simple words, every particle of rice is saturated with the aromas of zirvak.
The rice swells significantly and is almost 50% ready. We continue shamanism with a spoon...
Stage photo...
Literally 1 minute of witchcraft and at the stage of rice being 50% ready, tasting... The cooking process is nearing completion.
Add the remaining glass of water. It was possible not to do this if at the first stage they filled in as much water as needed. We literally poured 1.4 at once for zirvak, and left 0.2 liters for this stage...
We continue to distribute the water by making holes...
After 5 minutes, take a slotted spoon and start forming a circle from the edges (from the walls of the cauldron) (so that the middle is higher). With light movements of a slotted spoon, smooth the surface of the rice... I am attaching a photo:
Once again, use a spoon to make holes over the entire area of the rice (about 10 pieces). Stage photo:
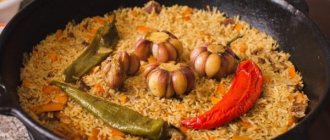
At this stage, many cooks send a couple of heads of garlic, hiding it entirely in the rice. It gives aroma to the pilaf and is removed after cooking. This recipe is a classic. Nothing extra! The simplest and most correct recipe for Uzbek pilaf.
Step 9. Cover the pilaf with thick-walled dishes. There was such a cup at hand...
Following the bowl, cover the cauldron with a lid and remove from the fire. Or we remove all burning wood from the stove. The idea is to steam the rice inside. I got there.
Do not lift the lid for 20 minutes.
In exactly 20 minutes, the pilaf is ready! We lift the lid and see what happens...
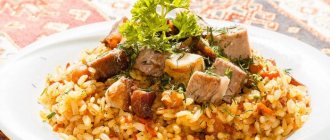
Looking ahead. The result was amazingly delicious pilaf!
Step 10. Mix. Enriching the pilaf with oxygen...
Here it is, real, crumbly Uzbek pilaf. Be sure to repeat this recipe and you will be delighted...
With rice and chickpeas
Quite often in Central Asia, pilaf is prepared not only from rice. To get the best recipe, you just need to add chickpeas to it. Nowadays it’s easy to find this type of legume in the store. Therefore, you should definitely try this recipe.
Components for a large cauldron:
- Devzira or laser – 0.5 kg.
- Chickpeas – 1 glass.
- Lean or medium fat lamb – 500 g.
- Carrots – 200 g.
- Onions - 2 medium heads.
- Lenten oil without a pronounced taste or smell - 120 g.
- Barberry - 1 tbsp. l.
- Turmeric, coriander, ground black and red pepper, salt - to taste.
KBJU:
- Calorie content – 157 kcal.
- Proteins – 5 g.
- Fats – 7 g.
- Carbohydrates – 19 g.
How to cook pilaf with chickpeas:
- To get a crumbly, flavorful pilaf, it is important to soak the chickpeas in advance. Make this the night before, adding about 1/2 tsp. baking soda into water. This way the chickpeas will cook much faster when cooking pilaf.
- Heat the fat in the selected container and cook the chopped onion until golden brown. You can cut into small cubes or half rings.
- Then add the meat chopped into portions. Fry it until half cooked. This will take approximately 30-35 minutes.
- Then lay out the carrots, cut into strips. You can put all the spices on top, except salt.
- Then, while the carrots are cooking, you need to rinse the rice.
- Place it in a cauldron and place the chickpeas, previously drained of soda water, on top.
- Add salt, spreading evenly over the surface.
- Close the lid and cook for 20-25 minutes.