Posted on Feb 2nd, 2021,
by Chief Milkman
Categories:
- Buns
- Cooking tips
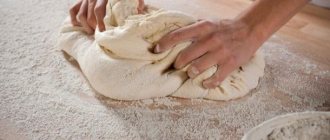
The ability to beautifully roll buns is a small skill, but still an art. It is important not only to prepare a successful yeast dough, but also to carefully roll it and give it an intricate shape, then just one type of baking will instantly lift your spirits. There are a great many varieties of molding homemade buns. Choose!
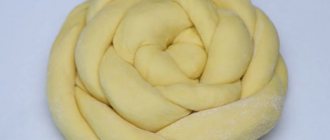
But before moving on to the molding process, I want to share with you a proven recipe for rich yeast dough. It is prepared without dough, but requires double rising.
So, you will need:
- fresh yeast - 15 g or 1 tsp. dry;
- water – 100 ml;
- milk – 200 ml;
- chicken eggs (cat. СО) – 2 pcs.;
- good butter (82.5%) – 100 g;
- granulated sugar – 150 g;
- salt - a pinch;
- vanillin/vanilla extract - to taste;
- wheat flour, premium – 700-800 g.
Recipe:
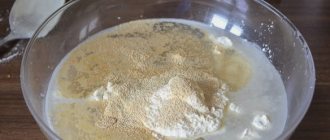
- Dissolve yeast in warm water, add warmed milk.
- Then pour in melted butter (not hot!), lightly beaten eggs, salt, vanilla, sugar. Mix everything thoroughly.
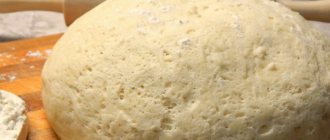
- Gradually add flour and knead into a smooth, soft dough that does not stick to your hands. Let it rise warm, knead it and wait until it rises again.
Ready!
If for some reason this recipe does not suit you, you can look at other excellent options for making yeast dough that I have published previously.
Learn how to beautifully roll and shape yeast buns with filling
It is ideal when there is a lot of filling, but it does not leak out. How to achieve this? It’s very simple – just form the product correctly. The proposed forms are suitable for making a wide variety of buns with any filling - cheese, sausage, jam, condensed milk, custard, poppy seeds, nuts, dried apricots or other dried fruits. Choose and cook with pleasure!
“Moscow” buns with sugar in the shape of hearts
The simplest and most familiar form of buns. These heart-shaped buns are sold in school cafeterias and bakeries. How delicious they are - layered, sweet, with a crispy caramel crust.
- Divide the yeast dough into pieces weighing 70-80 g (more is possible). Roll out into a thin layer about 2 mm thick; its shape at this stage is not important. Grease the surface with melted butter or refined vegetable oil, sprinkle evenly with sugar or a mixture of cinnamon and granulated sugar. You can also use poppy seed filling.
- Roll into a tight tube.
- Bend the resulting tube in half, placing one end on the other. Blind the edges.
- Make a cut from the fold side, not reaching a few centimeters to the edge.
- Unfold the resulting halves of the heart away from each other and straighten them out.
Done, you can bake!
Another version of sugar buns - in the shape of butterflies
Butterfly buns are made in almost the same way as hearts, but with some nuances. Children especially like this shape. And adults are not averse to enjoying such delicious pastries.
- Divide the yeast dough into portions, roll each one out, and distribute the filling. Keep in mind that if you are making buns with sugar, you need to coat the dough with a thin layer of butter before sprinkling.
- Roll the dough into a roll, fold both edges towards the middle, and seal them together.
- Turn the workpiece over so that the “seam” is at the bottom. Lightly (you can visually) mark the middle and make 2 cuts along the edges, slightly short of the mark.
- Turn the halves on each side in opposite directions to create the “wings” of a butterfly.
- This is how beautiful it turns out in the end.
All that remains is to place the butterflies with sugar on a baking sheet, brush with yolk and send directly to the preheated oven.
How to form a leaf-shaped product step by step?
These buns can be made with any filling that is not too liquid. For example, it works great with finely chopped apples mixed with sugar. Beautiful and tasty!
- Thinly roll out a piece of yeast dough into an oval or rectangle with rounded corners. Place the filling. It can be not only crushed fruits, but also thick jam or jam.
- Lift it up and mold the edges of the workpiece together, forming an elongated “pie”.
- Fold in half as shown in the photo.
- Make neat oblique cuts along the edges so that the workpiece becomes leaf-shaped.
- It will turn out something like this.
Place the products on a greased baking sheet and bake at 200 degrees. When serving, you can sprinkle with powdered sugar.
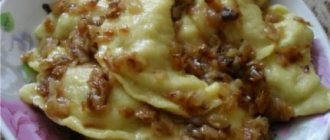
Making “Wreaths” buns step by step
Braided yeast buns can be prepared with poppy seeds, nuts, cinnamon-sugar mixture, jam/jelly/jelly.
If the filling is too liquid, it needs to be mixed with a small amount of semolina and heated a little over low heat until thickened.
- Roll out a piece of dough weighing 80-90 g into a rectangle. If it turns out a little uneven, that's okay. Apply the filling in a thin, even layer.
- Roll along the long side. Pinch the free edge.
- Cut in half lengthwise, literally 1-1.5 m short of the end, so that the halves remain attached.
- Intertwine the resulting strips together.
- And then mold the ends together to make a wreath.
Making “Caterpillar” buns - step-by-step instructions
This form is suitable for making yeast buns with any filling. The products are formed quickly, simply, and turn out elegant and beautiful.
- First you need to roll out a small part of the dough into an elongated oval. Place the filling on one edge - for example, boiled condensed milk or jam.
- Cover the filling and press the edge of the dough with your finger.
- Cut the long edge that remains free into strips 1-1.5 cm thick.
- Roll the bun from the filling towards the stripes.
Using the same scheme, you can wrap sausages in yeast dough.
Forming “Vertushek” buns with photo
When I need to make a lot of beautiful baked goods quickly, I make pinwheels. Any thick or loose filling is suitable for them, and molding two large baking sheets takes no more than 10-15 minutes.
- Roll out the risen yeast dough into a large square or rectangle. The thickness should not be too large, ideally up to 1-1.5 cm. Grease or sprinkle with filling.
- Fold one edge towards the middle first.
- And then bend the opposite edge so that it overlaps a little.
- Pinch the dough and cut crosswise into strips 5-6 cm wide.
- Turn the ends of the workpiece several times around the axis in opposite directions to form a spiral.
Before baking, be sure to grease with shaken yolk - this will make the surface of the baked goods glossy and rosy.
Frills
Another cute and easy way to roll buns from yeast dough.
- The dough should be divided into equal small balls (30-40 g), their quantity should be a multiple of 3. Each ball should be flattened into an oblong thin cake.
- Apply the filling to 2 out of 3 flatbreads (I used sweet poppy seeds); you should not put too much, otherwise it will leak out. Fold the resulting blanks into a tower, one on top of the other.
- And cover with an empty tortilla. Before reaching the edges by 2-2.5 cm, make a longitudinal cut through the entire thickness.
- Through the resulting hole, turn out one of the edges of the workpiece 2 times.
- Place the beautiful buns on a baking tray lined with baking paper.
Yeast preparations, as you know, need to be placed at some distance from each other, because in the oven they will noticeably increase in volume.
Snails
This option for cutting yeast dough is very simple and versatile. This is how you can make cinnamon rolls, including the famous Cinnabons, or the most common products with cottage cheese, poppy seeds, jam - in a word, with whatever you want.
- All you need to do is roll out the dough into a large rectangle. For ease of work, you can first divide it into 2-3 parts (if you kneaded a large amount). Next is the distribution of the filling. In this case, I was preparing Cinnabons, and therefore I first greased the workpiece with soft butter, and then sprinkled it generously with sugar mixed with cinnamon.
- Roll everything up into a tight roll and pinch the “seam” to prevent it from unrolling. Outline the boundaries of future “snails”, trying to make them the same thickness.
- Cut the roll into pieces and place them on the baking sheet so that the cuts “look” up and down.
You can top the finished baked goods with fondant or glaze - it will turn out even tastier!
Braided “bast shoes” stuffed with yeast dough
Children especially like these unusually shaped buns. Making them is as easy as shelling pears, follow the instructions.
- Pinch off 70-90 g of dough from the total lump, roll into a square. Trim the edges, this is conveniently done using a knife with a round blade. Make cuts on 2 sides as shown in the picture. Put some filling.
- Cover it with a whole section of dough. Press the edges around the filling with your fingers.
- Intertwine the “fringe” remaining at the edges with each other.
- You will get such a neat, beautiful, interesting bun.
After removing the cake from the oven, sprinkle it with powdered sugar.
How to decorate buttery “Flowers” stuffed with petals?
Flower-shaped buns can be made from any yeast dough. Forming is simple, clear and fast, the result is tasty and beautiful. What else do you need for successful home baking?
- The first step is essentially to make a round pie with filling. To do this, you need to spread a small piece of dough into a thin flat cake and add the filling.
- Gather on top and seal the edges well together.
- Turn the workpiece over with the seam down, make cuts along the entire perimeter at approximately the same distance, not reaching the center of the circle. In total, you should get 5-7 cuts - future petals.
- Rotate each petal 90 degrees so that the filling is visible. You need to turn the petals in one direction to make the flowers look neater.
- That's it, our delicious flowers are ready for baking. If desired, you can brush the top with egg.
In the center of the flower you can put a whole half of a walnut kernel, a pinch of sesame seeds, a piece of marmalade, or decorate the center in another way.
Flower-shaped buns with filling in the middle
Another version of “flower” molding made from yeast dough. You can even make these buns with children - everything is so simple to do.
- Form a piece of dough into a circle 3-4 cm thick and about 12-15 cm in diameter. Place a glass in the center. Cut the edge around the glass into an even number of “petals.”
- Mold the tips of the petals in pairs.
- Fill the center of the resulting flower with the chosen filling. In this case, apple jam was used.
Having formed all the pieces according to this scheme, you can heat the oven to 190-200 degrees and bake them at medium level until golden brown.
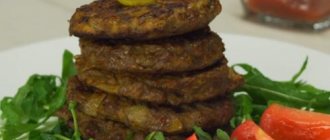
Cheese puffs
Very quick baked goods for breakfast and more. These puff pastries are ideal with coffee or beer. There is no need to make them big; it’s nice to serve them so small, like fluffy pillows with filling.) For 10 pcs. you will need: 200 – 250 g puff pastry (yeast-free); 100-150 g hard cheese; 1 table. cream. Preparation: Defrost the dough, roll it into a thin layer (2-3 mm). Cut into rectangles 12 x 6 cm. Cut the cheese into squares 4 mm thick with a side of 4-5 cm. Place a piece of cheese on the rectangle of dough. Wrap, press with a fork along the edges of the dough to seal. Place the blanks on a baking sheet covered with baking paper. Grease a little with cream. Place in an oven preheated to 200 C. Bake for 20-25 minutes, until lightly golden.
Simple ways to make buns from yeast dough without filling
If there is no filling in the product, it is logical to focus on the shape. There is no need to be afraid that the jam will leak out and burn, so you can use your imagination to the fullest. We share the best ideas, and the choice is yours!
How to make and bake “Rosochki” buns?
An impressive and very simple form. You can sprinkle miniature yeast “roses” on top with sesame seeds, sugar or chopped nuts - it will turn out even tastier.
- Tear off a small part of the dough from the general lump and roll it into a rope. Spread approximately 3/4 of the length with your hands or a rolling pin.
- Cut the flat part in half lengthwise.
- Intertwine the halves together.
- Twist the spiral so that it looks like a rose flower.
- The remaining convex end of the tourniquet is also cut into 2 equal parts lengthwise. Intertwine.
- And wrap it around the rosette. Next, follow the standard procedure: place the products on a baking sheet, brush with egg and bake.
Insanely simple, beautiful and unusual.
Graceful “Braids”
Another easy way to make braided mini buns. With this option there is no need to cut the dough into strips, everything is much simpler.
- Cut out rings from the rolled out yeast dough. To do this you will need 2 cuttings of different diameters. If there are no special molds, you can use a glass and a plastic lid, for example. First you need to cut out large circles, and then inside them - smaller circles.
- Take 2 rings and thread one into the other several times to create a beautiful braided braid.
Actually, that’s all, you can move on to the actual baking of the products.
Round braids
A simple, but interesting-looking form. It is perfect for making cottage cheese or any other yeast buns.
- Weave 4 identical ropes of dough together in the central part.
- Braid the loose ends in a circle.
- These are the buns you will get; personally, they remind me of a mini loaf.
You can add raisins, dried apricots, nuts, candied fruits to the dough - whatever you want.
How to make buns in the shape of a number 8?
Peerless “Eights” straight from childhood. The molding is simple and suitable for beginner cooks.
- Roll a portion of the yeast dough into a sausage.
- Twist it into a ring and fasten the ends.
- Twist the edges of the donut to form a figure eight.
You can bake without filling or sprinkle sugar streusel on top (30 g cold butter, 50 g granulated sugar, 55 g flour - grind everything to coarse crumbs). It will also turn out delicious if you fill the figure eight circles with boiled condensed milk, jam, jam, etc.
Bird-shaped buns – “Larks”
They are usually baked on March 22, the day when Orthodox Christians celebrate the feast of the 40 Martyrs of Sebaste.
- Form a rope that is slightly thicker at the edges.
- Twist it into a knot. From the back part, which will later become the tail, cut off a small piece of dough. Roll it into a sausage and place it under the side of the lark that will be slightly tilted down. This will make the bird buns more stable.
- Flatten the tail and make cuts along the edge. Use your fingers to make a sharp, long beak (during baking, the yeast product will rise and become noticeably rounded; this should be taken into account when molding).
- Instead of eyes, insert black peppercorns or cloves.
The buns turn out golden brown and really look like chicks.
How to simply decorate baked goods
If you decide to start making dough decorations yourself for the first time, then you can resort to the help of various molds, which often help out pastry chefs when baking a wide variety of cookies.
You only need dough, divided into two parts, to decorate your baked goods in an original way. First you need to roll out the bottom layer and form small sides. Next, any filling is laid out. Most often, various berries are used.
After the second layer is rolled out, you need to cut out the desired shapes using molds and always lay out the pattern towards the center from the very edge, baking at 200 degrees in the oven.
Another original idea for decorations using silicone molds is to make various cuts on a ready-made layer of dough, which is subsequently used to cover any filling.
By preparing several original shapes, you can create patterns with butterflies, flowers, and even unusual stars.
NOTE!
Decorating bottles - beautiful and original ideas for decorating bottles with your own hands (120 photos and videos)Hair jewelry: the best ideas for choosing hair jewelry and tips for choosing a design (105 photos)
- Sushi Master - Japanese restaurant in Chita
If you don’t want to tinker with various decorations for a long time, you can simply carefully cut a few strips from the dough that is left and place them on the baked goods in an absolutely chaotic order, twisting them in unusual lines in the shape of waves or spirals.