- November 14, 2018
- Miscellaneous
- Maria Grindich
Cooking any dish is a creative process. This is especially noticeable when preparing sweets. And when you decorate them, it’s time to show all your imagination and artistic talent. There are countless ways to make a delicacy not only tasty, but also beautiful. Today we’ll talk about decorating a cake with marshmallows.
Which marshmallow should I use?
The marshmallows prepared at the confectionery factory, which we buy in the store, can be different. And it’s worth thinking first about how, and not how, to decorate the cake with marshmallows.
- Unglazed sweetness. For example, pure white or painted in different colors. If the marshmallow is white, then it should not have a grayish tint, since pure whiteness is evidence of a good quality product, and grayness is the opposite. Treats with dye should have a dull color.
- Glazed marshmallows. This is the same sweetness, but only in a glaze of various types of chocolate, yogurt or sugar.
- Marshmallow with filling. Inside the treat there may be condensed milk, marmalade, chocolate or even jam.
- Marshmallows with different types of sprinkles. For example, coconut flakes, powdered sugar or nuts.
- Marshmallows for diabetics. It is prepared with a special recipe that uses fructose or stevia as a sugar substitute.
How to decorate a cake with cream and mastic
Cream is the simplest option for decorating a cake. For this purpose, use whipped cream, egg whites or butter creams. The main thing is that the cream has a dense consistency and does not spread. The easiest way is to grease the cake directly with a knife or spatula. This option applies if you place fruit on top.
If most of the dessert will be open, then use a pastry bag to decorate with cream. Many craftsmen advise replacing it with a regular stationery file. You can find out how to prepare the cream.
decorate the cake with cream and mastic
decorate the cake with cream and mastic
decorate the cake with cream and mastic
decorate the cake with cream and mastic
Mastic is made from marshmallows and powdered sugar. As a result, you will get a sticky mass similar to plasticine. It is used to cover dessert and cut out various decorations. Due to its plasticity, mastic is used for sculpting small parts. How to prepare mastic, watch the video.
Homemade marshmallows
But still, despite the variety of factory products offered, marshmallows made with your own hands will not only be tastier, but also healthier. Therefore, we are writing down an example of a simple marshmallow recipe for decorating a cake.
Ingredients:
- egg whites, 3 pcs., always fresh;
- jam or jam from any berries or fruits - 2 tbsp. l. with top;
- gelatin - 1 tsp, also with top.
Preparation:
- Soak the gelatin in a bowl with 1/3 cup of cold, always boiled, water. Wait until it swells. It should take 30-40 minutes. Then the mass must be heated over low heat until the gelatin is completely dissolved.
- Add a little sugar to the jam and place on low heat. After the jam has boiled for about 5 minutes, it should be removed from the burner and allowed to cool slightly. Then rub through a sieve.
- Egg whites must be whipped until stiff. Remember that not a single drop of yolk should get into the whites, otherwise nothing will whip up and decorating the cake with marshmallows will not work.
- Without stopping whipping, add a little jam and pureed gelatin. All this should be airy.
- At the end, we place marshmallows of the desired shape and size onto a sheet of parchment using a pastry syringe or a bag.
- Now we just have to wait for the marshmallows to harden. This will take approximately 2 hours.
Recommendations from culinary experts boil down to the fact that food coloring can also be added to such marshmallows to achieve the desired color, and it is also appropriate to use natural freshly squeezed juices instead of dye.
LiveInternetLiveInternet
Quote from message KaTyonOK_ChErtyonOk
Read in full In your quotation book or community!
A selection of instructions for making sugar mastic Marshmallow mastic
Thank you very much to the author - Tigra-Lvovna
for MK
Marshmallow mastic is very convenient for beginners... it dries for a long time... which means you can work with it slowly.
So... I put two marshmallows in a bowl, sprinkled them with water, added 3-4 drops of vegetable oil (just in case), put them in the microwave on defrost mode... and began to observe. The marshmallows, like the marshmallow soufflé, began to increase in volume. .swelled up. Well, everything else was as usual.. I took it out.. and started mixing in powdered sugar.. Until it started sticking to my hands. Everything turned out great. Well, if that’s the case...let’s make her a LILY
We roll out the mastic, cut out three petals from it, roll out the edges of the petals thinly so that they are a little ruffled. We go through the middle with a skewer, making a vein. And we place it on a pre-prepared foil, in the shape of a flower. We glue the petals at the base. And set aside until completely dry.
As soon as our two trefoils dry out... we lubricate the middle with “glue”... and insert one into the other... offset... so that we already have a flower of six leaves. We also glue a stamen into the middle... previously molded. Well, that’s basically it.. We’re waiting for our flower to dry.. We take a brush and paints in our hands.. and paint it.. trying to get closer to the original. Well, it’s up to you how it turns out.
source: https://lovelytutorials.com/forum/showthread.php?t=2261
author:Ariana
Gelatin mastic
Elastic sugar mastic for decorating cakes
made according to this recipe is used to cover the base of round or rectangular sponge cakes.
A detailed master class
on preparing elastic sugar mastic will help you master the art of cake decorating.
Ingredients for elastic sugar mastic (for 1200 g of finished mastic)
Water 80 ml Gelatin 7 g Glucose (sold in pharmacies) – 2 tablespoons Soft margarine – 1 tablespoon Powdered sugar 1 kg
Technology for preparing sugar mastic
Pour gelatin with water and leave for 40 minutes to swell. Heat the gelatin in a water bath; when dissolved, add margarine and glucose to the gelatin. Mix everything well. Pour into another container and leave to cool. Add a little powdered sugar to the cooled mixture. Start mixing and continue adding powdered sugar little by little. When the mass becomes thick
so that it can be kneaded.
Place on cutting table. First, pour a mound of powdered sugar on the cutting table, make a depression
and
put the mastic
. Knead the mastic in the powdered sugar until it acquires an elastic consistency.
prepare
elastic sugar
mastic
in advance; it is well preserved in hermetically sealed plastic bags.
VIDEO: https://lovelytutorials.com/forum/showthread.php?t=2257
Mastic on marmalade (instead of marshellow)
Thank you very much Natasha for MK Ingredients: jelly marmalade 4 pcs butter 1 teaspoon powdered sugar 100g
Recipe: Melt marmalade and butter in the microwave for 40 seconds (approximately). Gradually add powdered sugar and knead. First with a spoon and then with your hands for 2-3 minutes (properly)
This is the color I got experimentally from green and red flowers. And this is from yellow marmalade
The color of the mastic depends on the color of the marmalade, respectively. Which pleased me. my yellow mastic lay all night without a bag and did not dry out.
source: https://lovelytutorials.com/forum/showthread.php?t=2260
chocolate mastic
Thank you very much Elvira 1 for MK
Due to newly discovered circumstances, I am introducing a recipe for chocolate mastic as a separate topic. Here are 2 options for preparing chocolate mastic.
The 1st option produces harder jewelry, and the 2nd option produces softer ones. It is better to make figures and roses from such hardening soft mastic to directly place them on the cake. And for making jewelry like flowers on stems or just daisies, etc., option 1 is better. Option 1 (followed by heating) So, pour hot water into some vessel, or boiling water, put another smaller vessel in it (water bath), into which crumble chocolate (either white or dark). Add honey immediately and stir until the chocolate is completely melted. Do not place dishes with water on fire! The proportions are as follows: for 300 g of chocolate, take 50-60 g of honey. I even purchased electronic scales for these purposes. By the way, any honey is suitable for white chocolate (in the sense of liquid or thick), but for dark chocolate it’s probably better to use only liquid honey. These are observations from my own practice. And just a piece of advice: take only 50 g of chocolate and 8-10 g of honey for the 1st time. For example, I always try out everything new in small portions. The chocolate seems to be curdling. This photo shows this.
Divide the resulting mass into several pieces, wrap each in film and let sit. When it cools down, you can start sculpting. To do this, put a piece in the microwave for 30-40 seconds (depending on the power of the microwave), and when it gets very hot (so hot to hold in your hands), start squeezing it so that the oil flows out. Then heat it up again for 10 seconds. And roll it out through the film and cut it out or mold it, etc.
Heat in the microwave and stir and squeeze out the oil.
And here it is shown that if the mastic is not heated, it will crumble.
Therefore, you need to collect it in a pile and heat it up again, and then make from it what you want. Do not throw it away under any circumstances! If you crumple and crumple the mastic, and it crumbles, then you just need to heat it well, and not throw it away.
And here I showed how I make my roses:
I use petals of 3 sizes. First we start gluing the smallest ones. You need 3 of them for the 1st circle. The petals form something like a triangle among themselves.
For the 2nd row we use larger petals and glue them in a checkerboard pattern, similar to the 1st.
And starting from the 3rd row I use the largest petals. We are already taking 5 of them per row. And I make one more last row, in which I glue 6-7 petals. If in your opinion the rose looks unfinished, then add a couple more petals. If the rose turns out to be very tall, then I cut off the bottom with a knife or scissors.
Another piece of advice. When you apply the petals to the cone and then further, do not “lift” them up, otherwise they will look ugly. This is an important point. And this is a ready-made rose, which will get stronger overnight, harden, i.e. While the petals are soft, I add supports from napkin tubes.
If you need to make roses on a stem, then first put the mastic in the form of a drop on a stick and let it lie in a supine position for a day. It is advisable to place something under the stick so that it freezes vertically in the chocolate. And the next day you calmly stick on the petals. And one moment. If you overheat the mastic in the microwave until it turns slightly brown (I’m talking about white chocolate mastic), then it will even tan faster, which I personally find very convenient when making roses. But be careful not to overheat it too much, because if it turns brown, then it will immediately become oaky after cooling, like caramel. In fact, I noticed that even if the film on which the mastic lies melts, it means that there was the best heating. Then the mastic will hold its shape better and will not crumble. And here are photos of how I work with white chocolate mastic:
Here you can see the stands that I made specifically for drying daisies, gerberas, etc. Very comfortable, by the way.
And these are photos of finished flowers made from white chocolate mastic. Dyes are added to colored flowers.
And this is a cake that is completely decorated with chocolate. The roses are shown in the photo above, and to make the leaves, I simply took live leaves and coated them in melted chocolate. 2-3 mm thick. Then she let them cool and carefully removed the living leaf and threw it away, and the chocolate one came out with all the veins, just like the real thing. I drew the mesh with melted white chocolate, placed it on a convex surface (ladle) and put it in the freezer for a minute or two. I filled the cake with ganache
. For it, 300 ml of cream is heated, but not boiled. Add 450 g of grated chocolate and 90 g of slurry. oils Stir until smooth. For the sides of the cake, I spread this ganache on a strip of polyethylene, put it in the refrigerator (not the freezer!) until it hardened slightly, then applied it to the sides of the cake and removed the film. The result is smooth sides. I even made the sides wavy, but it’s not very visible in the photo.
Option 2 (without subsequent heating)
I recently read that
if you mix chocolate and honey, then you can simply sculpt something without heating the mass
, as I do.
I tried this option too. I read on some site that if you mix white or milk chocolate with honey in the proportion of 454 g of chocolate and 168 g of corn syrup (I took LIQUID honey instead of syrup), for 454 g of BITTER chocolate you need to take 224 g of honey or corn syrup, slightly warm it up in a bathhouse, then you can sculpt it from this mass. It's almost like that. First about the proportions. For white chocolate, I took less honey, about 127 g. I measured everything with scales accurate to the nearest gram. For bitter or dark and milk chocolate, I used the proportions given. Everything else is done as described above. 10/13/09.
Yesterday I finally tried all 3 types of chocolate. The coolest result came from dark chocolate. I took very small portions. And I changed the technology a little. For 25 g of white chocolate I put 7 g of LIQUID honey, for 25 g of milk chocolate - 9 g of honey, and for 25 g of dark chocolate (55%) I put 12 g of honey. Contrary to what I read that you should melt chocolate no higher than 37°C, I did it differently. Because At first I melted it at a low temperature, but I was not satisfied with this result. The mastic turned out to be somewhat liquid. In short, I crushed the chocolate, added honey, of course everything by weight, boiled water in a kettle, poured boiling water into a cup and put a saucepan with chocolate and honey in it. When everything melted, the mass became not crumbled, but somehow viscous. I kept the chocolate, stirring constantly, for 2-3 minutes. She took out the saucepan and left it to cool. When the mass became cold, I squeezed out a little oil and put it in a bag for a day. The next day it was time to sculpt the decorations. As I already wrote above, I would sculpt roses from this mass, which should be placed on the cake; they can be cut and eaten, because... This mastic remains soft, but holds its shape. I kept the dark chocolate in the bathhouse for 3-5 minutes. At first it was liquid, then it began to thicken. And the next day, this mastic became in consistency something between toffee and hematogen. Then I took a large portion of chocolate, 300 g. Now I didn’t just keep it in boiling water, but additionally heated it over the fire for about 5 minutes, and stirred the chocolate all the time. Here are photos of this process. A lot of oil came out. I just poured it out. Then I let the mixture cool a little, after which I took a little and squeezed it out. Time 3. On the 2nd and 3rd times the oil was almost not squeezed out, only my hands got a little dirty. By the way, I painted the chocolate right away so that everything would be ready tomorrow. Otherwise, if you paint it again tomorrow, it will become soft again, you have to wait again, so I decided to do everything right away. The important thing here is to let the mastic sit for 24 hours. During this time, the mastic will get stronger, and it will then be easier to sculpt from it. To check whether the mastic has turned out, touch it after resting. If it is quite hard, then everything is fine, but if it remains soft, then something was done wrong. My mastic made from dark chocolate became quite hard, but from milk and white chocolate it was softer, but not very soft, it still held its shape. Knead the hard mastic a little and it will become pliable. But sculpt the flowers slowly, roll out the petals, leave them on the table for a couple of minutes, i.e. let them cool from the warmth of your hands. Then stick it to the base of the flower. I don’t know how this mastic will behave during the heat, because... I haven’t tried it, but it doesn’t get hot here. It's still cool at home. But I can definitely say that this mastic does not like heat. And it’s better NOT to put it in the FRIDGE! This mastic becomes limp from moisture. You can throw it away later if you decide to put it in the refrigerator to “freeze” for even a short while. And I will repeat. It is better to make roses and small figures from such mastic, but if something is more impressive and grandiose, then it is better from mastic with heating. Such jewelry lasts a long time. I wrote all this not to scare you away, but so that you, on the contrary, are fully armed. So go ahead with this option. Good luck!
source: https://lovelytutorials.com/forum/showthread.php?t=2258
Chocolate custard mastic for covering a cake or for sculpting figures
Recipe and tips from Natalia Fedorow- Etoile (Zaichenko)
Chocolate mastic for covering a cake or for sculpting figures. We will need 100 ml of water 50 g of butter 100 g of flour 500-600 g of powdered sugar 8 tbsp cocoa (this is for a rich chocolate color, for a lighter color, you need to take less) pinch of salt Boil water along with butter, add a pinch of salt, then add cocoa, good stir and add flour.
You should get a cool choux chocolate dough. Cool the dough. When it has cooled, pour a little powdered sugar onto the table and knead, adding more powder as you knead. At first it will seem that there is so much powder, it’s a lot, and it won’t all go in, but as you knead, the dough will soften... It will become sticky, but this is normal. Continue kneading until you get a plastic mass. Place the prepared mastic in a bag, close it well and refrigerate for a couple of hours. After refrigeration, the mastic will become a little harder; it needs to be kneaded well again until plastic. Author's Notes... This mastic, similar in quality to marzi, is very good for sculpting animals, because it is sculpted like marzi, but it is tastier to eat. It is not suitable for flowers. Very good (without cocoa) For covering cakes where a lot of mastic is needed, for fondant, instead of marzi. In chocolate form, it is very good for covering a cake. Especially where a skin effect is needed, because it does not look as plastic as regular mastic. This portion according to the recipe is enough to cover a 26 or 28cm cake. I don’t really know how long it will be stored, but my first sample lay in the refrigerator for 2 weeks and nothing happened to it, neither in taste nor in quality. A huge plus ––––Delicious!!!! Pros: - tasty (at least for my taste - I really love unbaked choux pastry and custards) - economical (a little powder is needed) - easy and quick to make - no cloying sweetness, like most other mastics - easy to sculpt from it - All sorts of ball sticks mold and roll well - they don’t harden indestructibly, the figures remain soft (in a humid climate) - they PAINT wonderfully (!), with a small amount of dye - bright and saturated colors - AND THE MOST HUGE PLUS! - it easily chokes through the gun (who knows, he will understand) Disadvantages and how to overcome them: - it’s better to keep it in the refrigerator and take it out in small pieces - small parts are molded poorly, they crack (but I found a way out - I sculpt them from mary mouse) (and it seems that if your hands are clean, without a flour coating, then small ones are molded well) - you can’t make flowers - the color is not white and if you roll it in a thin layer, the previous layer will show through, therefore, it is not suitable for clothing - the parts do not stick to each other on their own, like marzipan ( but they sit perfectly on condensed milk) - in my dry climate, small parts dry out a lot in literally two days - it happens that when sculpting, a small flour coating forms on your hands and the figures stop sculpting; the solution is simple - wash your hands source: https://lovelytutorials.com/forum/showthread.php?t=2135
Mastic from Marshmallow candies with the addition of butter (without milk) Thank you very much Nastya for the MK To prepare sugar mastic we will need: marshmallows - 100 g butter - 1 tbsp. powdered sugar - 200-300 g (you may need more or less powder) food coloring
Place the marshmallows in a mold, add butter, and microwave for 15-20 seconds. The marshmallow should increase in volume.
Add 50-100 g of powdered sugar, mix. If you make colored figures, divide the resulting mass and add food coloring.
Add powdered sugar until you get a mass similar in consistency to plasticine.
The mastic is ready. You can roll it out and cut out various shapes. Finished products are dried within 24 hours. Finished products should not be stored in the refrigerator. If you have any unused mastic left, wrap it in cling film and put it in the refrigerator. If the cake is covered with cream, then it should be decorated with mastic products before serving.
Girls, I took pictures of several types of marshmallows that I managed to buy.
source: https://lovelytutorials.com/forum/showthread.php?t=2259
2. 3. 4. 5. 6. 7.
8. 9. 10.
11.
Decorating the cake with pops
Kids will love marshmallows on sticks for decorating a cake. All you need is a package of marshmallows, which are also marshmallows, chocolate, nuts, powdered sugar and sprinkles of your choice. And, of course, you will also need skewers, and even more fun - colorful straws for cocktails.
Now you need to string the marshmallows onto the existing sticks, melt the chocolate, dip the pop into it and dip it in the chosen sprinkles. And so on for the entire package. It's even easier to decorate marshmallows with colored sugar. To do this, pops need to be dipped alternately in water and sugar. They will also look very cheerful.
All that remains is to stick the marshmallow pops into the finished birthday cake. This is how you can decorate a cake with marshmallows in an original and easy way.
Chocolate marshmallow mastic
We will need. 1 pack of chewing marshmallows, 100g dark chocolate, 1 tbsp. butter, 2 tbsp. milk (preferably cream), powdered sugar about 200g, maybe less.
First, melt the chocolate in a water bath, add the soufflé, let it melt too, mix everything, add milk and butter.
Mix everything well, you can mix with a mixer. Let the mixture cool slightly and sift in the powdered sugar in small portions, stirring well each time.
You should have a soft, elastic, non-sticky “dough.” If you don’t work with it right away, wrap it in cling film. And in the refrigerator for storage.
I did this. So far this is the only type of mastic from which at least something can be obtained.
I read somewhere (after I had spoiled 1 serving) that the main thing is not to overheat the soufflé, remove it from the heat when the marshmallows are almost melted, but not all - the temperature will be enough for them to melt.
Decoration of several types of confectionery products
Any children's cake can also be decorated with a huge mixture of various confectionery products. Decorating the cake with marshmallows and marmalade will not take much time. You can add all sorts of sweets here, and even cake pops with meringues, making the top of the dish simply explosive in appearance. The main thing is to choose bright colors a la “pluck your eyes out”. You can layer it with cream and soak the cake with these sweets. And if you allow the hero of the occasion to decorate, then everyone will remember the cake for a long time.
A more complex cake decoration with marmalade and marshmallows is to place preferably homemade marshmallows on the surface of the cake, and place roses on top from pieces of marmalade rolled out in sugar and stuck to toothpicks. It looks romantic and tastes unusual.
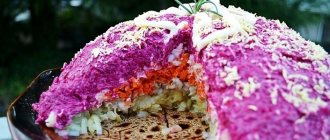
Marshmallow cake with fruits
A light, airy and tender cake that does not need to be baked can be made from marshmallows, whipped cream, nuts and fruits. To do this, you need to cut the marshmallows lengthwise into thin circles, leaving the tops for decoration, and lay them out in layers with whipped cream, sprinkling it all with nuts. The cake is elementary simple even for a novice cook. And you can decorate it based on your imagination. Take, for example, bananas, kiwis and oranges, and put them on the cake mixed with marshmallow tops. In addition, you can use strawberries or raspberries, or maybe berries that contrast with each other in color. Fantasy and the availability of certain products in this case play a major role. The main thing is to properly prepare the cake itself.
Step-by-step preparation from Laima Vaikule
An airy dessert from a celebrity can be prepared based on:
- marshmallows – 250 g;
- sugar – 75 g;
- cream – 250 ml;
- nuts – 75 g;
- strawberries – 210 g;
- kiwi – 190 g;
- chocolate – 25 g.
Step by step steps:
- Cut marshmallows into rings 10 mm thick. This should be done with a knife dipped in boiling water. Place the first layer.
- Spread with whipped cream and sugar.
- Distribute washed and dried strawberries with chopped nuts. Cover with cream.
- Then lay out the marshmallows and a layer of thin kiwi slices, covering each with cream.
- The top layer should be made of embossed pieces of marshmallows.
- Leave in the refrigerator for 3 hours to maintain its shape and prevent fruit juices from leaking out.
The height and diameter can be adjusted at your discretion using different quantities of ingredients.
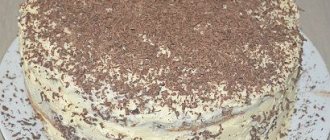
Decorating the cake with marshmallows, chocolates and nuts
Decorating a cake with a mixture of a wide variety of delicacies looks rich. For example, you can combine marshmallows, chocolates and nuts. How to make this delicacy the most unusual and attractive? First, you need to purchase a box of assorted chocolates so that the decorations are as varied as possible in shape, size and taste. You can, for example, leave a circle inside for a congratulatory inscription. For example, “Mashenka is 17.” Make it using cream or glaze and create an incredibly tasty ring of different candies around it. But candy alone doesn’t look very festive? Then sprinkle this circle with ground nuts. Already more diverse. But some fun is still missing. Add marshmallows to the cake. You can purchase several pieces of marshmallows in a variety of colors. Or prepare bright homemade mini marshmallows in advance. Or you can buy a package of multi-colored small marshmallows and scatter them over the chocolates like a snowball. And it’s even better to combine all these types of this wonderful delicacy.
Cooking method
Marshmallow mastic is an excellent material for decorating homemade cakes or pastries. To make it, you need to put chewing marshmallows in a deep bowl, and then fill them with slightly cool water. After this, the filled glass or ceramic bowl must be loosely covered with a lid and placed in the microwave. It is advisable to heat this mass at high power for about 30 seconds.
After the marshmallow has melted, you need to remove it from the microwave oven, and then add any food coloring to it, which should be diluted in a small amount of water in advance.
Following this component, add powdered sugar into the bowl. In this state, all ingredients must be mixed vigorously with a large spoon. After some time, the marshmallow paste should become so thick that it can only be kneaded with your hands. This should be done long enough for the mass to become as homogeneous as possible.
Marshmallow flowers
Another elementary simple, but incredibly beautiful way to decorate a cake with marshmallows is to buy a package of fairly large marshmallows and pick up regular scissors.
So, take the marshmallow and cut it crosswise into several identical parts, without reaching the end. We knead the resulting “fringe” into petals and glue them together at the ends. You will get a flower. Of course, you can just put it on the cake, or you can add volume. Then we will need a stem. To do this, cut off a piece of marshmallow and roll it into a tube. Glue the stem to the flower and the decoration is completely ready. You can also use food spray paint or colored sugar to dye your decorations different colors. Or you can just use colorful marshmallows. A photo of decorating a cake with marshmallows in this style is presented below.
Despite the fact that we have presented quite a variety of ways to decorate cakes, we can only say that the most important thing in this matter is your imagination and an invariably creative approach.