Any holiday is much brighter if it culminates in a delicious, and most importantly beautiful and appetizing cake! In this article, we invite you to learn how to make homemade book-shaped cakes.
The Book cake will be appropriate for many holidays. For example, you can please your schoolchild with such a homemade cake, in the shape of a book, by preparing it to celebrate Knowledge Day or Graduation Day. Many professional holidays can also be celebrated with a Book Cake: Teacher’s Day, Librarian’s Day, Writer’s Day, etc.
A cake of such an original look will also be appreciated by those who cannot imagine their life without reading romance novels, exciting adventures, and intriguing detective stories.
Open book cake
To create such a confectionery masterpiece, you will need two thick rectangular cake layers.
Place these two cake layers on top of each other and coat well with cream.
Now mark the center of the cakes and make a neat cut, thereby forming a small depression.
The edges of the cakes also need to be slightly rounded.
Now coat the entire cake with cream.
Roll out a thin layer of snow-white sugar mastic and wrap the cake.
Using the blunt side of a knife, you need to mark neat stripes on the sides that will look like pages. If desired, you can place another layer of sugar mastic on top and fold the edges slightly to make the pages appear voluminous.
Roll out long thin strips of brown sugar mastic and wrap them around the edge of the cake - this will be the cover of the book.
Now use food coloring, you can use cocoa powder, and apply a tint to the snow-white sugar mastic to give the book an aged effect.
From sugar mastic, make letters and the necessary elements for decorating the cake: pen, pencil, glasses, feather, etc.
Ingredients:
- Egg white - 6 pieces (4 - in the dough, 2 - in the meringue)
- Egg yolk – 2 pieces (dough)
- Flour - 130 grams (dough)
- Sugar - 245 grams (100 g - in the dough, 75 g - in the meringue, 70 g - for assembling the cake)
- Baking powder - 1 teaspoon (dough)
- Vanilla sugar - 1 teaspoon (dough)
- Salt - 1 pinch (dough)
- Baked milk - 90 Milliliters (dough)
- Vegetable oil - 65 Milliliters (dough)
- Cocoa - 2 tbsp. spoons (dough)
- Cognac - 50 Milliliters (for assembling the cake)
- Mascarpone - 500 grams (for assembling the cake)
- Vanillin - 5 grams (for assembling the cake)
- Condensed milk - 200 grams (for assembling the cake)
- Marshmallow - 50 grams (mastic)
- Lemon juice - 1 teaspoon (mastic)
- Powdered sugar - 150 grams (mastic)
- Food colorings — — To taste (mastic)
Number of servings: 16
Closed book cake
A birthday cake in the shape of a closed book is much easier to make, because you just need to make a perfectly even, tall rectangle from the cake layers.
Wrap the sides of the cake with snow-white sugar mastic, using the blunt side of a knife to apply stripes imitating pages.
Use brown sugar fondant to make a cover for the Book cake.
Use a knife to make decorative embossing.
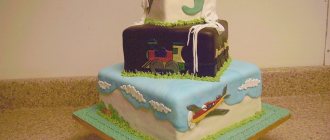
Cake book made from fondant
This cake can be made quite large; it does not have voluminous decorations that take a long time to dry, so you can start decorating it just the day before serving. The cake is simple and quick to prepare, suitable for beginners to learn the basics of working with mastic, and can truly become the housewife’s first mastic masterpiece. And to help - a detailed master class.
What do you need?
Products you will need:
- sugar paste;
- dyes of turquoise, lilac, yellow, red;
- green and brown food powder;
- a little white icing to create an inscription;
- rectangular cake.
Take the following tools:
- foil backing;
- rolling pin for mastic;
- iron;
- modeling stacks;
- knife;
- brush;
- cornet (pastry bag) with a thin nozzle.
Decor
We begin the design by creating a convex volumetric inscription. This inscription can serve as a congratulation for the birthday person, the name of the organization, wishes, date and anything else. We create the inscription as follows:
- Print the required inscription on a sheet of white paper A 4. Place the sheet in a regular file.
- Prepare snow-white icing and place it in a bag with the thinnest nozzle.
- Leave the letters right on the surface of the file along the contours of the inscription, trying not to go beyond their boundaries.
- After the icing has dried (it dries instantly, depending on the thickness of the lines it will take about 5-10 minutes), use dry food coloring and a thin brush to paint the inscriptions in the color you want. This MK uses red dye.
- The inscription must dry for at least 10 hours or more depending on the thickness of the icing. After drying, carefully lift the edges of the letters and transfer them to the finished decorated cake.
We recommend: Lightning McQueen cake - step-by-step production
The inscription is glued to the mastic using beaten egg white, which must be used to coat the back side of each letter (this is shown in MK).
Now let’s start decorating the “Book of Mastic” cake:
- According to the master class, you will need a rectangular cake. This can be a regular sponge cake soaked in butter cream, a sour cream cake or a honey cake. The main condition is to make perfectly smooth edges with sharp corners.
- Roll out the snow-white sugar mass into a layer no more than 4 millimeters thick, cover the cake with it, release air bubbles with an iron, and form sharp corners.
- At the bottom, cut off the excess paste with a round paste knife.
- Using a sharp modeling stick, shape the binding of your book and imitate the pages. Be careful not to press the stack too hard, otherwise you may tear the mastic coating.
- Glue the icing lettering to the appropriate place on your book, as the tutorial indicates.
- Sprinkle the table with starch and roll out a small circle of purple mastic no more than 2 millimeters thick. Cut out a cake mold from it and apply markings with a modeling stick. Make the rest of the pieces in the same way.
- Brush the bottoms of the pieces with egg white and glue to the surface of the cake.
- Now tint the surface of the cake with dry food paint - it will be green around the edges, and make the pages brown. Use a wide brush and blow off any excess.
Our master class shows only one option for decorating a cake in the form of a book, but you can make the design themed. For example, give a student not a simple cake book, but one that corresponds to his specialty or in the form of a grade book. Another secret of this MK is that the cake must be large enough, otherwise all the markings and decor, as well as the inscription, will be lost. The optimal size would be 40 by 25 centimeters.
What are the pages in the Book cake made from?
You can use sugar mastic to make pages in the Book cake. To do this, you need to roll it out thinly, give it the desired shape,, if desired, age it with food coloring, and then dry it.
Another good option would be pages made from waffle paper.
Also, if you know how to work with chocolate and temper it correctly, then the pages in the Book cake can be made of white chocolate with the addition of whitening food coloring - titanium dioxide.
Description of preparation:
If you have a great desire to prepare a great surprise for someone, then you won’t find a better option than an unusual cake, so today I want to tell you how to make a “Book” cake.
This wonderful cake is perfect for absolutely any holiday, because you can decorate it to your taste according to the theme of the holiday itself. For example, I made it for my mother on Teacher’s Day, everyone was absolutely delighted, my mother was especially happy. And although the preparation will take you quite a lot of time, you shouldn’t be afraid of this, because if you look closely, there’s nothing complicated here, the main thing is not to be lazy. But with this recipe for making the “Book” cake you will make an unforgettable gift, believe me. Purpose: For the festive table / Festive lunch Main ingredient: Dough Dish: Baking / Cakes
Step-by-step preparation
Step 1:
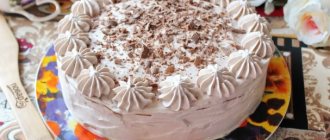
To prepare this cake you need: 800 g of sponge dough, 200 g of chocolate butter, 300 g of cream (whipped butter with sugar), 140 g of sugar mastic, dark red dye or cocoa powder, 4 chocolate balls, decorating bag, nozzle a bag with small round holes, an artistic brush. Bake the biscuit, divide into two parts as in the photo and let cool.
Step 2:
Coat the top of one part of the biscuit with cream and place the other part of the biscuit on it.
Step 3:
Coat the resulting pie with cream on all sides and measure the length, width and height. Leave some of the cream for decorating with wool.
Step 4:
Divide the white mastic into 3 parts, roll out and cut 3 plates to size for future pages.
Step 5:
Roll out and cut out a tongue bookmark from red fondant.
Step 6:
Score shallow stripes on the white plates.
Step 7:
Use a brush to apply dye or cocoa powder onto the resulting plates so that they look like the pages of a book.
Step 8:
Place the cream pages onto the biscuit.
Step 9:
Set the language bookmark as in the photo.
Step 10:
Add some of the chocolate butter to the remaining cream.
Step 11:
Mix until the mixture has a uniform color.
Step 12:
Fill the decorating bag with vertical layers of the mixture and chocolate butter. And start decorating the cake with wool from delicious cream!
Step 13:
When decorating the cake, try to achieve maximum realism.
Step 14:
Place a little more wool cream in place of the future eyes.
Step 15:
Set eyes from chocolate balls.
Step 16:
Apply a little more fur over the eyes.
Step 17:
Apply more wool at the base of the cake.
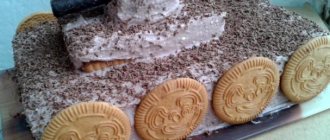
Step 18:
That's all - a completely non-scary Book of Monsters cake from Harry Potter is ready to serve. Treat your guests and enjoy your meal. Keep in the refrigerator before serving!
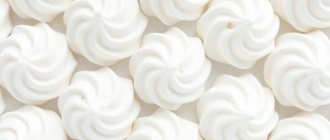
How to make mastic
Every pastry chef has his favorite recipes, which he chooses for himself through experimentation.
Mastic is no exception; it can be made in different ways. I would like to present you a recipe based on Marshmallow. Ingredients
- Zephyr Marshmallow – 300 gr.
- Powdered sugar – 550 gr.
- Water – 1.5-2 tbsp.
Cooking method
- Pour marshmallows into a deep container, add water, and put it all in the microwave for 30 seconds. As an alternative to the microwave, you can use a water bath.
- After 30 seconds, take out the container with Marshmallow, mix it and put it in the microwave again for the same time.
- The mixing container and the mixer attachment for kneading the dough must be greased with vegetable oil (odorless).
- We transfer the melted marshmallows there, add powdered sugar, but not all of it, but only 300 grams, and knead the sugar dough.
- In the process, add another tablespoon of water and the remaining powder. Knead until the mixture becomes smooth and elastic.
- Grease your hands and the surface on which you will spread the mastic with vegetable oil.
- Form the mixture into a ball and wrap tightly in cling film.
- To add a vibrant color to the fondant, simply add food coloring at the end of mixing.