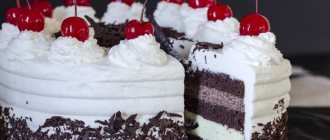
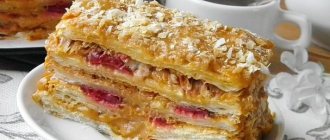
Berry cake “Heart”
Making such an original dessert is not difficult; even a novice housewife can cope with the job.
The baked goods turn out delicious and appetizing. A heart-shaped cake is something unusual and interesting. Among other delicacies, a heart-shaped cake will definitely not go unnoticed. Advice!
You can use fresh or frozen strawberries to make the cake. If only frozen berries are available, there is no need to defrost them first.
Ingredients:
For the test:
- sugar – 300 g;
- cocoa – 100 g;
- flour – 300 g;
- eggs – 8 pcs.;
- baking powder – 10 g.
For cream:
- sugar – 200 g;
- cream – 600 ml;
- cocoa – 100 g.
For the glaze:
- chocolate – 230 g;
- milk – 100 ml.
For filling:
- kiwi – 2 pcs.;
- strawberries – 150 g.
For decoration:
- strawberries – 150 g.
Preparation:
- To prepare the cake at home, preheat the oven to 200 degrees. In the meantime, let's start preparing the dough. To do this, combine sugar with eggs, beat until white foam.
- Pour the sifted flour into the egg mixture. Mix everything with a spoon. We also add cocoa here. As a result, we obtain a homogeneous chocolate consistency.
- Add baking powder to the remaining ingredients. Mix everything.
- Prepare a baking dish and pour the dough into it.
- Bake the biscuit for 35 minutes. Remove the finished cake from the oven. Once the biscuit has cooled, cut it into 3 parts.
- Let's start preparing the cream. It is made from cream and sugar. Beat all ingredients well. Then add cocoa and mix everything with a spoon.
- Peel the kiwi and cut into thin slices. We wash the strawberries, remove the stems, and cut them into small pieces.
- Let's start assembling the cake. Place the cake on a plate, grease it with cream, place kiwi slices on top, and cover with a layer of cream.
- We lay out the second cake layer, coat it with cream, place strawberries, apply a little more cream. Lay out the third cake layer.
- Making chocolate glaze. To do this, break the chocolate into cubes and throw it into a bowl. Add the milk and place the container with the contents in the microwave. We are waiting for the chocolate to melt.
- Drizzle the dessert with glaze and decorate with berries. Place the baked goods in the refrigerator for several hours.
The video will make the cooking process more interesting and entertaining. Even a young housewife will be able to prepare a culinary masterpiece in her own kitchen and treat all household members to an amazing delicacy.
Cooking with mastic
How do you like the idea of proposing marriage with a wonderful cake? Such an unexpected turn will excite memories and warm the soul for many years to come.
You will need:
- one prepared biscuit;
- one can of condensed milk;
- powdered sugar – 1 kg;
- butter – 200 g;
- marshmallows – 200 g;
- vodka – 20 ml;
- water – 20 ml.
Step-by-step instruction:
- Separate the marshmallows by shade. Separately, melt marshmallows of each color in the microwave for about 1 minute.
- Knead each mass like dough, adding powdered sugar little by little. We also use it instead of flour. When the sweet dough stops sticking to your hands, it is ready.
- From the resulting material we fashion themed figures (flowers, hearts, etc.) and leave them in the refrigerator for 5-10 hours.
- Mix the melted butter thoroughly with condensed milk and grease the biscuit divided into several parts with this cream.
- Roll out the remaining mastic thinly, cover the future cake with it and level it.
- Lubricate the surface of the cake and the figure with a mixture of water and vodka.
- We use the same liquid to glue the figures to the cake.
Sweet Valentine Cake
If you want to give your loved one an unusual gift, you can prepare a heart-shaped cake for him. Baking fits perfectly into a romantic setting and will help lift your spirits. Particular attention should be paid to the design of the dessert. For decoration you can use berries, mint leaves, and sweet figures.
Ingredients:
For the test:
- flour – 50 g;
- sugar – 70 g;
- eggs – 2 pcs.;
- butter – 10 g;
- vanilla sugar – 10 g.
For impregnation:
- water – 30 ml;
- sugar – 10 g.
For the mousse:
- cream – 400 ml;
- sugar – 150 g;
- lemon juice – 20 ml;
- raspberries – 600 g;
- gelatin – 15 g.
For decoration:
- berry jelly – 2 bags.
Preparation:
- Let's start preparing a heart-shaped cake. In a deep bowl, mix eggs and 2 types of sugar. Beat the mixture with a mixer for 7 minutes.
- Divide the sifted flour into 2 parts and add it to the general mixture. Knead the dough with a spatula, making movements from bottom to top.
- Place the butter in a bowl, melt it, and pour it into the rest of the ingredients. Mix the dough.
- Prepare the baking dish, it should be in the shape of a heart. Cover the bottom with parchment and pour in the dough.
- Bake the biscuit at a temperature of 180 degrees, allow no more than 20 minutes for cooking.
- In the meantime, let's prepare the mousse. We sort the raspberries and put them in a saucepan. Add sugar and lemon juice here.
- Place the container with the contents on the stove and cook over low heat.
- As soon as the berries release their juice, mash them with a masher.
- Bring the mixture to a boil, cook for 7 minutes.
- Remove the pan from the heat and grind the berries through a sieve. The recipe with photo will tell you how to do it correctly.
- Pour the chilled cream into a deep bowl and beat with a mixer until thick. Pour the berry juice into the cream and mix well. Place gelatin in a plate and fill it with boiled water. We are waiting for the gelatin to swell.
- Lightly heat the gelatin mixture and combine with the creamy berry mixture. Mix everything, for convenience we use a mixer.
- We do the impregnation. To do this, dissolve the sugar in boiling water and let it cool.
- Take a baking pan and line the bottom with parchment. We lay out the cake, pour it with impregnation. Pour in the creamy-berry mixture, level the surface, and put the dish in the refrigerator.
- Let's start making jelly. Pour it over dessert and put the cake in the refrigerator.
- After the jelly has hardened, take a hairdryer. With its help, we warm up the side of the mold and remove it. Place the delicacy on a plate and decorate with berries.
If you want to please your beloved man, you can prepare a delicious and original cake for him. This dessert will delight the recipient. All that remains is to taste the delicacy and hear a lot of compliments addressed to you.
Note! The mold must be heated with a hairdryer so that the dessert has smooth edges. Alternatively, you can use the standard method. To do this, you need to run a knife along the sides.
Cake of 12 cakes in the shape of a heart without a mold
For both the dough and the cream we will need a water bath. Therefore, you first need to select two saucepans that match each other. The most optimal option is when one enters the other, does not touch the bottom, but is not too far from it, while resting its handles on the walls of the larger pan. In fact, you can adapt in different ways based on your available capabilities. However, you should take into account the fact that both the dough and the cream will increase in volume during the cooking process, so the smaller pan should not be completely tiny. I used a 1.5 liter.
Kneading the dough:
So, I took hot water into a large saucepan (or you can heat cold water) and brought it to a boil. I determine the volume of water experimentally - I lower the smaller pan and see what water level is obtained. The smaller pan should be partially submerged in water, but should not allow the water to overflow when boiling. I set out a second (smaller) saucepan with butter and sugar. As always, I didn’t use a very large amount of sugar, less than in standard recipes. Therefore, if you are not used to reducing the sweetness of baked goods in this way, then add 250 grams.
While the butter and sugar are melting, I broke the eggs into a separate bowl and beat them with salt simply using a fork.
I let the oil cool a little (not until completely cooled, but to a warm temperature) and poured in the eggs. Then I added vodka (along with soda it acts as a leavening agent), honey and cinnamon.
Placed it in a water bath and stirred well until more or less homogeneous. Added soda.
Mix well and cook, stirring, until the mass approximately doubles and a lighter shade is obtained (compare both volume and color with the previous photo).
I poured the aromatic mixture into a bowl for kneading the dough. She waited a few minutes for her temperature to drop. This is necessary solely to avoid getting burned. As soon as you can work with the mass, you need to start without waiting for further cooling. First I poured in 2 cups (250 g) of sifted flour. Beat with an electric whisk.
Then I sifted another 2 cups of flour here and started kneading with my hands. In the process, I added another 0.5 cups of flour. But your quantity may differ, because different flours have different gluten levels. I put it in a food bag. I left it to rest while I prepared the cream.
DIY heart shaped cake cream:
For the cream, as I already wrote, you also need a water bath. So I washed the smaller saucepan and started cooking in it again. I combined sifted flour (it’s better not to be lazy and sift it so that the cream is homogeneous), sugar (again, I have a minimal amount, but you can increase it) and seasoning for desserts and coffee (it includes cinnamon, cloves, cardamom and vanilla) . Mixed thoroughly.
Separately, lightly beat the eggs with a fork with a pinch of salt and pour them into the flour mixture.
I also poured milk in here. I took the usual store-bought stuff - ultra-pasteurized, with a fat content of 2.5%.
Placed it in a water bath (the water in a large saucepan should be boiling) and cooked until thickened. The cream should not be very thick for the spoon to stand)) See the consistency in the photo. After cooling it will thicken further. I poured it into a container for further preparation of the cream and let it cool completely.
Separately, I combined butter and honey in a saucepan (it can be either liquid or candied).
When the butter was completely melted, I mixed it with honey until smooth and cooled the resulting mass.
I combined two cooled (this is important!) mixtures - egg-milk and honey-butter. I poured in the cognac. Beat it thoroughly. The cream is ready! Very tasty cream 
How to make a heart-shaped cake with your own hands without a mold?
This requires a template! I took a large cardboard. You can use paper, but it’s better to take a thicker one, it will be more convenient. I have a heart shaped baking pan. Remember, I baked a fragrant honey cake in the oven and a delicate sponge cake with chocolate cream in it?.. But, I admit, I don’t really like the heart that turns out when baking... I would like a more pronounced shape! So I did this - I outlined the baking pan with a pencil. And then I adjusted it to suit my wishes - I made a deeper cut between the “shoulders” and reduced the width at the bottom.
If you don’t have such a shape, then simply draw a heart of the desired size or print any picture with a heart from the Internet. If you have a large card or, conversely, a small pillow in the shape of a heart, you can circle one of them. It doesn't matter at all what you take as a basis. The main thing is to get a beautiful heart of the right size. My parameters are as follows: the widest point of the heart is 22.5 cm; the total length is 23 cm.
I cut out a heart template from cardboard with scissors. All is ready! You can bake cakes.
DIY heart-shaped cake - baking cakes:
So, the dough has rested, you can divide it into 12 approximately equal parts. This is how I did it: I cut the ball of dough crosswise into 4 parts, and then divided each of them into three identical segments.
Roll out the dough thinly, sprinkling the board with flour (if you don’t do this, the thin dough will stick and tear). The layer should be translucent, like a strudel! Yes, yes, if not more subtle. When rolling out the dough, I applied a template - the layer should be about a centimeter larger than the cardboard dough on each side. Because the dough will shrink a little during baking, and if you roll it out end to end, then the cake will turn out smaller than the template.
I poked the dough with a fork to prevent it from puffing up too much during baking. Carefully transferred to a baking sheet (no need to grease it; however, if it is uneven or rough, it is better to cover it with foil or parchment paper). Placed it in an oven preheated to two hundred degrees. I baked each cake for 3-4 minutes. The first traditionally requires a little more time (4-5 minutes) until the oven enters the desired mode. As soon as the cake was browned (there is no need to fry it until brown), I immediately removed it from the baking sheet onto a board and immediately, before it cooled down (!), cut out a heart using a small knife according to the template.
This must be done quickly and immediately, because the cake cools very quickly, and as it cools it begins to crumble - instead of cutting off the excess, you can inadvertently break off the desired part.
I did this procedure 12 times... While one cake was in the oven, I rolled out the next one, trying it on the template, and stuck it with a fork.
I broke the scraps into small pieces and put them in a shredder.
In several passes, I ground the remaining cake layers into crumbs, which will be needed for sprinkling.
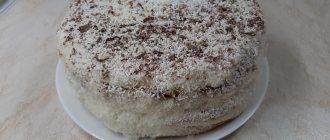
The cream is ready and cooled, the cakes are baked, the scraps are ground - everything is ready, you can start assembling the Heart cake for Valentine's Day or another holiday.
I placed a spoonful of cream in the center of the cake stand, and the first cake layer on it. This way it won’t move around, and then when cutting the cake it will be better to lag behind the dishes. I coated each cake well with cream and placed the next one on top. So all 12.
I greased the sides of the cake with the remaining cream, and then sprinkled them thickly with crumbs, as well as the top. I placed small chocolate hearts along the contour of the large honey heart. You can leave it like this - it’s already festive!
At the same time, I decided to dilute the strict and yet romantic style with decor. I just left the cake on the kitchen table overnight. During this time, it is soaked quite well, after which it can be put in the refrigerator until serving.
We couldn’t start tasting it for a long time because we couldn’t lift our hands to cut it))
But reluctantly, we still decided on this procedure!)) In the cut, he amazed his beloved with an abundance of cakes
Well, here it is - a DIY heart-shaped cake without a mold! It turned out incredibly tender, tasty and very aromatic thanks to the spices! Would you like to try a piece?
Cake with fondant
A heart-shaped cake can be made from anything. Sweet dishes made from mastic are gaining great popularity. The material allows you to create amazing culinary masterpieces. Why not make dessert in your own kitchen and give the treat as a gift.
Ingredients:
For mastic:
- marshmallow – 120 g;
- butter – 20 g;
- lemon juice – 5 ml;
- powdered sugar – 350 g;
- food coloring – 3 pcs.
For the test:
- vanilla sugar – 10 g;
- sour cream – 180 g;
- sugar – 180 g;
- cocoa – 50 g;
- baking powder – 10 g;
- eggs – 2 pcs.;
- flour – 250 g.
For the meringue:
- sugar – 180 g;
- egg whites – 2 pcs.;
- salt - a pinch.
For cream:
- powdered sugar – 100 g;
- boiled condensed milk – 300 g;
- butter – 250 g;
- cream – 450 ml;
- peanuts – 150 g.
Preparation:
- Let's start preparing the mastic. It’s not difficult to make it yourself. The only thing to keep in mind is that you need to sculpt the decorations a few days before preparing the dessert. Place marshmallows in a bowl, add lemon juice and oil. Place the dishes in the microwave for 30 seconds. This time is enough for the mass to increase in size. Pour powdered sugar into the resulting mixture and mix everything.
- We divide the mastic into several parts, each painted in a separate color. Wrap the mass in cling film.
- Let's start making decorations. We tear off a small piece of mastic and make a thin cake out of it. We roll the resulting element into a tube.
- In the same way we make the next petal, placing it on top of the first. The petals should touch only at the base.
- We form the remaining parts of a larger size, attaching them alternately around the core. We cut off all excess and wrap the petals outside.
- We form the remaining roses in the same way. We make leaves by cutting them out of mastic using a die cutter. Place the decorations on a tray with powdered sugar and put them in a dry place. The photo shows flowers in finished form.
- Let's start preparing the meringue. In a bowl, combine egg whites, salt, sugar. Beat the mixture with a mixer.
- Place the meringue on a baking sheet lined with parchment. Bake them in the oven at 100 degrees for an hour. At the end of the allotted time, remove the baking sheet from the oven and let the meringue cool.
- Let's prepare the dough. Grind eggs with sugar, add sour cream. Mix everything.
- Add cocoa, vanilla sugar, and baking powder to the total mass.
- Add flour in small portions and knead the dough.
- Prepare a round baking dish. Cover it with paper, grease it with oil, and lay out the dough.
- Bake the biscuit at a temperature of 200 degrees, allow about 40 minutes for cooking. Cut the finished cake into 2 parts.
- Place peanuts in a frying pan, fry lightly, and set aside.
- Let's start preparing the cream. In a deep plate, mix melted butter and boiled condensed milk. For convenience, we will use a mixer.
- Add peanuts to the remaining ingredients and mix everything. This cream is perfect for making children's desserts.
- Let's make another cream. In a separate bowl, combine cream and powdered sugar. Divide the mixture into parts and place in the refrigerator for a few minutes.
- We take thick cardboard and cut out a heart from it. We attach the template to the biscuit, transfer the figure to the cake. Cut off the excess and get 2 heart-shaped cakes.
- Let's start assembling the cake. Coat the bottom cake with buttercream and apply the paste with nuts.
- Lay out the meringue in the shape of a heart, coat with cream. This time we apply the cream compositions in the reverse order.
- Cover with the second cake layer and brush the surface with whipped cream.
- Fill a pastry bag with cream and install a toothed nozzle. We place the cream on the cake in the form of decorations.
- Top with sugar flowers for dessert.
- Place the baked goods in the refrigerator for several hours and let them soak.
The treat is ready. It will take a lot of free time to prepare it, but the result is worth it. Why not please your loved one and give him such a surprise.
Advice! If there is any mastic left after cooking a dish, there is no need to throw it away. It can be stored in the refrigerator for a week.
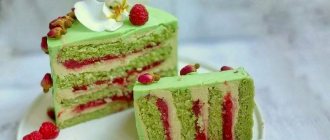
With a heart inside
A cake with a heart inside seems to hint that its creator is ready to give his own heart. But indeed, culinary art requires complete dedication and cooking with soul.
You will need:
- eggs – 12 pcs;
- sugar – 140 g;
- flour 315 g;
- soda – 0.5 teaspoon;
- cocoa – 1 tbsp. spoon;
- starch – 115 g;
- butter – 30 g;
- red food coloring – 1 teaspoon;
- cream (33%) – 300 ml;
- powdered sugar – 1 teaspoon;
- vanilla – 2 g.
Step-by-step instruction:
- Beat 8 egg whites with one glass of sugar. We also beat 8 yolks with a glass of sugar, but in a separate bowl. Then mix both parts.
- Add 300 g of flour, 100 g of starch, soda and mix.
- Pour the dough onto a greased baking sheet and bake for 20 minutes at 180-190℃.
- Cut the resulting pie into 4-6 pieces.
- Beat 4 egg whites with 150 g of sugar. In the same proportion, beat the remaining yolks and reunite the mixtures.
- Add 2 tbsp to the eggs. spoons of flour, 1 tbsp. a spoonful of starch and 1 tbsp. spoon of cocoa. Stir and add melted butter and coloring. Bake for 25 minutes at 180℃.
- To obtain the cream, whip the cream until foamy, add powdered sugar and vanilla.
- From two parts of the cakes you need to cut out a recess and a cone, as if creating the lower and upper parts of the heart. We fill these voids with mashed red dough.
- We arrange the cake in layers, greasing it with cream. We also coat the structure with cream on top.
Mascarpone cake
Honey dessert is considered one of the easiest to prepare; it will take a minimum of time to prepare. You can choose anything as decoration: nuts, chocolate, berries, flowers, sweets, cookies.
Ingredients:
For the test:
- egg – 1 pc.;
- sugar – 130 g;
- honey – 55 g;
- butter – 100 g;
- flour – 300 g;
- soda - a pinch;
- salt - a pinch.
For cream:
- mascarpone cheese – 500 g;
- condensed milk – 200 g.
For decoration:
- meringue - to taste;
- berries – 100 g;
- flowers - to taste;
- pistachio greens – 100 g.
Preparation:
- In one bowl, mix honey, sugar, salt, butter and egg. Beat the mixture with a mixer.
- Add flour and soda in small portions. Gently knead the dough.
- Place parchment paper on the table and roll out the dough. Its thickness should be no more than 3 mm.
- Let's prepare a paper template in the shape of a heart; you will need 2 blanks. Place the dough on them.
- Bake the cakes in the oven at 180 degrees for 15 minutes. As a result, we get soft, golden-brown cakes.
- Let's start preparing the cream. In one bowl combine cheese with condensed milk. Beat the mixture with a mixer until smooth. The cream turns out lush, light in color.
- Let's prepare a pastry bag, put the cream in it, select a round nozzle.
- We place the cream on the cake along the contour, then fill the voids.
- Place the second cake layer on top and spread the cream in the same way.
- Place the baked goods in the refrigerator and allow at least 5 hours for soaking.
- Before serving the dessert, let's start decorating it. For this we use berries, meringues, flowers, and pistachio greens.
Even without mastic we can get an amazing treat. You will have to show a little imagination and the result will amaze all expectations. The cake will be a wonderful holiday gift and will help to please a loved one.
Cream dessert for lovers
The most delicious delicacy is made with your own hands. Making a cream cake is not at all difficult if you strictly follow the proportions.
You will need:
- four eggs;
- granulated sugar – 100 g;
- almonds – 100 g;
- milk – 300 ml;
- wheat flour – 30 g;
- powdered sugar – 70 g;
- cocoa – 5 g;
- vegetable oil – 10 ml;
- butter – 100 g;
- pudding – 18 g;
- chocolate – 50 g.
Step-by-step instruction:
- Beat sugar and egg whites until stiff peaks form.
- In another container, combine almost all the almonds, flour, sugar and cocoa. Carefully combine the resulting mixture with sweet proteins.
- Draw a beautiful heart on parchment. Grease the parchment inside it and distribute a third of the dough. Sprinkle with the remaining almonds and bake in the oven for 20 minutes at 170℃.
- We bake 2 more cakes in the same way.
- Prepare the pudding according to the instructions, combine it with chocolate and cool.
- Beat butter and powdered sugar. Add chocolate and pudding little by little and mix.
- Assembling the cake: grease the cakes with cream and line them up one on top of the other. Place in the refrigerator for a couple of hours.
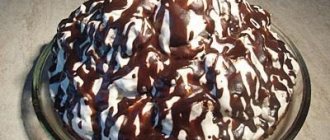
- You can decorate the dessert with whipped cream and chocolate chips.
Cake decoration
In order for a dessert to attract everyone's attention, you need to take time to decorate it. The most common decorations are:
- Figurines and flowers. There is nothing easier than decorating a dish with ready-made figures. They look interesting and original. Every cook will be able to select amazing elements and use them to create a real culinary masterpiece.
- Variety of colors. Flower arrangements are beyond compare. Most often they are used to decorate desserts prepared for beloved women. The recipient will appreciate such a surprise.
- On a stand. If you want to not only decorate the cake, but also give it originality, you should consider decorations on a stand. Such decorative elements are found when decorating wedding desserts; they look incomparable.
Heart-shaped cakes attract special attention. They need no introduction, and without words it is clear that the giver has tender feelings for the recipient. If you want to talk about your love, you shouldn’t invent something new. All you have to do is prepare a treat and surprise your loved one with your culinary skills. The surprise will be remembered for a long time and will bring a lot of positive emotions.
How to make “Honey Cake “Heart””
To prepare honey cake, prepare all the necessary ingredients. Sift the flour through a sieve. If necessary, melt some honey in the microwave.
To prepare the dough, take a spacious pan. Mix eggs with sugar in it. Then add chopped butter and honey. Place on the fire and bring to a boil while stirring constantly. The honey and butter will melt and everything will turn into a homogeneous mass.
Remove the pan from the heat and immediately add the baking soda. Mix everything vigorously. When honey reacts with soda, the whole mass will begin to foam strongly and increase in volume. After vigorous stirring, cool everything until lukewarm.
Add flour to the warm mixture and knead into a homogeneous dough. It will stick to your hands quite a bit, but you don’t need to add extra flour, otherwise the dough will become hard. Wrap the finished dough in cling film and refrigerate for 1 hour. During this time it will rest and it will be convenient to work with it.
Divide the dough into 3-4 parts and roll into a thin layer. Cut out a heart shape and prick it all over with a fork. Place in the oven preheated to 180 degrees for 3-5 minutes.
Bake all the cakes and cool them.
To prepare the cream, whip the heavy cream with powdered sugar into a fluffy and stable cream. Then stir in the cream cheese.
Using a pastry bag, pipe the cream over the entire surface of one cake layer. Then cover with the second cake layer.
So collect the whole cake. Cover the top of the cake with cream. Place the cake in a box, cover it and put it in the refrigerator overnight to allow the cake to soak.
Decorate the finished cake to your liking. Enjoy your tea!
Rate the recipe for Honey Cake “Heart”:
average rating: 5.0, total votes: 1
I prepared: Editors recommend: Similar recipes:
How to decorate a heart cake at home
Cover the cake with a thin layer of cooled cream. Refrigerate. Then apply the second and third layers in the same way. Level the surface. Now you can use decorative elements.
How to decorate a heart-shaped cake: flowers from mastic or fruit pastille
Fruit pastille perfectly replaces difficult-to-handle confectionery mastic. From it you can easily form flowers with leaves, letters and ornamental elements to decorate a heart-shaped cake.
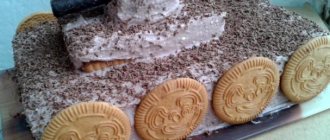
How to Decorate a Heart-Shaped Cake: Marshmallow Braids
To add a warm and cozy look to your heart cake, make it a knitted scarf like this.
To do this, warm up the marshmallows a little, pull them into long ropes and braid them. Place the braids on the base - a thin layer of marshmallows. Cut out a heart shape to the size of your cake, and place on top of the cream layer.
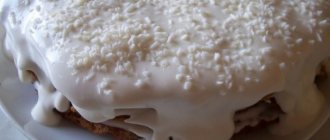
How to decorate a heart-shaped cake: decorative powder
A cute and unpretentious way to decorate a heart cake at home when you have neither time nor materials for creativity. The colorful confectionery powder will do everything for you.
Read also: How to make strawberry meringue hearts: a recipe for Valentine's Day
Read also: Chocolate brownie cake: a recipe for those who don’t have time to cook
Read also: Sweet heart: cupcake recipe for Valentine's Day