9
Prepared by: Dashuta
04/14/2014 Cooking time: 12 hours 0 minutes
| Save | I cooked) | Estimate |
It's every boy's dream to receive such a wonderful cake for the holiday! What a child, even an adult man would be delighted with such a gift, so let's spoil our beloved boys!
Cake "Tank" made from mastic
Test composition:
- butter - 250 g;
- premium flour (white) – 0.3 kg;
- pasteurized milk – 160 ml;
- cocoa powder – 50 g;
- regular granulated sugar – 250 g;
- baking powder – 30 g;
- chicken eggs – 4 pcs.
Buttercream composition:
- butter – 350 g;
- condensed milk – 350 ml.
Mastic composition:
- powdered sugar – 900 g;
- invert syrup – 175 ml;
- gelatin – 15 g;
- drinking water – 2.5 tbsp. l.;
- vanillin – 12 g;
- a pinch of citric acid;
- food colorings.
Step-by-step preparation:
- Mix the dough. In a bowl, combine sugar, cocoa, butter, milk, beat everything with a mixer. Without ceasing to process the mass, add wheat flour along with baking powder. The result will be a mixture of medium thickness.
- Coat a round baking pan (23 cm in diameter) with butter and place the dough into it. Bake the biscuit for 50 minutes. in a preheated oven (190 °C).
- Beat the butter with a mixer, add condensed milk. The cream should be fluffy and homogeneous.
- To prepare the cake, you can use ready-made mastic (600 g), but it is better to make it yourself. Soak the gelatin in a bowl of water. It should swell. Place the container in a plate with hot water so that the product dissolves well. Heat the invert syrup in the same way and combine with gelatin.
- Sift powdered sugar into a bowl. Add citric acid, vanillin and a warm mixture of gelatin and syrup. Mix the ingredients like regular dough. Knead the mastic with your hands until it is homogeneous and has a plastic structure.
- Divide the cooled cake lengthwise into 3 parts. We cut off two parallel sides (we will use them to make the upper part of the tank.)
- Place the donuts in a stack, covering each one with cream. We make the top of the tank and also coat it with a sweet composition. Place the mixture in the refrigerator for 1 hour.
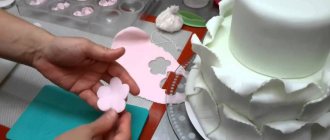
- We divide the mastic into 6 parts, paint each in different colors: two shades - brown and dark gray, the other 2 - green).
- Roll out a layer of mastic (green). On top of it we place pieces of a mass of a different color in spots. Roll out the sheet with a rolling pin to obtain a flat cake intended for “camouflage”. Cover the cake with it, repeating all the curves of the “tank”.
- From black mastic we sculpt caterpillar tracks, a barrel, and wheels. You can add some other details to make the product look as much like a tank as possible. We attach all the elements to the finished “combat vehicle”.
The tank-shaped cake is ready. It is very easy to make parts from mastic, because it is as plastic as plasticine.
Making an elastic mass
You will need:
- 850 g powdered sugar;
- 400 g marshmallow candies.
- 4 tbsp. l. water;
- 1 tsp. vanillin.
The easiest way to prepare an elastic mass is from marshmallows - ready-made soft marshmallows. It is sold in the form of multi-colored Bon Paris-type candies. In addition, you will need powdered sugar.
The candies should be slightly warmed in the microwave until melted. In this form, the sweet mass becomes soft and plastic. It must be thoroughly kneaded, gradually adding powdered sugar. If the mastic turns out to be hard, then you just need to slightly warm it up, knead it with your hands and continue kneading. If the mixture begins to crumble, add water or lemon juice to it. During cooking, add a little green food coloring.
It is very convenient to roll out the mastic, placing it between sheets of polyethylene. Then you can easily cover the entire surface of the cake with it. The thickness of the mastic should be approximately three millimeters. A thicker layer creates extra volume. And if you roll it very thin, the surface can be easily damaged. Also, stains from the cream may appear through a thin layer.
Creamy dessert for real men
Ingredients for the cakes:
- premium white flour (sifted) – 150 g;
- granulated sugar – 150 g;
- chicken eggs – 6 pcs.;
- hot drinking water – 30 ml;
- a pinch of salt.
Butter cream composition:
- instant coffee – 35 g;
- butter (softened) – 300 g;
- chocolate (bitter) – 2 bars;
- highly heated purified water - 2 tbsp. l.;
- powdered sugar – 100 g;
- table salt – 2 g.
To decorate the cake:
- one waffle roll;
- cookies (round shape) – 15 pcs.
Instructions for making the “Cream Tank” cake:
- Place eggs in a bowl. Separate the yolks from the whites.
- Place 120 g of granulated sugar and the required volume of water in a container. Beat the ingredients with a mixer, then add the yolks and flour, continuing to mix everything.
- Beat regular sugar (30 g) with salt and egg whites into a thick foam. We combine the composition with the dough. Divide the resulting mass into six parts.
- We treat a round baking container (diameter 23 cm) with oil. Spread one piece of dough in an even layer. Bake the pieces in a preheated oven (190 °C) for 5 minutes. We get 6 cakes.
- Let's prepare the cream. Dissolve the coffee in hot water and cool to room temperature. Combine the mixture with powdered sugar, salt, and melted butter. Beat the mixture with a mixer until smooth.
- Place 6 tbsp in a separate bowl. l. cream. Melt the chocolate in the microwave. Add it to the main part of the cream and mix.
- Grease the cooled cakes with chocolate cream and stack them. Align the sides of the cake to form a rectangle. We make the upper part of the “machine” from scraps. Cover it with cream and put it in the refrigerator for 1 hour.
- Let's start decorating the cake. We make the barrel of a tank from a waffle tube and coat it with cream. We divide the deferred composition into two parts. We paint one half with green food coloring, and brush the entire surface of the tank with coffee and green cream to create camouflage.
- We turn round cookies into wheels and a hatch. Using a pastry bag filled with fluffy mixture, draw a caterpillar ribbon. If desired, the cake can be sprinkled with chocolate or coconut shavings.
Place the product in the refrigerator for 2 hours. This recipe is very simple, even an inexperienced housewife can handle it.
Preparing the cream
You will need:
- 200 g butter;
- 4 tbsp. l. granulated sugar;
- 100 ml milk;
- two chicken eggs.
For Charlotte cream, the ingredients should be taken out of the refrigerator in advance so that they are at the same temperature. Beat eggs into milk and add granulated sugar. Place over medium heat and, stirring, bring to a boil. Boil the mixture for three to four minutes. After this, cool to room temperature.
Beat the butter with a mixer at medium speed until white, then gradually add the milk mixture. The result is a very fluffy and delicate cream, to which you only need to add vanilla sugar for flavor.
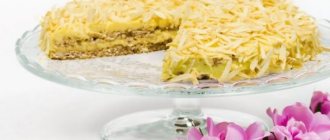
This cake has another unusual ingredient - kiwi jam. To make original jam, you need to peel and grind several (4-5 pieces) ripe fruits in a blender. Add sugar (150-200 g) and lemon juice (2 tbsp) and cook over medium heat. After boiling, add gelatin (1/2 sachet), stir and continue cooking for about ten minutes. You can add a few drops of green food coloring to the cooled mixture to enhance the color.
With an edible picture
Composition of the cakes:
- premium white flour – 700 g;
- eggs – 2 pcs.;
- milk – 145 ml;
- baking soda – 7 g;
- cocoa powder – 15 g;
- regular sugar – 120 g.
Custard composition:
- cognac – 50 ml;
- vanillin – 8 g;
- granulated sugar – 180 g;
- butter – 200 g;
- whole milk – 0.4 l;
- premium white flour – 300 g.
To decorate the cake:
- chocolate (milk) – 100 g;
- milk (cow) – 15 ml;
- waffle picture with the image of a tank.
Step-by-step preparation:
- Using a mixer, beat milk, chicken eggs and granulated sugar. Add cocoa, flour and baking soda (quenched with vinegar) to them. Knead the dough with your hands. It is important that it turns out without lumps.
- Divide the dough into 6 parts. Roll out each one into round cakes of the same size. Place them on a greased baking sheet and bake in the oven (190°C) for 10 minutes. Let the cakes cool.
- Stir the sifted flour in cold water. Combine sugar and milk in a ladle, heat on the stove, then pour in the flour mixture and cook for 3 minutes.
- Add butter, vanilla sugar and cognac to the cooled mass. Beat everything with a mixer until smooth. Color the fourth part of the cream green with food coloring.
- Grease the cakes with white cream and stack them on top of each other.
- Place chocolate and milk in a bowl and heat in the microwave. Coat the entire surface of the cake with this mixture in an even layer (don’t forget about the sides).
- Place the waffle picture on top and press it with your hands so that it sticks well.
- Place the green cream in a pastry bag and decorate the cake as desired.
To make the waffle picture brighter, you can cover it with syrup or fresh honey. Place the product in the refrigerator for 4 hours.
Second phase
Flour must be introduced into the egg-sugar mixture very carefully, sifting it through a sieve and spraying it evenly over the surface. The dough must be mixed with a slotted spoon, making vertical movements so that the flour is evenly distributed.
To bake a biscuit, you need a rectangular or square baking tray with high sides. Line the bottom and walls with special baking paper. Pour the finished dough into the prepared container and bake in a hot oven (190-200 degrees) for half an hour.
Original DIY World of Tanks cake
Test composition:
- white flour – 100 g;
- whites from 14 chicken eggs;
- granulated sugar – 0.5 kg;
- peanuts (roasted) – 300 g.
Vanilla cream composition:
- whole milk – 150 ml;
- butter – 200 g;
- egg – 1 pc.;
- white sugar – 180 g;
- vanillin – 1 pack;
- cognac – 15 ml.
Cream composition:
- butter 400 g;
- chocolate – 400 g.
To design the product:
- mastic – 1.5 kg;
- food colorings.
Step-by-step preparation of the cake:
- Chop the peanuts into pieces with a knife.
- Using a mixer, beat the egg whites and sugar (100 g) into a thick foam. Add sifted flour, 400 g of sugar and nut crumbs to the resulting mass. Mix the ingredients with a spatula. Divide the resulting mass into two parts.
- Line the baking container with parchment paper. Spread one piece of dough in an even layer and bake for 60 minutes. in the oven (190 °C). Remove the workpiece from the mold and cool. We bake the second cake in the same way.
- Let's make buttercream. Place eggs, sugar and milk in a saucepan. Place the container on the stove and heat it, remembering to stir constantly. Place the finished mixture in the refrigerator.
- Beat the butter with a mixer until it becomes fluffy. Continuing to stir, gradually add the now cooled mixture, vanillin and cognac.
- Cut the cakes lengthwise into two layers. Coat them with cream and stack them.
- Using a mixer, beat butter and chocolate (melted) until smooth.
- Coat the surface of the cake with the resulting brown cream.
- We paint a kilogram of mastic light green and roll out the cake. Small pieces of the mass can be painted black, brown, dark green, yellow. We lay them out over a layer to create a camouflage pattern and go over them with a rolling pin.
- Cover the cake with the resulting sheet, cutting off the excess. We put the product in the refrigerator.
- Using our imagination, we sculpt a tank, grass, and stones from mastic.
- Roll out a flat cake from the black part and cut out the letters “World of Tanks” from it.
- Using a mixture of drinking water and a brush, we secure all the parts.
We put the World of Tank cake in the refrigerator for several hours so that it is well soaked. This is the best gift for fans of the famous computer game.
Cooking process
Beat chicken eggs with a mixer with powdered sugar until fluffy. Continuing mixing, gradually add first sour cream, then condensed milk.
Add flour, previously sifted and mixed with cocoa powder and baking soda, into the resulting mixture. The consistency of the dough should be similar to thick sour cream. In a preheated oven, bake three layers one at a time.
To make it convenient to remove the finished cakes from the mold, it should be pre-greased with oil and lined with parchment paper.
The cream contains butter (150 g), condensed milk (half a can), egg yolks (two or three pieces) and cocoa powder (half a pack). By thoroughly mixing and whipping all the ingredients, you can get a delicate buttery cream with a pleasant chocolate shade. The finished cakes are cut into separate parts in accordance with the prepared pattern. The silhouette of a military machine is formed from them. The tank cake is evenly coated with cream and placed in the refrigerator overnight to soak and harden. You can decorate it the next day using pastry mastic, which will smooth out all the contours of the product and help make it more realistic.
Advantages of ordering from us
“Tortarium” maintains a high level of quality of desserts and service:
- products with a completely natural composition: without preservatives, artificial colors and flavor enhancers;
- amazing taste of cakes: new combinations or familiar fillings - the hands of our masters create magic;
- prompt and careful delivery throughout Moscow;
- price without additional payments - 1700 rubles / kg for any complexity of the order;
- individual approach: at the client’s request, we will replace any ingredient.
Order a cake for the date you need on the website or by calling +7(495) 722-62-37. You can also click on the “Call me back” button, and we will contact you promptly.
Decor
Let's start designing the product, clearly using the master class:
- We make ordinary mastic, as the master class shows, paint most of it dark green, a small piece black. We select a part to cover the body of the “Tank” cake, and pack the rest in cellophane so that the mastic does not dry out.
- Roll out a thin layer of green mastic with a larger diameter than the tank body.
- We carefully tighten it, smooth out any air bubbles, and trim off the free edges. We don’t throw away the remaining mastic; they will be useful for covering the tower. To make it easier to cover the bottom of the tank (the mastic layer is quite large), roll it out on parchment, then lift it and turn it over directly onto the surface of the cake.
- Separately, coat the tower with cream on a plate, also roll out a layer of green mastic, cover the tower and release the air.
- Carefully transfer the round part to the center of the “Tank” cake for boys and men and press it down a little with your hands. To ensure that the tower sticks well, you can grease its bottom with cream or syrup.
- Now we roll out a long cord from green mastic – slightly larger than the diameter of the tower. We lay it at the base of the tower to hide the unsightly seam.
- We make the barrel: we cover a thin wafer tube with a rectangle of green mastic, having previously sealed one edge with black mastic. Roll out the tube in mastic on the board to expel the air.
- Carefully lift the tower, as in MK (master class), stick a tube into the body under its base, cover it with the tower and smooth it out.
- Now we glue a thin strip of green mastic to the free end of the barrel, simulating thickening - the barrel is ready exactly according to MK.
- Now we take round chocolate cookies (according to MK - double, with cream inside, they must be divided), grease each with cream or sandwich the lower part of the side surfaces of the body with it - we form wheels. On each side you need to attach 4 cookies, if it is small - 5 pieces.
- Then we cut out two rectangles from black mastic, the length of which should be slightly greater than the length of the tank body.
- Using a fork, we make longitudinal dents on both sides and up to the center of the strip, simulating a caterpillar directly on the mastic.
- We cover the top of the cookies with these strips, cut off the excess, and slightly tuck the strips under the bottom.
- From unpainted white mastic we glue 2 headlights on the front - flattened circles.
- We make a hatch in the center of the tower - we lay out a rim from a lace, separately we make the tank driver's head - a yellow ball (head with eyes), a green helmet on top - and lay it inside the hatch.
- We make a hatch cover according to MK - a circle 0.5 cm thick and with a diameter like a hatch. We insert a toothpick into it, stick it in the back of the base of the hatch, and lean it against the tanker’s head.
- Cut out a small rectangle from a black piece. We glue the second driver's hatch to the front of the tank hull.
- Using a toothpick, draw the relief on the tank turret directly over the mastic.
That’s it, the “Tank” cake for men is ready to serve. If you want to achieve greater strength and adhesion of parts, the product can be placed in the refrigerator overnight. Also, additionally, the bottom cake can be layered with cream; it is advisable not to layer the top (tower), otherwise it may crumble when transferred to the body.