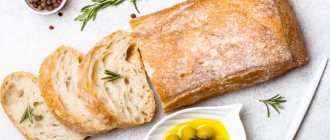
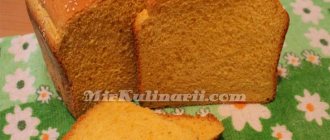
I want to tell you how to bake rye bread in the oven
No matter what diets we indulge in, not many people will risk giving up bread, and even then only for a while. Bread is present at any feast, on a trip, on a hike.
You can bake bread in the oven in any way - yeast, unleavened, flatbread, lavash, etc. Mainly wheat and rye are used for baking, other cereals are used as additives.
PARTNER NEWS
Other Homemade Rye Bread Recipes
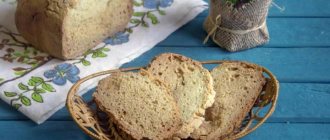
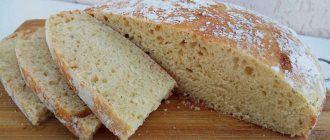
Our family really loves rye bread, which is baked from an equal mixture of rye and wheat. This is our family recipe, which I am happy to share with you. The process is simple and does not take much time, but the result is excellent, and delicious bread on the table.
Variations of use
We are used to eating bread with soup or making sandwiches out of it, but besides this there are a lot of options for using bread! You can make delicious toast from it! And even if you don’t have a toaster, you can cook equally delicious and fried toast in a regular frying pan. To do this, do the following:
- Heat a frying pan and pour in some butter. You can also fry avocado or sesame seeds in oil.
- Immediately dip a slice of bread in the oil on one side and press the bread firmly into the pan with a spatula.
- Fry the bread on one side for about 2-3 minutes.
- Then turn the bread over, add a little more oil and press the back of the bread into the pan.
- Place toast on a plate lined with paper towels to absorb any remaining oil. Toasts are ready!
Rye bread in the oven
There are various deviations from the main recipe, resulting in different flavors.
- In the basic recipe for homemade bread baked in the oven, as I have already noted, there is an equal amount of rye and wheat flour. Take these two ingredients and one and a half glasses of water.
- You will need a tablespoon each of dry yeast and vegetable oil.
- Half a tablespoon of sugar and one teaspoon of salt.
Preparing the dough for baking bread in the oven begins with the dough: Mix sugar with yeast, add warm water, and knead well.
Then set aside for 15 minutes for fermentation to begin. Meanwhile, in a separate container, mix both types of flour, add vegetable oil and salt.
Gradually pour water with yeast and sugar into this mixture with continuous stirring, and finally knead the dough.
You can also make homemade kvass from rye bread
To prepare bread in the oven, knead the dough so that it does not stick to your hands, cover with a towel, and leave in a warm place for an hour until it rises. It should approximately double in volume.
After the dough has risen, it should be kneaded well again and placed in a pre-greased baking dish.
To properly bake bread in the oven, the dough should also rise slightly in the pan, so cover it with a towel and leave for half an hour.
In the meantime, preheat the oven to 200 degrees and bake the bread for 43-45 minutes. When the bread is ready, you need to take it out of the mold and cover it with a towel so that it leaves the hard crust faster.
By slightly changing the proportions and adding 5-6 cloves of garlic, we get very tasty garlic bread.
In this case, for 400 grams of wheat flour and water you will need 300 rye flour. Dry yeast and salt 2 teaspoons each, and sugar 5 teaspoons. Add 2 tablespoons of vegetable oil to the dough, and leave another one to grease the mold.
The cooking technology is also slightly different from the basic one. Here the yeast is mixed with sugar and half the volume of water. Place the mixture in a warm place for half an hour.
And when the yeast begins to sparkle, add the rest of the water, vegetable oil, rye flour and salt. After you mix everything well, you can add wheat flour, chopped garlic, and knead the dough well and thoroughly. Next, cover with a towel and leave to rise for an hour and a half.
Having spread the dough into greased pans, cover it with a towel and leave to rise for another 45-50 minutes. Now you can bake bread in the oven.
Here the oven is heated to 220 degrees, and the bread is baked for 50 minutes. After baking, it is advisable to sprinkle it with plain water and wrap it in a towel to cool.
Recipe for rye bread in the oven
Baking bread in the oven according to this recipe will not take much effort and time, but you will get homemade delicious bread.
Ingredients:
- rye flour – 1.5 tbsp;
- wheat flour – 1.5 tbsp;
- warm water – 1.5 tbsp;
- dry yeast - 1 tbsp. spoon;
- vegetable oil – 1 tbsp. spoon;
- sugar – ½ tbsp. spoons;
- salt – 1 teaspoon.
Preparation
Combine the yeast with sugar, pour warm water over it and place in a warm place for 15 minutes until the yeast begins to sparkle.
Sift both types of flour and mix them in a separate bowl, add salt and vegetable oil to them. Then, add yeast water to this mixture a little at a time and knead the dough.
Cover the bowl with the dough with a towel and place in a warm place for 1 hour until it increases in volume.
Sprinkle the table or other work surface with flour and place the dough on it, remember it well and transfer it to a baking dish, which must first be greased with vegetable oil.
Cover the pan with cling film and leave the dough for 20 minutes.
During this time, preheat the oven and cook the bread in it for 40-45 minutes at 200 degrees.
Today we will share with you recipes for a delicious homemade product for different tastes.
Homemade bread recipe with raw yeast
Today, raw yeast is rarely used, because there is a good alternative - dry yeast.
But for baking our today’s hero, it is recommended to use the first ones, because it’s not for nothing that they are called “live”. They give special softness and fluffiness to the bread. In any case, try it and see what you like best.
Ingredients:
- Raw yeast 15 gr.
- Butter 15 g
- Egg 1 piece
- Sugar 1 tsp.
- Flour 11 tbsp.
- Sunflower oil 1 tbsp.
- Salt 1/2 tsp.
Preparation:
1. The most important stage is the very first. Take a deep bowl and put yeast, butter, sugar and a third of a glass of water there for easy mixing.
When purchasing live yeast, make sure it is fresh. Their freshness is the key to successful baking.
Stir all ingredients thoroughly until the liquid becomes homogeneous.
2. Next, mix in the egg and beat lightly. Just beat with a fork, or use a whisk.
3. Then add 8 heaped tablespoons of flour, continuing to stir the mass with a spoon. The flour must be sifted, and it is even better to do it twice.
During this action, it is saturated with oxygen molecules and becomes more airy. This will ensure that the dough rises well and produces fluffy baked goods with plenty of air pockets inside.
First, start kneading with a spoon. When you have added almost all the flour and it becomes difficult to mix, add two or three more tablespoons of flour and continue kneading with your hands.
The finished dough should be slightly sticky and soft. If you transfer it from hand to hand, it seems to flow smoothly. And it's not thick. Pay attention to this. If it turns out too thick, it will be more difficult for it to rise.
4. Then add sunflower oil and salt and continue kneading. When you have added all the butter, the dough is ready.
Now it's time to place it in a bowl, cover with a towel and leave in a warm place for 25 minutes. It's better to put it somewhere near the battery.
Or, if there is no such warm place, you can turn on the oven and place the bowl of dough on top, where the burners are. The oven will heat up, the air space nearby will also heat up, and the mass will quickly increase in volume.
It should double in volume, or maybe more. It all depends on the quality and freshness of the yeast.
5. When this happens, place it on a work surface sprinkled with flour, and without the help of a rolling pin, stretch it to a thickness of 1.5-2 cm. It is soft, flexible and quite easy to do. Therefore, at this stage there should be no difficulties.
When you have given it the desired shape and thickness, the top must be sprinkled with flour.
6. After this, fold the two opposite ends towards the center, as if covering the sprinkled flour inside. We pinch along the other edges, press a little on top and form our bread in the form of an elongated loaf. This is done to make it easier for him to bake.
7. Sprinkle the baking sheet with flour, transfer it and leave it to “cook” for 10-15 minutes.
Bake for 20 minutes at 200 degrees in a preheated oven.
What we get is a fluffy, delicious loaf with a crispy crust. It rose well and was perfectly baked. And a larger number of air sinuses formed inside. Which makes it light and airy! And of course it is very tasty.
Usually it is not even allowed to cool. So they eat it hot, which is called “hot, hot.”
Delicious yeast-free bread cooked in the oven
There are people who absolutely do not use yeast. They say it’s not natural, they contain impurities and unknown ingredients.
Everyone has the right to their opinion and, in this case, to their own recipe. Therefore, we will share with you a wonderful recipe for yeast-free bread. It will rise due to kefir. And to make it even healthier, we’ll make it whole grain, with cumin and basil. So!
Ingredients:
- Whole grain wheat flour 500 gr
- Kefir 500 ml
- Soda 1 tsp.
- Olive oil 1 tbsp.
- Salt 1 tsp.
- Basil
- Zira
Preparation:
1. Take a deep bowl and mix all the dry ingredients in it: flour, salt, seasonings. Do not forget that the flour must be sifted once or twice.
If you don’t find the above spices, you can add a little chopped cumin and coriander seeds. Or other spices suitable for baking the product.
2. Pour half of the kefir into a glass, quench it with a spoon of soda. For a faster reaction, the mixture should be stirred.
3. Bubbles will immediately appear in the kefir, we will pour it into a bowl and mix thoroughly. If the mixture seems thick to you, add a little more kefir. If liquid, add flour.
Kefir for baking does not have to be fresh. A product that has been left in the refrigerator for 3 to 5 days is ideal.
4. Pour a little vegetable oil and knead a good strong dough. We form a “bun” and place it in a bowl. Cover it with a towel and leave it in a warm place to infuse and rise.
This will take about 40 minutes.
5. Cover a baking sheet with parchment paper or foil and sprinkle with flour. Lay out the workpiece and cover it with a wet towel. Place in a warm oven for 30 minutes.
6. Then you need to take it out, use a knife to determine the lines for “growth,” that is, cut the top crosswise, and put it in the oven again.
First you will need a temperature of 250 degrees. It should cause the dough to rise intensively, and it will only take 15 minutes.
After which the temperature should be lowered to 140 - 150 degrees. And let the dough bake for another 15 minutes. After this time, turn off the oven and do not remove the pan for another 10 minutes.
7. And finally you can take it out of the oven, but you need a little more time for it to rest. Then invite your family to try what we got.
And we got healthy, tasty bread, without yeast or starter cultures. You can add seeds or, as already noted, any other favorite seasonings to the dough.
The big advantage of this recipe, among other things, is the speed of preparation!So try it and share your impressions! And I hope everything works out for you.
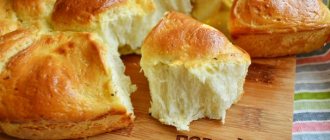
Homemade sourdough loaf
In this recipe, as you probably already understood, the main emphasis will be on the sourdough. The same one that our grandmothers and great-grandmothers made when baking bread in the oven. But to do it right, you have to try. And we will help you with this.
But as a reward we will receive a simply incomparable loaf.
Preparing sourdough
This process is not quick and therefore you need to be patient.
Ingredients:
- Raw water (not boiled) 100ml
- Flour of the highest or first grade 100g.
- Half liter glass jar
Preparation:
You can make more starter by keeping the proportions 1:1.
1. Pour raw water into a jar and add flour to it. Mix the ingredients thoroughly. You should get a liquid sticky paste without lumps.
2. Close the jar with a lid and put it in a warm place for about a day and a half. The optimal temperature will be 28 degrees.
3. Check the ground periodically. A sign that the fermentation process has begun will be an unpleasant odor and bubbles on the surface.
4. We wait until the mass becomes liquid and increases in volume two to three times. At the same time, light openwork bubbles will appear on the surface, and through the glass you will be able to observe many small bubbles, as if a needle had been passed through the mixture. It is at this time that it will be time to “feed” the starter.
5. Measure out 50 grams of the total mass. Place in another bowl and add 100 ml of water (raw, from the tap, as in the beginning) and 100 grams of wheat flour. Mix everything.
6. We throw out our first starter; we no longer need it. In the same jar (pre-washed) we place a new, fed starter.
7. Also, close the jar with a lid and leave it in a warm place for a day.
8. The mass should increase 2-3 times; in our case, fill the entire jar. So, it’s time for “complementary feeding” again. It should be noted that the second leaven turns out thicker than the first, this is normal.
9. Repeat the same steps. Measure out 50 grams of starter, mix in 100 grams of flour, 100 ml of water, mix and place in a warm place in a closed jar. You can make pancakes from the remaining starter; it is great for this.
10. You need to feed the starter until the time of “approach”, that is, its complete preparation, is 4-6 hours. You will also notice that it has begun to “fall” along the walls of the jar.
11. To store the starter, you just need to put it in the refrigerator. And when you want to bake bread, you need to take 10 grams from the mixture, add 30 grams of flour, 30 ml of water to it and leave it to rise as we already know how to do it. And use for baking.
How to bake a sourdough loaf
We will need:
- Sourdough 260 gr
- Flour 600g
- Milk 70 ml
- Yogurt or any fermented milk product 200 g
- Sugar 1 tbsp
- Egg 1 piece
- Vegetable oil 50 ml
Preparation:
Prepare the starter in advance. Give it the opportunity to brew for the required amount of time.
1. Pour yogurt or other fermented milk product into the dough. Also pour in the oil, add salt and add the egg. Sugar can be used both regular and brown, cane. In the second case, the loaf will not be so sweet.
2. Sift the flour twice and mix all the ingredients, first kneading them with a spoon and then with your hands. For convenience, you can place the mixture on a table dusted with flour. Knead for at least 15 minutes.
The correct dough should be soft, pliable, homogeneous and practically not stick to your hands.
2. Place the finished dough in a bowl greased with vegetable oil, cover the top with film and leave for 3-4 hours.
During this time it should increase 2-3 times.
3. Divide the finished dough into 5 parts and roll one of them into a ball and immediately set it aside, wrapping it in film.
4. We also roll four pieces into small balls. We leave one, and remove the rest, covering them with a towel so that they do not dry out or become airy.
Roll it out into a small rectangular layer, grease it with melted butter and make transverse cuts in the amount of 6 - 7 pieces.
Then we roll it into a long roll.
Place the finished rolls around the perimeter of the baking dish. It is better to line the form with parchment paper.
Place the previously set aside ball of dough in the center and give it the desired shape.
5. Cover the future loaf with a lid or cling film and leave for another hour and a half to proof. It should increase approximately 2 times. Then grease it with yolk and sprinkle with sesame seeds.
6. This beauty is baked for 40 minutes at 180 degrees.
Yes, it takes more time to prepare a loaf of bread, but believe me, it's worth it!You may never want to buy it in the store again.
Homemade bread prepared in a slow cooker
And this recipe, as they say, is for the young and fast. Today, almost every kitchen already has a multicooker - a new miracle of technology. It bakes baked goods evenly and there is virtually no risk of overcooking or overcooking.
Many people don’t risk cooking bread in it, but in vain!We offer you an excellent recipe for such an occasion.
Ingredients:
- Flour 1 kg
- Vegetable oil 5 tbsp.
- Salt 1 tbsp.
- Sugar 1 tbsp.
- Dry yeast 1 tbsp.
- Warm water 500 ml
Preparation:
1. Pour yeast, salt, sugar into a bowl. In this case we will use dry yeast.
Pour warm water into the mixture. Mix thoroughly so that there are no lumps left. You can mix with a spoon, or you can shake with a whisk. It will be faster.
Do not use water above 38 degrees, otherwise all the yeast will die and the dough will not rise.
We send vegetable oil there and mix it into the mixture.
2. Next, little by little add sifted flour to the bowl.
Until the dough thickens, stir it with a spoon.
3. Once it becomes difficult, transfer it to a work surface and continue kneading with your hands. The dough should be dense and not stick to your hands.
It's best to knead it a little more abruptly. It will be better for baking in this miracle pan.
4. Grease the bowl of the pan with oil and place our dough there.
First you need to set the slow heating program. On different brands of this cookware it may be “heated”, “yogurt”, “jelly” or something similar. In a word, this should be the minimum temperature so that the bread does not bake, but rises. The dough should rest in this mode for 40 minutes.
5. Keep an eye on it, it should double in size.
6. After this, proceed to the next stage and set the “baking” mode for 55 minutes. When you hear the signal, you need to remove the product from the bowl and turn it over, placing it back on the other side in the bowl. The fact is that the bottom is already baked, but the top remains light and not fully baked.
We put it back on the “baking” mode, but for 50 minutes.
7. After the time has passed, the bread should be immediately taken out and placed on a towel. Otherwise, drops of water from the pan lid will damage the crust. Leave it like that. You shouldn’t cut it right away; it’s better to wait until it cools down a little.
But it can be stored for two or three days without losing its taste.
The result is soft inside, crispy outside, tall, delicious bread that you can cook every day!
Video on how to make delicious fluffy loaves
And finally, let me bring to your attention a video in which you can watch how to bake delicious bread. It will be baked in the form of your favorite sliced loaf. But the form is not the main thing. Anyone can do it. And most importantly, how beautiful and tasty it turns out.
These turned out to be such beautiful and tasty loaves. Do you want the same?! Then watch and cook for your health!
The video also tells many of the secrets of successful baking. Take note.
Today we looked at different recipes. And now you can choose any of the proposed ones. After all, the selection includes both quick options and longer preparation times. But they all have one thing in common - the baked goods turn out very tasty!
So all that remains is to take it and cook it! Do this only in a good mood, with love and desire. And then your bread will not only be tasty, but also healthy.
Bon appetit!
Homemade rye bread in the oven
The good thing about making bread at home in the oven is that you can add any ingredients to it, thereby making the taste more original.
Ingredients:
- rye flour – 300 g;
- wheat flour – 400 g;
- water – 400 ml;
- salt – 2 teaspoons;
- sugar – 5 teaspoons;
- dry yeast – 2 teaspoons;
- garlic – 5-6 cloves;
- vegetable oil – 3 tbsp. spoons.
Preparation
Mix sugar with dry yeast and half the indicated portion of water. Place this mixture for 20-25 minutes in a warm place. After the yeast begins to sparkle and a “cap” appears, add the rest of the water, 2 tbsp. spoons of vegetable oil, salt and rye flour, which do not forget to sift before doing this.
Mix it all and gradually add pre-sifted wheat flour. Add chopped garlic here and knead the dough. When it is ready, cover the bowl with the dough with a towel and place in a warm place for 1.5 hours. When the time is up, remember the dough and place it in a greased baking dish. Leave the dough in the pan for 40-50 minutes to proof. Preheat the oven to 220 degrees and bake the bread for 50 minutes. Then, sprinkle it with water, wrap it in a towel and let it cool.
Rye-wheat bread in the oven
Bread prepared according to the following recipe, thanks to the addition of honey and coriander, acquires an unusual and very pleasant taste.
Ingredients:
- wheat flour – 350 g;
- rye flour – 350 g;
- warm kefir – 250 ml;
- dry yeast – 1 sachet;
- salt – ½ tbsp. spoons;
- honey - ½ tbsp. spoons;
- coriander beans.
Preparation
In a food processor or bowl, mix kefir, honey, salt and yeast. Grind the coriander grains in your palms and then add them to kefir and other ingredients. Sift flour, both rye and wheat; if you want it to be more “black,” add a little more rye flour. Knead the dough and form it into a ball, which we place on a floured plate.
Using a knife on top of the dough ball, make a mesh, not small, and send it to a warm place for 20 minutes. You can preheat the oven to 50 degrees, turn it off and put the bread in there to let it rise.
After 20 minutes, place the bread on a greased baking sheet and place in a warm place for another 15-20 minutes. Preheat the oven to 270 degrees, sprinkle the bread with water and place on the top shelf of the oven for 10 minutes, then reduce the heat in the oven to 180 degrees and bake the bread for another 20 minutes. This way you will get delicious bread with a crispy crust.
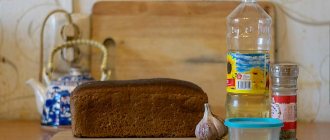
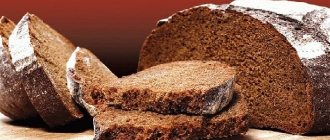
From rye flour
Bread baked using the presented method is known as “Borodinsky”.
It is this type of baking that has gained enormous popularity among Russian consumers and is well known in many countries near and far abroad.
What ingredients will you need?
To bake bread you will need:
- liquid honey - 15 g;
- Refined sunflower oil - 70 ml;
- rye malt - 4 tbsp. l.;
- drinking water - 800 ml;
- table salt - 12 g;
- yeast (dry) - 6 g;
- wheat + rye flour - 340 + 600 g;
- dry coriander - to taste.
Step-by-step cooking process
The sequence of stages for creating baked goods:
- Initially, you need to brew malt - cereal seeds that have gone through the fermentation process. To do this, pour 300 ml of freshly boiled drinking water into the mixture and cool the mixture slightly.
- Mix the remaining liquid with liquid honey.
- Sift both types of flour into a deep bowl, add table salt, yeast, dissolved malt, butter, and drinking water diluted with honey.
- Pour both types of pre-sifted flour into the resulting mass, then knead a little dough that sticks to your hands.
- Place the decorated ball in a spacious bowl treated with oil, cover it with film, and leave in a warm place for 1–1.5 hours.
- Knead the risen mass, transfer it to a cast-iron bowl treated with fat, lightly press the dough into the mold, sprinkle the product with coriander.
- Cover the workpiece with film/cloth and leave it like that for 30–40 minutes. for proofing.
- When the dough rises again into a lush mass, you need to leave the dishes with the product for 40 minutes. into an oven heated to 180 °C.
- The cooking time depends on the power of the oven, so at the final stage you need to check the readiness of the baking - pierce the loaf with a wooden stick, make sure that there is no stuck unbaked dough on it.
The hot product needs to be cooled a little, then removed from the mold and kept on a wire rack to cool completely.
What can I add?
Homemade Borodinsky bread, baked in the oven using conventional yeast, has a special taste if the recipe includes sunflower seeds lightly roasted in the oven, crumbled nuts, raisins soaked in boiling water, then dried and rolled in flour (preferably the Isabella variety ").
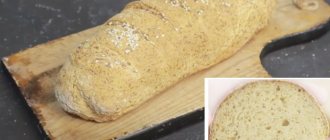
Sourdough rye bread
For beginners, we recommend starting a starter for rye bread first. There are many ways to prepare it. Below is a simple and effective way to make rye sourdough. The only thing you need is rye flour, water and time (but don't worry - rye flour starter is too much of a hassle; making it is not a labor-intensive process).
What are the benefits of sourdough bread?
With this type of baking, fermentation of yeast and lactic acid bacteria develops in the dough. During this process, we are talking about the anaerobic decomposition of the organic substances of the flour into simpler compounds with the participation of bacteria that metabolize sugars and disaccharides into lactic acid and other products. There are effects of acidification of the dough, proliferation of lactic acid bacteria, aeration, as well as the production of carbon dioxide with the help of enzymes. During the fermentation process, the dough receives large amounts of lactic acid. The benefits of different types of bread are known to everyone; what additional benefits do lactic acid bacteria provide?
- Lactic acid bacteria are present naturally in the intestines of a healthy person.
- Lactic acid inhibits the growth of pathogenic microflora, including the activity of staphylococci.
- Lactic acid prevents the spread of unwanted bacterial flora, inhibits diarrhea, constipation and indigestion.
- Lactic acid bacteria in our bodies are destroyed by antibiotics, alcohol and processed foods. This causes abnormal processes of digestion and absorption of food.
- Lactic acid is found in fermented vegetables such as cabbage, cucumbers, apples, beans, bread and fermented drinks.
- Lactic acid bacteria present in bread starters will effectively help eliminate nitrates, nitrites and other carcinogenic compounds.
- They stimulate the immune system and affect the functioning of the entire body.
- Such products will help restore beneficial bacterial flora in the human gastrointestinal tract.
- Such products can maintain freshness longer, even up to 10 days.
Rye sourdough recipe
Preparing rye sourdough will take about 5-6 days. Some bakers bake already on the third day, but it is better not to rush and let it mature well, it will be very different. Usually on day 6 you can already bake.
How to make rye sourdough – day by day
Day I
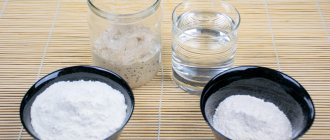
You will need:
50 g (about 5 tablespoons) rye flour, 50 g (about 5-6 tablespoons) water, 1 liter jar (the jar must first be thoroughly rinsed and scalded with boiling water).
Useful tips and tricks
Baking high-quality homemade bread is not an easy task, requiring attention and precise adherence to the technological process.
The following tricks and important culinary tips will help you achieve the desired result without making irreparable mistakes when creating baked goods:
- To give the baked goods that unique taste and aroma, as was done in Russian wood-burning ovens, you can use a special baking stone - a round or rectangular plate, which will not only maintain the correct temperature in the oven, but will also distribute it evenly throughout the cabinet. It will provide baking conditions for the muffin without the risk of interfering with the active growth of yeast, and will allow you to obtain an appetizingly crispy crust. A stone slab will create the effect of a hearth oven;
- It is advisable to bake bread in a cast-iron form, periodically lubricating the workpiece with drinking water using a culinary brush;
- To prepare high-quality cotton products, experienced chefs recommend using pressed (“live”) yeast, which has better properties compared to other options. You should know that 16 g of dry matter is equivalent to 50 g of fresh component;
- It is recommended to bake high-quality bread using sifted premium wheat flour in combination with a whole grain product containing gluten, which binds all the components of the recipe;
- if you are going to bake bread on a baking sheet, the sheet must first be heated in the oven, then cut the surface of the product in several places, sprinkle the workpiece with water from a spray bottle, and only after that send it to the oven;
- It is possible to knead the dough using a kitchen unit - a dough mixer, but you should not exclude working with your hands at any stage of preparation. The dough responds best to direct human participation in the process of kneading the composition;
- the liquid in the recipe, like all other components, must be in a warm state at the time of kneading the dough, because each ingredient is responsible not only for the taste of the bread, but also takes an active part in the formation of the delicate and spongy texture of the crumb and crispy crust;
- when combining products, you must make it a rule to pour flour into filtered water, but do not do it in the reverse order;
- It is possible to prevent burning of bread baked on a metal sheet using an old technique, for which you need to pour a layer of coarse salt on a baking sheet or place a cabbage leaf under each loaf and cover the product with foil;
- Oven temperature may vary between recipes. In addition, the baking mode depends on the power of the kitchen device, but the optimal indicator is considered to be 220–260 °C;
- To convince that the loaf is ready, you need to pierce it with a wooden stick or use a useful life hack - take the bread out of the oven and tap on its bottom crust. A ringing sound will signal that the process can be completed;
- The finished loaf should be taken out of the oven, sprinkled with drinking water, covered with a cotton cloth, and left in this form until it cools completely. If you cut the bun while it’s hot, the crumb in the middle will instantly stick together.
It is recommended to bake homemade bread in the oven, following proven recipes, so that the dough prepared with conventional yeast does not end up with an unpredictable and unpleasant taste.
How to make rye sourdough for bread?
The proportions of flour and water are approximate, they do not need to be measured precisely, this is not so important. The ratio of flour to water should be approximately 1:1 - that is, one serving of flour to approximately the same amount of water. Mix flour and water in a jar. The consistency should be quite dense. Cover the jar with cloth or gauze (so that air can pass through it) and let it stand in a warm place for 24 hours. The temperature at which we store it should be between 24 to 27 degrees Celsius. Rye sourdough for bread without yeast will increase the volume and bubbles will appear.
Day II
rye sourdough from the previous day - separate half, the rest should be thrown away, 50 g (about 5 tablespoons) rye flour, 50 g (about 5-6 tablespoons) water.
On the second day you will need half of the previous day's starter, some flour and water. And, as before, mix the ingredients and let sit in a warm place for 24 hours, covering the jar with a cloth or gauze. Our rye sourdough without store-bought yeast will gradually grow and ferment.
Rye dough starter – days III, IV, V, VI
Repeat the procedure every next day using the same proportions of flour and water. Before adding a new batch of flour, you need to select half of the previous portion and add flour and water in the same quantities as before.
On the third day, rye sourdough at home will clearly increase in volume, will have a lot of bubbles, its color will change and the smell will become more sour. Sometimes you can even smell acetone, but this is not a sign of failure. On the third day, by and large, you can already bake. However, it is better to wait until 6 or 7 days.
Every day the yeast-free rye sourdough matures more and more. After a few days, our product of symbiosis of yeast and bacteria will change color from gray to yellow-brown.
On the sixth day we have a fairly stable product suitable for baking. Homemade rye bread starter has a pleasantly sour smell. You can compare it to the smell of balsamic vinegar. Be careful, if mold appears on the surface, do not hesitate to throw everything away; this product cannot be used.
Day VII
On the seventh day, you can easily bake homemade rye bread with sourdough that is already mature enough and working correctly. When starting to experiment with baking, it is recommended to bake simple bread from rye flour.
Sourdough storage
The finished product is diluted in accordance with the proportions specified in the recipe. As a rule, this is not a large amount and there is quite a lot of starter left in the jar. How to store bread starter? If you want to use it for the next baking, you should store it in the refrigerator. There are several basic rules to follow when storing so that it does not spoil:
- The less starter in the jar, the better. It should be stored in the refrigerator in small quantities. Ideally, there should only be a few tablespoons left in the jar. With the rest you need to bake something or just throw it away, or give it to someone who is interested in this topic.
- Provide air access. The vessel or jar just needs to be covered with a lid, but loosely. Even in the refrigerator, air must flow to it.
- Activation before baking. Before using the starter, it must be fed again. You should remove it from the refrigerator and add about 100g of flour and about the same amount of water and stir. After about ten hours it will be ready for use. You should also remember that if you need more starter, it is better to add more flour and water just for feeding, you do not need to store a large amount of starter in the refrigerator.
- Long-term storage. The starter can be stored and used regularly for quite a long time. Of course, provided that it does not sit in the refrigerator for several months without feeding, that is, without adding flour and water.
Sourdough rye bread
This is a delicious bread made from wholemeal rye flour. It is especially suitable for those who are just starting their adventure with yeast-free baking. It does not require kneading, just mix all the ingredients with a spoon. In addition, it can be modified in many ways, depending on the taste, various additives can be used, for example:
- sunflower seeds,
- pumpkin seeds,
- caraway,
- sesame,
- flax-seed,
- etc.
Sourdough rye bread recipe
Ingredients
- sourdough for bread made from rye flour - 4-5 large spoons,
- 300 grams of rye flour,
- 300 grams of wheat flour,
- 500-600 ml warm water,
- 1 large tablespoon of salt,
- 10 grams of sunflower seeds.
Sourdough rye bread in the oven - preparation
Mix two types of flour (it is better to sift), add water, salt and leaven. Add most of the seeds, reserving a little to sprinkle on the top. Knead everything thoroughly to make a smooth dough. Knead the semi-finished product with a spoon until it is quite sticky. If necessary, add more water or flour if the dough is too thick or too thin.
Place the dough in a 35 x 12 cm tin lined with baking paper, wrap tightly with plastic wrap and leave to rise for 4-6 hours (or until the dough has clearly risen almost to the edges of the tin. The dough can also be served overnight or Place it in the refrigerator overnight to let it grow there, at a lower temperature it will grow slower and take longer.
Before baking, spray the top with a spray bottle and sprinkle with sunflower seeds.
How to bake sourdough rye bread in the oven
Heat the oven to a temperature of 240 °C. Place the pan in the oven and bake first for 10 minutes at 240 degrees Celsius, then lower the temperature to 200 degrees and bake for about 1-1.5 hours. The bread is ready when you tap the bottom and hear a dull thud.
Helpful tips for baking sourdough rye bread:
- This recipe for sourdough rye bread in the oven calls for a viscous dough that can be stirred with a spoon, it should be thick and sticky.
- It should not be too thick, otherwise the product will crack during baking and will crumble after baking.
- When placing the dough into the mold, press it down well using a spoon or wet hands to avoid empty air pockets inside.
- Such a large loaf should be baked for 1.5 hours, but not less than an hour. It should also be noted that these proportions are presented for a mold with dimensions of 35 cm x 12 cm. If you are using smaller molds, it is important to reduce the proportions.
- The proofing times given in the recipe are only approximate and depend mainly on the temperature at which the dough rises. The dough grows faster in summer, slower in autumn and winter.
- If your rye sourdough bread doesn't want to rise because it's too cold, you can help it a little. The oven should be heated to a temperature of 50 degrees and immediately turned off. Place the pan in the oven, wrapping it in cling film, and let rise. After about two hours, the oven can be reheated to 50 degrees and turned off.
- The problem of baking paper sticking can be avoided by removing the paper from under the bread after about 1 hour of baking. Remove the product from the mold and remove the paper, provided that it is so baked that this will be possible. When you remove the paper, place the loaf in the oven again, but without the pan.
- Baking with rye sourdough can be prepared without baking paper, regardless of the form in which it is baked. To do this, the mold can be well greased with oil or lard and sprinkled with something, for example, bran.
- The loaf should not be cut until it has completely cooled; it is preferable to cut it better the next day after baking. Freshly baked bread is moist and sticky in the middle.
- These products can also be baked in a bread machine. In addition, sourdough rye bread also turns out great in a slow cooker. The choice of modes depends on the model of the bread machine and multicooker. In a multicooker, proofing can be carried out using the “yogurt” mode, if your model has it, or by turning on the heating briefly, but be careful, the starter will die at high temperatures.
How to choose and use regular yeast for baking bread
Ancient baked goods, in their taste characteristics, were more reminiscent of such oriental baked goods as lavash or pita, since the base for them was prepared from plants and grains ground into flour, combined with water. Leavening dough using the fermentation method in baking was first used by the ancient Egyptians.
The work of lactic acid bacteria and yeast fungi is a complex biochemical process, as a result of which baked goods become fluffy, soft, uniquely tasty and aromatic, with many air pores.
To select and correctly apply regular yeast, you need to take into account the characteristics of the component:
- Fresh pressed yeast. This domestically produced product is presented in the form of grayish-brown rectangular briquettes containing up to 70% moisture. To use the composition, it must be dissolved in slightly warmed (30–35 °C) drinking water without adding salt. The resulting liquid solution should be poured into the dough at the rate of 5 g of the substance for each 100-gram portion of flour. The imported pressed mixture can be crumbled and added directly to the dough when kneading it. It should be taken into account that the foreign product is more active than its Russian counterpart. The lifting power of imported yeast manifests itself in approximately 30–35 minutes, while the effect of domestic compositions takes about 70 minutes. For this reason, when using foreign products, it is recommended to reduce their quantity by approximately 1.7–2 times.
- Dry yeast (active). This component, packaged in hermetically sealed bags, is presented in the retail chain in the form of noodles/pellets/grains. The dried and crushed granules are isolated from the air by a special protective shell, which also has another function - the ability to relax the dough. Dry yeast needs to be activated, for which it must be combined with purified water heated to 35–38 °C in a ratio of 1:5 with the addition of a small amount of granulated sugar and sifted flour. The resulting mass should be kept warm for up to 10–15 minutes. The high-quality composition forms a lush foam “cap”. When using Western-made live bacteria, their quantity should be reduced by approximately 4–5 times.
- Dried yeast (instant). This product is made in the form of mulch granules using the latest technologies (emulsifier/drying). Such yeast does not need activation, it dissolves instantly, so the composition can be immediately poured into flour and mixed thoroughly. In another embodiment, the product is supposed to be introduced into the bowl (bread dough) during its kneading. When using an imported analogue with high enzymatic activity, for example, Saf-Levure, its amount should be reduced by 4–5 times.
Homemade bread in the oven (both sponged and straight doughs are prepared with ordinary yeast) can be baked using different methods, depending on the composition of the workpiece prepared using live bacteria.
When choosing yeast, you need to consider the following nuances:
- check the expiration date of the product. For a compressed composition, this period does not exceed 24 hours. When stored at room temperature (t 0...+4 °C), such a component can be used within 14 days. This period will increase to 2–3 months. when placing yeast in the freezer. Dry/dried formulations will last in the refrigerator for up to 1 year, but the freshest product has the best properties;
- pressed yeast should have a pleasant aroma and a creamy pinkish color. When you press on a freshly prepared bar, it will crumble, but not smear. A darkened briquette with plaque on it is a sure sign of a spoiled product that must be disposed of;
- To ensure the quality of dry/instant yeast, you need to check the integrity of the packaging, then simply shake the mini-bag - its contents should be free-flowing, but not move around in one lump.
Despite all the attractiveness of imported products, the best option would be domestic yeast, which never contains preservatives or “newfangled” additives that are undesirable for creating an ideal cotton product.
Sourdough rye bread in a bread machine recipes
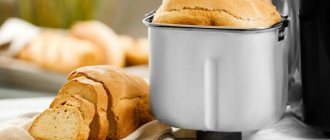
Using a homemade bread maker, you can easily prepare yeast-free bread. It is very convenient to proof the dough in a bread machine using the programs provided by the manufacturer; the machine itself will take care of the required temperature conditions, and you will not need to constantly monitor the temperature, as happens in the oven.
Yeast-free rye bread with sourdough recipe
Ingredients:
- 400 g of sourdough;
- 400 g rye flour, you can also use a mixture of wheat flour and rye flour, then the bread will look much better, since 100% rye bread is quite heavy and the taste is not for everyone;
- 160 ml warm water;
- a teaspoon of salt;
- a spoonful of sugar (you can use honey);
- tablespoon rast. oils
Sourdough rye bread in a bread machine - preparation
Rye bread is baked in a sourdough bread machine, just like regular bread with yeast. We put all the ingredients in the bread machine bucket in the order provided by the manufacturer. At the end, rye sourdough is added to the bread machine. To bake bread, you can use the “gluten-free” program or the program for rye bread. The program should last approximately 4 hours.
You can also bake wheat bread with rye sourdough.
Whole grain wheat bread with rye sourdough in a bread machine
Ingredients:
- 300 ml warm water,
- about 200 g of sourdough,
- 470 g whole grain wheat flour,
- 1 tablespoon olive oil,
- 1 tablespoon sugar,
- a pinch of salt.
We put all the ingredients in a bucket and set the program to “whole bread”, size M or medium. The mixing, rising and baking time should be about 4 hours, depending on the bread machine you need to select the appropriate program.
Thus, if you have already mastered rye bread without sourdough using yeast, you should try baking rye or rye-wheat sourdough bread. This is not a labor-intensive task at all; growing and feeding will not take you too much time.
PARTNER NEWS
Watch the video recipe
Kitchen: Author's. Cooking time: 3 hours 20 minutes. Number of servings: 900 g Finally, I gathered up the courage and baked some bread with pressed yeast. To be honest, I have long wanted to replace dry yeast with pressed yeast. After analyzing the information obtained from forums dedicated to baking, I found a solution to the problem.
Now I’m happy to share my experience =)
Preparing the yeast
Divide a 100 gram pack of yeast into 8 equal parts. Each piece weighs 12.5 g, which corresponds to 1 tsp. dry yeast.
I took one of the basic bread recipes and replaced dry yeast with compressed yeast.
Place 2 pieces of yeast into a measuring cup and add 2 tbsp. l. granulated sugar and fill with warm water to the 350 ml mark. Stir the yeast until completely dissolved and set aside for 15 minutes. until bubbles appear on the surface.
Now pour the yeast solution into a bread machine cup.
Kneading the dough
Sift 600 g of white wheat flour (it is very convenient to use a special mug for sifting flour), add 2 tsp. salt and add 2 tbsp. l. vegetable or butter.
Program
Select a dark crust and a basic program for baking bread.