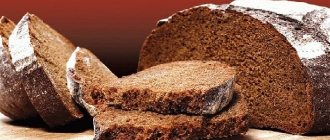
When switching to a gluten-free diet, the most difficult issue is bread. Since childhood, we have become accustomed to this product, so it is very difficult to give it up. Unfortunately, all baked goods in stores are made with wheat flour. There are only dry breads made from corn or rice, which are not very healthy for the body.
So the only way out is to cook it yourself. But here, too, difficulties arise. The fact is that gluten is gluten. It makes the dough elastic and elastic, it rises well and does not spread. If you remove it, the baked goods become heavy, do not bake and do not hold their shape.
Therefore, you have to add various adhesive additives to the dough - eggs, psyllium, guar or xanthan gum, flaxseed, etc.
What is psyllium? This is psyllium seed husk. When wet, it binds the dough and retains moisture. It becomes plastic, does not fall apart and holds the shape of the product well.
In addition, psyllium is almost completely soluble fiber. It is very beneficial for the digestive system, reduces sugar and cholesterol levels, and has a prebiotic effect. Husk is recommended for people with irritable bowel syndrome, Crohn's disease and other disorders.
Gluten-free types of flour - buckwheat, sorghum, rice, chickpea, almond, sesame, coconut, amaranth, corn. But when choosing it, you also need to pay attention to the glycemic index. I didn’t know about this; I only used rice for baking. I really liked the taste of it. As a result, the pancreas became inflamed, since rice has a very high GI. Now for baking I mix sorghum with chickpeas - it turns out to have a pleasant taste and an average GI level.
For taste, you can add your favorite additives to the dough - seeds, seeds, nuts, raisins, etc.
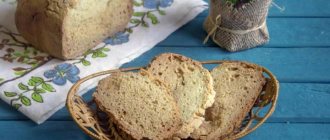
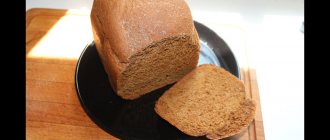
Gluten-free bread in the oven without yeast, eggs and milk
This is my favorite and basic recipe for making gluten-free bread, and I have tried a lot of them. It turns out the way it should - not wet, soft, doesn’t taste like soda, doesn’t crumble, and has a pleasant taste. I store it in the refrigerator for up to 5 days until I eat it.
I found his recipe on the “Food and Figure” channel on YouTube (link to the video under the photo). The first time the bread turned out hard, it did not rise at all in the oven when baking. It crumbled a lot when cutting. However, I liked its taste. So I had to experiment a little to get it the way I needed.
I will outline all the cooking features in the recipe below. I hope you like it and also become your favorite.
The composition of the products was written as in the original. But I use sorghum flour instead of rice flour (it has a lower glycemic index). You can also add a little buckwheat or sesame.
From the specified amount of products one small loaf is obtained. It lasts me 5 days on my own.
Source -
Ingredients:
- 20 g psyllium
- 300 ml water
- 1 tbsp. apple cider vinegar
- 1 tbsp. mustard oil (or regular sunflower oil)
- 0.5 tbsp. Jerusalem artichoke syrup
- 120 g rice flour (and a little more will be needed when kneading the dough)
- 120 g chickpea flour
- 40 g corn starch
- 0.5 tsp salt (a little more to taste)
- 1 tsp baking powder
1. Place psyllium in a separate bowl and cover with water at room temperature. Using a whisk, thoroughly stir the husk until smooth, so that its grains do not stick together into lumps. Leave for 5 minutes - it will absorb water, swell and become thick. Then pour in apple cider vinegar, vegetable oil and mix well. If desired, add Jerusalem artichoke syrup - it will give the bread a beautiful golden brown crust.
2. In a separate container, mix all types of flour, salt, baking powder and starch. I don't add starch because it has a high glycemic index. It also seems to me that without it the bread is not as dry.
3. Now combine both mixtures. Using a spoon, mix the ingredients vigorously, rubbing the flour into the wet psyllium. Then pour the mixture onto the table and quickly knead it into a homogeneous dough with your hands. Sprinkle the surface of the table with a small amount of flour if necessary.
Important! During kneading, the baking powder will react and bubbles will appear in the dough. It will become fluffy and soft, you will feel it with your hands. Now carefully shape it into a loaf without disturbing the airy texture. If you crush it, the mass will not rise again. And the baked goods will turn out hard.
4. Place the loaf on a baking sheet or in a mold greased with a piece of butter. Make not too deep cuts along the entire top and sprinkle with sesame seeds.
5. Bake in an oven preheated to 180° for 40 minutes.
Cool the finished loaf completely. Now you can cut into pieces.
If the bread doesn't turn out well (it may be wet inside):
- try adding more flour, or using some other flour;
- add a tablespoon of starch;
- cut the loaf into 3 parts and bake into buns. But do not crumple them, but carefully place each piece on a baking sheet. Use a knife to make cuts on the tops. This way it will bake better.
Lately I’ve been adding Polysol (extract from sprouted grains of barley, wheat, corn and oats) to the dough. I don't have a severe gluten intolerance, so I can use it. It is sold in cans as a health product. Only 1 teaspoon of extract, but the taste of the bread is excellent and very similar to what we are used to. If you can't find it, try barley malt syrup, it will also work.
Write your result, I'm very interested. Perhaps you will find some other interesting supplement.
Mistress's secrets
How many ingredients to put into the dough is important, but the tricks of the entire baking process also play a decisive role.
- Flour for the dough should be well sifted. This will saturate it with oxygen, the product will turn out loose and fluffy.
- When kneading, the liquid is gradually poured into the flour in a slow stream and stirred, and not vice versa.
- The oven must be preheated, but not hot.
- Do not immediately take the finished bread out into the cold; it may settle.
- The pan from under the dough must be washed first with cold and then with hot water.
- The sieve is also washed and dried.
- The dough in the oven can settle even if the door slams sharply.
It is better if it is yesterday's or dried in a toaster. The effect of a flour product with slow sugar is additionally balanced by the addition of fat (butter, fish) and fiber (vegetable caviar). Even children with diabetes enjoy sandwiches for a snack.
Bread is not a shelf-stable product. According to experts, baked the day before is healthier than fresh. A good housewife can prepare many different dishes from stale bread: croutons for soup, croutons or casseroles.
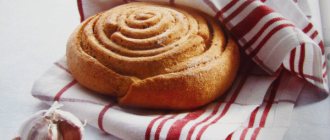
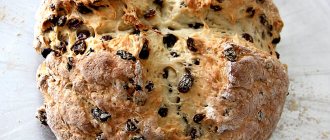
Gluten Free Sourdough Bread Recipe for Kids
Baking according to this recipe has a pleasant taste, is not bitter and bakes well. It resembles the bread we are used to, only not as soft.
For preparation, sourdough on rice is used. How to prepare it - see the recipe below.
Do not use metal objects while working with it. Therefore, prepare a wooden or silicone spatula, as well as a deep kneading container.
It is better to take a rigid form, it makes it easier for the dough to rise. Size approximately 16x7 cm.
Source -
For the dough:
- 70 g rice starter (remove from the refrigerator in advance)
- 70 g rice flour
- 130 g warm water
For the test:
- 1 chicken egg
- 30 g corn, 30 g rice and 10 g flaxseed flour
- 30 g starch
- 1 pinch of salt
- 30 ml water
1. In a bowl with a wooden spatula, thoroughly mix the flour, water and sourdough until the consistency of sour cream. Cover the mixture with film and make a small hole in the middle. Leave in a warm place for 3 hours.
2. Mix all the dry ingredients (flour, starch and salt), then sift them into the prepared dough and start kneading the dough with a spatula. Gradually beat in the egg and add water. Grind the mixture well until smooth.
3. Grease the bottom and sides of the pan with butter. Pour all the dough into it. Leave in a warm place for 2 hours.
4. Before baking, lightly spray the top of the product with water from a spray bottle. Preheat the oven to 180°, place a container of water on the bottom.
5. Bake the form with the dough for 1 hour. It is recommended to cool the bread completely before slicing.
Video on how to make rice sourdough for bread
It will take 3 days and a minimum of ingredients to prepare.
It is advisable to prepare the mixture at the same time - for example, in the morning at 9:00.
You cannot use metal objects, only wooden or silicone ones.
For the recipe you will need:
- glass jar with a capacity of 650 ml
- a few raisins (for better fermentation)
- rice flour
- regular filtered water (not carbonated, not mineral)
- wooden spatula
Watch the video for the process of making gluten-free sourdough:
1. First day
Pour 60 g of flour into a jar. Gradually pour in 60 ml of water, stir with a spatula until smooth. At the end, add 7-8 pcs. raisins Cover the container loosely with a plastic lid or gauze and leave it warm for a day.
2. Second day
Add the same amount of flour and water to the jar with the mixture. Stir well, cover and leave again for another day.
3. Third day
Repeat the same thing one last time. After 6 hours, the starter is completely ready. The mass should be airy with bubbles on the surface.
It can be stored for 7 days in the refrigerator, tightly covered with a plastic lid. Before use, remove the jar, remove the lid and let stand in a warm place for 1 hour.
Use only a wooden spoon to scoop up the starter. The metal will oxidize it, and the dough on it will no longer rise.
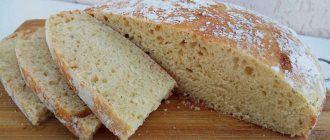
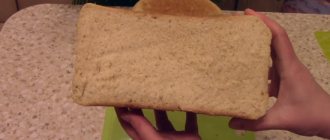
Homemade bread from gluten-free flour in a bread machine
There is nothing easier than baking with a bread machine. It must be gluten free. If your device has it, then you can use this recipe.
For preparation, you definitely need a special mixture, otherwise adding yeast is useless. It already contains various thickeners, so there is no need to add anything additional.
Source -
https://youtu.be/wDqNj-ks
-8
Composition (per 1 kg):
- 340 ml warm milk
- 500 g gluten-free mixture
- 10 g dry yeast
- 2 eggs at room temperature
- 5 tbsp. refined sunflower oil
- 1.25 tsp salt
- 2 tbsp. Sahara
1. In a bowl, mix sifted flour, dry yeast, sugar and salt. Then pour in warm milk, butter and eggs.
2. Cover the bowl with a lid. Set program No. 5 (“gluten free”), and the cooking time is 1 hour 20 minutes (the mode is specified for the Mulinex OW3000 bread machine). Once the machine has mixed all the ingredients, open the lid and use a spatula to scrape down the sides of the flour.
You can also pre-mix all the products with a mixer, then pour the dough into the mold.
3. Remove the finished bread from the pan and cool on a wire rack.
Store the product in the refrigerator in a food bag.
Recipe
To prepare bread from whole grain flour in a bread machine with the addition of bran, you will need to place all the ingredients in a bowl in the order indicated in the recipe itself. There is no need to mix them with each other, since the machine will take care of this itself, having previously warmed up and activated the yeast action process. For cooking, it is best to choose the “Main” cycle, which provides for all the steps. When making bread, it is under no circumstances recommended to open the lid unless the technological process itself requires it. If you do this, the dough will collapse and the loaf will be very flat. So, we set the desired mode and go about our business. At the end of the program you need to take out the bread. Its crust will be medium or dark. The baked goods can be served only after they have cooled.