Mastic cake “Machine”
A cake in the shape of a car is most realistic when decorated with fondant, but not every sponge cake is suitable for such a dessert.
It is better to bake an oil version with vanilla flavor, for which you should take:
soft butter – 150 g;
How to bake a sponge cake:
The cream for layering sponge cakes and leveling the cake must hold its shape stably, so preference should be given to oil-based fillings.
You can, for example, make curd cream ganache:
In order for the cream to be free of unsightly yellow spots, you need to collect all the oil from the walls of the bowl while whipping the mass, for example, with a silicone spatula.
To cover the cake, you can use purchased mastic or make it yourself.
You can quickly make sugar mass from marshmallows:
When everything you need to assemble the dessert is ready (sponge cake, cream and mastic), it’s time to move on to the fun part. So, how to make a “Machine” cake with your own hands:
To make the machine bright and beautiful, you can’t do without food coloring. You can use gel (they give more saturated colors) or dry compositions diluted in a small amount of water or alcohol.
"Police car" for a boy
A cake in the shape of a police car will not only delight a little boy, but can also be a themed gift for a police officer’s birthday.
To make it, you will need:
- rectangular butter sponge cakes measuring 35 by 18 cm - 3 pcs.;
- butter cream or chocolate ganache – 600 g;
- ready-made mastic – 400 g;
- blue, red, black and gray food coloring.
Algorithm of actions:
- From thick cardboard, cut out a rectangular template of the car body with cutouts for the arches into which the wheels will fit. Assemble the biscuit parts cut out according to the template into the cake, smear them with cream, and put them in the cold for a while.
- While the cake is settling, prepare small parts from mastic: flashing lights on the roof, side mirrors, radiator grille, headlights, POLICE inscription.
- Take the biscuit out of the refrigerator and simply cut off all the excess from it, giving it the shape of a police car. After this, cover the cake with cream and refrigerate again.
- Next, comes the most interesting stage: you need to cover the cake with prepared mastic, attach all the small parts and wheels.
To make the car more realistic, it is better to keep a model in the form of a toy police car before your eyes while working. After assembly, you can go over the mastic surface of the cake with a brush dipped in vodka. This will give the car a glossy shine.
Preparing a creamy dessert
Those who do not like the mastic design of cakes can make a cake in the shape of a cream machine. The difference between this dessert and the previous one will be in the design technology and the need for preparation.
To decorate cakes of this type, protein custard is often used, made from the following components:
How to make cream and decorate a cake with it:
To make the cake look neat, you need to try to make cream stars of the same size. If there is no nozzle and a special bag, the cream can be transferred to a thick plastic bag (for example, for freezing), then cut off the corner and deposit the cream in neat droplets.
Cake in the shape of a car made from cream for a boy
Making a cake in the shape of a cream car with your own hands is not as difficult as it seems. To do this, you don’t necessarily need to have artistic skills; even a novice cook can cope with the task. In addition, if you involve children in the process, the very preparation of dessert will become a real holiday for them.
Ingredients:
- ready-made round sponge cake;
- protein cream, because it is less susceptible to spreading than others;
- natural or food colors red, black, yellow and blue.
Cooking method:
- Cut circles parallel to both sides of the biscuit. This will be the sides of the car.
- Divide one cut part in half and place 2 pieces on the top of the biscuit - this will be the cabin.
- If the sponge cake is tall, then you need to cut along the bottom of the “machine” and coat it with cream so that the cake does not turn out too dry. Confectioners recommend first spreading the cream along the contour of the product and only then coating the center. Thanks to this, it will not protrude beyond the edges of the product. Moreover, you can use different fillings as a cake filling, not just protein cream.
- Transform unused biscuit scraps into crumbs. The fastest way to do this is with a blender.
- Prepare the base for sculpting the car, for which you need to mix biscuit crumbs with cream.
- From the resulting mass, fashion the missing fragments of the car - bumper, wing, etc.
- Beat part of the protein cream with butter and add dye of the desired color. Cover the car with the resulting mixture and put it in the cold so that the workpiece “sets.”
- Using a toothpick, draw the outline of windows, headlights, doors, wheels and other parts of the car.
- Prepare an airy protein cream. Place a small part of it in a separate bowl and add a couple of drops of yellow dye. Place the cream in a pastry bag with a thin tip and draw the car headlights, as well as those details that your imagination suggests.
- By analogy, paint the remaining areas of the cake with cream of the desired shade. https://www.youtube.com/watch?v=GR5Y79IkntE
Using this technology, you can prepare a cake in the shape of a machine of any model and color, since it is easy to form any details from sponge cake crumbs.
Children's treat "Car McQueen"
There is a joke among pastry chefs: you are not a pastry chef if you haven’t made the Lightning McQueen cake. But for mothers who want to please their little sweet tooths, it will not be difficult to make such a treat for a children's party.
The amount of ingredients is determined depending on the expected size of the dessert.
To make the machine as close as possible to the cartoon original, all the details that will need to be glued onto the mastic-covered cake can be printed on sugar paper and glued onto the mastic coating with syrup.
"Car McQueen" for a boy
Lightning McQueen is the favorite hero of almost every boy aged 4 to 6 years. Therefore, when preparing a children's party, the choice of cake style becomes obvious.
Ingredients:
- ready cake;
- butter cream to smooth out the structure of the cakes;
- dyes;
- powdered sugar;
- mastic.
Cooking method:
- Give the cake a character shape, coat with cream and refrigerate.
- Make tires from black mastic, and rims from white mastic.
- Cover the body of the machine with a layer of red mastic.
- Cut out all the necessary Makvin parts from colored pieces of mastic and secure them in the right places.
Using a similar scheme, you can make a small car figure from mastic and use it as a decorative element for a standard-shaped cake.
DIY cake “Machine” step by step. Without mastic - it's easy
So, more details. Let’s look at how to prepare the “Machine” cake with your own hands step by step without mastic. There can be many options. Let's focus on a rather simple cake.
For the cakes you will need: 5 cups of sugar, 6 eggs, a teaspoon of soda, 2 pinches of salt, 400 grams of soft margarine, 750 ml of kefir and 6 cups of flour. For cookies you need to take a tablespoon of honey, 100 grams of margarine, a glass of sugar, 2 tablespoons of sour cream, 0.5 teaspoon of soda, 1 egg, 2 cups of flour and a bag of vanillin. For custard: 2 cups sugar, 6 tablespoons flour, 4 eggs, 4 cups milk.
DIY “Police Car”
No little birthday boy will remain indifferent to a cake decorated in the shape of a police car. At first glance, the complex process of preparing it comes down to a set of simple steps that even a beginner in the culinary business can handle.
Ingredients:
- 2 layers of rectangular sponge cake;
- 0.5− 0.6 kg custard butter cream;
- 400 g of finished mastic;
- several pieces of round cookies;
- food colors in 4 shades (blue, red, brown and black).
Cooking method:
- Prepare a stencil of the outline of the car and cut out the cake layers according to it.
- Assemble the frame of the workpiece, not forgetting to coat the areas between the biscuits with cream.
- Place the car coated with cream in the cold for 2-3 hours to soak, or better yet, overnight.
- Make blanks of small car parts from multi-colored mastic and attach them to a permanent place.
- Cover a couple of stacked cookies with black fondant. Attach imitation wheels to the car. https://www.youtube.com/watch?v=YAVGzdT4BYw
The more small details there are on the car, the more realistic it will be. Therefore, in addition to glass, headlights and flashing lights, it is worth making a bumper, radiator grille, and mirrors.
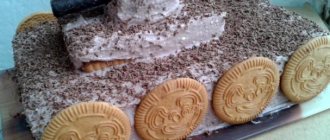
Cookie
Making the “Machine” cake with your own hands step by step without mastic is not too difficult. Let's start with the wheels. To prepare cookies in a water bath, you need to melt the egg, sour cream, honey, margarine, sugar and vanillin, stirring occasionally. Once everything is mixed, add soda and a little flour. Everything is mixed again. Next, add flour in small portions. Sticky dough is being prepared.
The wheels of the future car are cut out using a champagne glass. Of course, you get a lot of cookies. And there should only be four wheels. However, it won’t disappear, will it? It will also come in handy at the holidays. A depression is made in the center of the cookie. The tread pattern is pressed into the sides with a fork.
Cake “Machine” without mastic
To make a birthday cake for a boy, you don't have to use fondant for decoration. Moreover, not all small children love her. For such a case, colored cream is suitable, which can be used to draw the necessary car details on the finished cake.
Ingredients:
- 2 chocolate sponge cakes;
- chocolate buttercream;
- ½ cup apple juice;
- 6 egg whites, whipped with powdered sugar until stiff;
- 4 Oreo cookies;
- food colorings.
Cooking method:
- Prepare the stencil necessary to give the cakes the desired shape. It is not necessary to create wheel arches right away.
- Coat the sponge cake generously with cream and moisten with apple juice. From the scraps form a cabin, which also needs to be soaked with juice and filler.
- Existing uneven shapes can be corrected with crumbs mixed with cream.
- Cover the machine body on all sides with cream and refrigerate for 2 hours.
- Divide the whipped whites into parts and paint each one.
- Paint the car with cream, mark the space for the wheels using a medium-sized glass.
- Place cookies instead of wheels.
You can add extra shine to the body of the machine with confectionery glitter from a spray bottle.
Cakes
Making your own “Machine” cake step by step without mastic is very simple. The next point is the cakes. Mix margarine, soda, salt, sugar, eggs and half of the kefir. Little by little we begin to add flour, and at the very end - the remaining kefir. The dough should be slightly thick. You need to take a large saucepan so that you can easily mix all the ingredients.
Cover the baking tray with baking paper. Place the dough on it with a spoon and spread it evenly over the surface. The cakes are baked at a temperature of 200 degrees. The result is four large cakes and one smaller one.
"Fire engine" for a children's party
The “Fire Truck” cake is a bright gift for a child’s birthday, and it is also much easier to make than the other car options suggested above. Of course, you will have to tinker a little with the decor, but detailed instructions will help you cope with this task.
To create a cake in the form of a machine you will need:
We make a fire engine as follows:
It is important not to forget that for a fire truck you will need to make not two, but three pairs of wheels.
From the remains of the mastic it will be possible to create a fire hydrant, which will complement the overall picture next to the machine on the backing.
Cake Machine made from fondant
For boys (and not only) it is a joy to receive as a gift a dessert with a car at the head, and even more than that - the cake itself is in the shape of a Car. Let's look at today how to make a cake machine.
Machine finished cake covered with fondant
After all, if you put a machine (even if it’s not a complex design) on top of a cake, the structure will turn out to be heavy, and the culinary delicacy may be damaged. Moreover, a mastic car will be very, very heavy. Although it is only permissible to cover it with mastic and fill it with biscuit crumbs with cream, puffed rice or crumbled cookies (like a cake called “Potato”).
Decoration machine on the finished cake
We will do it simpler, make a large cake in the shape of a car: it will be more joyful for the kids to see a dessert in the form of Lightning McQueen (McQueen), but you can simply decorate the cake using colored cream, and see how here.
ASSEMBLY THE BASE FOR A CAKE IN THE FORM OF A MACQUEEN
There is one more preparatory stage left before we begin assembling the Makvin children’s cake: coating the cakes with cream, “tamping” and cooling the workpiece. 1. Cut the biscuit into 3 layers.
2. Cook syrup for impregnation: pour sugar with water, heat until sugar dissolves. Cool. 3. Soak the cakes with sugar syrup.
4. Divide the cream into 2 parts. The first thing is to grease the first cake layer. Place the second one on it, grease with the remaining curd cream. Close with a third sponge cake. Do not grease the top of the cake with cream.
It is necessary for the cake to stand in the refrigerator under pressure for several hours, so that everything that could leak out and move away will do so and the cakes will not “go around” in the future.
I placed a cutting board on the top crust. put it in the refrigerator, put everything on top that was on the shelf
Forming a cake
And now the most important thing. How to make a cake machine from prepared ingredients? First you need to cut out the cakes. The length of the cake is 30 centimeters, width – 15 centimeters. The bottom cake is made a little smaller so that the machine does not “lie on its belly.”
The cakes are stacked on top of each other. Cover with cream.
Next, the top of the machine (its head) is formed. Its height is 3 centimeters. Length – 18 centimeters, width at the back – 7 centimeters, width at the front – 10 centimeters. Stripes are laid out on the sides to give the “head” a roundness.
Spaces are cut out for the wheels. The distance to the front is 3 centimeters, to the rear – 4 centimeters. Having measured these distances, you need to attach the wheels and cut out the necessary places.
Next, the machine is formed - the cakes are cut. Roundings are made on the sides. The remaining cake and scraps are mixed with the remaining cream and a small amount of water, and the whole thing is whipped with a blender. The result is the so-called “sculpting mass”. It is needed in order to give the machine its final shape. Cookies are inserted into the wheel spaces. The windows and muzzle are cut out. To ensure that the parts hold tightly, they can be lubricated with a small amount of vodka. The cake goes into the refrigerator overnight for soaking.
How to make “Machine Cake” from mastic
1. First of all, you need to assemble the base. Trim the sides of the cakes and place them on top.
2. Spread with cream, soak in syrup, add berries or other additives to taste.
3. Coat on all sides with mastic cream and put in the refrigerator for a couple of hours.
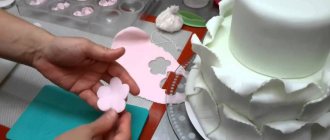
4. Knead the mastic and add food coloring. Roll it out thinly.
5. Cover the cake with fondant. Use white mastic to decorate the windows and headlights. Glue the elements with regular water. The bottom can be decorated with a thin strip of mastic in a contrasting color.
6. Wheels can also be made from mastic. Or cookies. Make these small elements from mastic, place them in the center of the cookies and place them on a toothpick, with which you attach them to the cake.
7. This is such an interesting cake. I hope your baby will appreciate it!
Children's treat "Car McQueen"
There is a joke among pastry chefs: you are not a pastry chef if you haven’t made the Lightning McQueen cake. But for mothers who want to please their little sweet tooths, it will not be difficult to make such a treat for a children's party.
The amount of ingredients is determined depending on the expected size of the dessert.
To make the machine as close as possible to the cartoon original, all the details that will need to be glued onto the mastic-covered cake can be printed on sugar paper and glued onto the mastic coating with syrup.
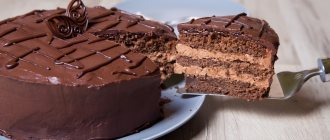
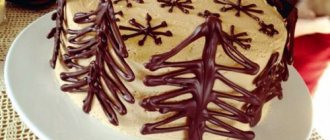
Chocolate and cream
Another great decor option is chocolate. You need to melt the tile, pour the cake, level the surface with a knife and put the dish in the refrigerator. In half an hour the beautiful cake will be ready.
Using white chocolate and food coloring you can create colored frosting. In addition to synthetic dyes, juices or syrups are also used. For quick decoration - the best option.
The “Machine” cake made from cream, or rather, decorated with it, also looks very attractive. The child will definitely like it. Moreover, you can add chopped nuts, berries, and pieces of fruit to the cream.
CREAM FOR CAKE IN THE FORM OF MACQUEEN
My knowledge of decorating cakes with mastic ends with the fact that not every cream is suitable. The structure must be stable and not “float”. For this reason, I did not consider yoghurt, sour cream, or whipped cream. I had a recipe for a cake with curd cream in my bookmarks. I stopped there. 1. Grind the cottage cheese through a sieve or beat it thoroughly in a wombay until it becomes smooth and homogeneous.
2. Mix cottage cheese, sour cream and powdered sugar. (It is better not to use sugar, as it may not completely dissolve and there will be crystals in the cream).
3. Beat the cream with a mixer until smooth.
4. Rinse the prunes well. If it is too dry, pour boiling water over it for 10 minutes.
5. Cut the prunes into small pieces and mix with the curd cream.
Shavings and shapes
You can decorate the cake using shavings. The chocolate must be grated on a coarse grater. If you heat the chips slightly, they curl very nicely.
Or you can add figures to the machine. After the chocolate has melted, it needs to be poured into silicone molds. The product dries at room temperature. Any chocolate is used for these purposes - regular, porous, white, bitter or special confectionery.
In a word, if you want to give your child a pleasant surprise, the “Machine” cake is perfect for this. The master class presented in this article will definitely help you with this! Good luck!
With an edible picture
Recently, food photo printing has become popular. Using this technology, you can print any image of a car on rice or sugar paper. The picture will become an original and bright decoration for the dessert.
Ingredients:
When using edible pictures, it is more convenient to work with rectangular-shaped cakes, as this greatly simplifies the process of centering the image.
By choosing this method of decorating a cake, you can save a lot of time and effort, because the picture is applied easily and quickly.
Source
Cake “Car” with an edible picture
Even if you have virtually no ability to create 3D desserts, you can please your child with a cake with his favorite car. In this case, an edible seal will come to the rescue.
For a dessert decorated with an edible picture, you will need:
- ready cake;
- cream for leveling and decoration (the amount depends on the size of the dessert);
- edible picture on food paper.
Sequence of actions:
- Level the top of the finished cake with cream. To achieve perfect smoothness, run a hot but dry pastry spatula or the wide side of a knife over the cream layer.
- Cut the picture to the size of the cake and place it on the cream. Using light smoothing movements, remove all air bubbles from under the picture.
- After this, all that remains is to decorate the sides of the cake with cream, and the dessert is ready.
Edible pictures are printed on sugar and rice paper. The latter option is cheaper, but for home confectioners, sugar printing is preferable, since such a picture will not get wet on any cream, and it will not need to be covered with glitter gel.