How to dry flowers so they don’t lose color and shape
The time to collect natural materials for crafts is in full swing. We have already collected cones, acorns, and branches. Shouldn't we dry some more autumn flowers? Dry it so that the flowers retain both color and volume. It is impossible to do this in a book; it will turn out flat, like for a herbarium. But in the sand or semolina they are wonderful, voluminous, like real flowers. Shall we try?
1. On a clear autumn day we go hunting for marigolds. We choose clean, dry, strong flowers. We bring it home and cut off all the excess. We only need flower heads on small stems.
2. Then pour a layer of semolina, about 2 centimeters, onto the bottom of a plastic container or any other container. (If you have fine, clean river sand, then, of course, you can use it. But something tells me that not everyone has it. But semolina is a cheap product and is always available. Some are dried in salt, but it can form a ball if the house is humid, and then you will not be able to remove the already dried flowers without breaking them.) We lower the flowers with their heads down and carefully cover them with semolina up to the stem. That's all. If necessary, you can make several layers. The secret to drying flowers is simple. To preserve color, they need to be protected from light (that is, completely covered with semolina), and to maintain volume, dry the flower in a straightened state.
3. Leave the flowers to dry. If in the sun, they can dry in a few days, if in an apartment, then about 2 weeks. You will know that the flowers have dried out by their stems; they will become dry. Now all that remains is to slowly pour the semolina out of the container, freeing the flowers. Remains of semolina from dried flowers can be brushed off with a brush, and the flowers themselves can be sprayed with hairspray for strength and shine, and a drop of transparent glue can be added to the place where the flower is attached to the stem.
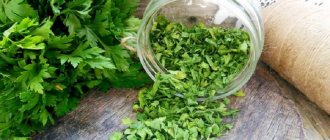
And here's a miracle. Look at the photo. On top are flowers just brought home, and in the lower right corner are already dried flowers.
Ready-made flowers can be used in different ways, for example, to create small floral arrangements for children's competitions. An autumn bouquet in a basket will never wither, and your craft will proudly stand on display in a kindergarten or elementary school.
Flowers. In autumn, even at the end of October, you can find and dry flowers. The variety of flowers at this time, of course, depends on the area. We managed to find only asters, marigolds, white and blue daisies. But we were very happy with these autumn flowers!
Soak the plant with the solution
Mix water with glycerin in a 1:1 ratio, pour into the vessel where you will keep the flowers. Cut the stem of the plant diagonally; remove the bark from its lower part if it is dense; It is better to split a thick stem so that soaking occurs faster. Place the flowers in glycerin so that the stem is immersed in glycerin by a few cm. During the first week, cut the stem by about 1 cm every day. Then simply leave the flower in the solution for another week. All these days, add glycerin solution, as the plant will absorb it.
Usually 14 days is enough to stabilize a rose or flower of similar size. However, if you notice that the solution level is still noticeably decreasing, continue conservation until active absorption stops. Now you can wipe the stem of the flower, place it in a beautiful vase or fix it on a stand, creating a beautiful composition. The exquisite interior decoration is ready. Sometimes it just needs to be cleaned of dust with a hairdryer or a dry brush, and not kept near water. By the way, you can protect a flower from dust and moisture, while making it more decorative, by covering it with a glass cap.
In the next article we will share another way to preserve flowers in glycerin - in some ways it is even more interesting than the first. You will also learn how to correct the color of an unsuccessfully preserved flower and how to give the plant a brighter or unusual color.
Hunt for cones!
So, you decided to collect natural materials for creativity... And that's great! After all, creating small and large masterpieces from materials that Mother Nature herself gives us is a great pleasure! Carefully collected with your own hands, they keep the warmth of sunny days.
To do this, we should arm ourselves with bags, pruning shears and a good mood.
You can find materials not only in the forest or field, but also in the park or on your own plot. It is at this time that bushes and trees are pruned in autumn.
There is no need to collect too much; be careful not to fill the whole apartment with these gifts of nature. Because I know from myself – “just start”!
Keep in mind that everything you collect will have to be processed immediately. That is, package it in boxes, in books, cover something with semolina or sand. In general, this process can be compared to picking mushrooms - it’s fun to pick, but they need to be processed afterwards, otherwise all the work is in vain. Remember, everything needs a place in the apartment.
Let's say you put all the materials in a large box, then you shouldn't hide it too far. Because there is a chance that you will never use what is stored in it.
One year, I stored all the materials on the balcony, and I really didn’t want to go out there every time in the cold to get some kind of lump, I avoided it in every possible way. Materials should be at hand, but also not get in the way, much less fall on your head when opening the cabinet door :)
Think about where you will put them?
Cones. So you brought home a whole bag of pine cones! You should not leave the pine cones in the bag, they may become moldy. You need to spread the newspaper on the floor or windowsill and scatter them in one layer. From the warmth of home, the cones will definitely open and dry out in a few days. Then they can be put away in a box for further storage.
You can collect all kinds of cones: spruce, pine, cypress, alder, juniper, etc.
If a beautiful cedar grows in your region, then its cones can also be useful. You can use empty, dehulled cones for crafts.
Sometimes for crafts you need unopened pine cones. I deal with it this way: I throw the cones into wood glue or PVA glue and forget about them for a couple of hours, then I mix them and forget about them again for a couple of hours. Then I come up, and the cones are all closed.
I take them out of the glue, wipe them with a cloth and put them on napkins, the glue flows out of them for a while, I transfer the cones to a dry place and wipe them.
When they dry completely, they no longer fluff up. Then, if desired, they can be varnished.
Moss. Now let's talk about moss! It should be immediately removed to a dark, dry place. Away from light, the moss will dry out and remain green.
One day, unknowingly, I dried the moss in the sun, it turned brown and not beautiful.
Moss should be stored in a box, as once it dries, it will become very fragile and brittle (especially reindeer moss).
Needles. Green pine needles need to be laid out on a sheet of paper and dried, but also away from the sun, otherwise it may change color.
Yellow larch needles can be dried on the windowsill and put in a box.
Leaves. The easiest drying method, which I have liked since childhood, is to dry the leaves between the pages of an old thick book. The leaves dry out in about two weeks and still retain their color.
The second method, if you urgently need dry tree leaves (for example, for a herbarium for a child for school), you can put them between two sheets of white paper and iron them with an iron, but not too hot. If you immediately fry them with a hot iron, the leaves will turn out toasted, not dried, fragile and change their original color. You need to dry tree leaves in this way by applying the iron on top (through paper, of course) and removing it for a while. There is no need to move the iron back and forth. Drying the leaves this way will take about 20 minutes.
How to dry chokeberry
Chokeberry is not as popular as other berries. And its tart and bitter taste is to blame for this. If it is collected, it is most often for medicinal purposes.
- Rowan is a good vitamin supplement. Vitamins P, K, tocopherol, rutin, riboflavin were found in it. And there is more vitamin C in fruits than in lemon or orange. Therefore, chokeberry is effective for colds, in the form of a diaphoretic.
- Rowan is also rich in iron. Moreover, it contains three times more of this microelement than apples.
- It also contains essential oils, tannins, iodine, malic, tartaric, sorbic, and succinic acids.
- Thanks to pectins, it suppresses gas formation in the intestines.
- Chokeberry is a preventative against scurvy.
- Rowan fruits are used as a diuretic, mild laxative, choleretic and hemostatic agent.
- Rowan is an excellent addition to compotes, compotes, jelly, and fruit tea. It is added in powder form to confectionery products.
Chokeberry is prepared for future use - frozen, canned, dried.
In order for the berry to reveal its medicinal properties and taste, it must be picked from a tree or bush in time.
The fact is that mountain ash ripens in August - September. But at this time, its berries, or rather, its “apples,” are bitter. Therefore, they are harvested in late autumn, preferably after the first frost. Then the rowan fruits acquire a pleasant sourness with a slight bitterness.
Berries are removed from the bush in clusters, cutting with a knife or pruning shears.
Dry rowan berries in the attic, in the oven, in the oven or in the dryer. The fruits are dried both in bunches and in bulk. Most often, rowan berries are dried in clusters if they are harvested for a short time, for example, until the new year.
Candied chokeberries for the winter
Important! 100 grams of berries will enrich our body with iron, manganese, and iodine. Thanks to the consumption of chokeberry berries, we can prevent atherosclerosis and hypertension, we will sleep soundly, strengthen the immune system, and remove radioactive substances from the body. And vitamin P will strengthen the walls of blood vessels, and this is one of the key advantages of these fruits.
The jam made from this original berry with a specific taste is incomparable. Like other berries, it can be cooked in several ways, with the addition of other fruits, grated, simply boiled, etc.
Recipe No. 1
Ingredients
- Chokeberry – 1 kilogram
- Sugar – 1 kilogram
- Water - 1 glass.
Preparation
Let the water drain from the washed berries. Let's cook the syrup and put the berries in it. It would be good to leave the jam overnight (for 8 hours), then in the morning you could complete the process without having to wait the whole day. Bring to a boil and remove from the stove. Let it sit for a few more hours. Continue cooking until the chokeberry sinks to the bottom of the vessel in which it is cooked. Then the jam can be rolled into jars.
Recipe No. 2
Ingredients
- Chokeberry – 1 kilogram
- Sugar – 1 kilogram
- Water - 1 glass
- Apples – 1-2 pcs.
- Cherry leaves - a couple of handfuls
Preparation
Make syrup from washed cherry leaves. To do this, put them in a vessel, fill them with water and bring them to a boil over low heat. Let's strain the infusion and cook the syrup. Let's boil it and put the sorted and clean berries into it. About 15 minutes before readiness, add finely chopped apples. You can wipe it, or you can close it like that.
Application: filling, baked goods, desserts, drinks, etc.
Recipe No. 3
Ingredients
- Chokeberry – 1 kilogram
- Sugar – 1 kilogram
Preparation
The berries need to be washed, drained, covered with sugar and allowed to boil. Let it cool and return to the fire for 2-3 minutes. Let it cool again, and so on 3-4 times. If it's sweet, you can add a few drops of lemon juice. Then, while boiling, roll it into sterile jars. The berries will be intact!
Important! If you prepare candied fruits from these fruits, people with diabetes will receive an ideal product with a sugar substitute, sorbitol. Substances found in the leaves improve liver function. The candied fruits turn out to be incredible!
Recipe No. 1
Ingredients
- Chokeberry – 1 kilogram
- Sugar – 1 kilogram
- Water – 1 glass
- Citric acid – 1 teaspoon
- Vanillin – 1 sachet
Preparation
After the berries have stood in water for two days (we drain them a couple of times a day), prepare the syrup and add the rowan into it. Cook for an hour, at the end add vanillin and citric acid. The berries should then sit in a colander overnight. Then we scatter them on paper and let them dry for another day. Will be stored well in a glass jar, sprinkled with sugar. Don't pour out the syrup - it's great in tea!
Application: for dessert, baking, teas
How to dry rowan in bunches
Rowan bunches are examined for spoiled berries. Rowan berries that are going to be dried in shields are not washed.
Then the bunches are thrown over a rope, fishing line or wire and dried in this suspended state. The room in which the bunches are stored should be well ventilated and cool.
In this form, the berries remain fresh for a long time and then dry out. They are used as needed.
If rowan needs to be preserved until the new harvest, then it is dried differently.
Ikebana from rowan
What could be simpler than ikebana? It would seem like a minimum of hassle:
- dried rowan;
- added leaves, flowers;
- put it in a jar, glass, glass, etc.
But no, the most important thing is to place it in the right place so that such decor does not disturb the interior harmony of the room. The Japanese have created a whole philosophy out of this, but why are we worse? Take a close look at the following options and try to find a place for them in your “home”.
An easy-to-make decor that can easily be used as a body decoration. To make it you only need a few bunches of rowan berries, a needle and thread.
The scheme of work is extremely simple: sequentially string the berries onto a thread, and at the end tie both ends. You will get such a beautiful necklace.
These beads can be placed anywhere. We give you some advice: they look especially impressive in the kitchen if they are strung on the neck of a jug.
How to dry rowan berries in bulk
The berries are sorted, spoiled, dried out, rotten, or pecked by birds are removed.
Then remove the stalks, leaves and other debris.
The berries are washed in cold running water and dried well, laid out on a towel or left in sieves.
After this, they are transferred to baking sheets covered with parchment and placed in a low-heat oven. Initially, the temperature should not exceed 40°C. To avoid steaming the berries, the oven must be ventilated. During this time, the berries will wilt.
Then the temperature is raised slightly (to about 60°C) and drying continues, periodically stirring the berries.
Drying time depends on the juiciness of the berries and the capabilities of the drying machine.
If you have an electric dryer, then it produces higher quality raw materials, since in this case the drying process takes place according to a predetermined program.
You cannot dry rowan fruits at high temperatures, otherwise they will turn black on the outside and remain raw on the inside. And in the end they will turn out rancid.
Another way to dry berries in bulk
Rowan berries are separated from the branches, stalks, leaves and other debris are removed.
Sorted, removing spoiled ones.
Place the prepared berries in a colander and lower them into a pan of boiling water for 3 minutes.
Place the berries on a towel and dry them from moisture.
Then the berries are placed on a baking sheet covered with parchment and sent to the oven or oven. Dry at a temperature of 60—70°C with constant air circulation. The berries need to be stirred frequently. This method is also suitable for drying.
Dried rowan is well cooled in air and then packed in paper bags. In this form, rowan can be stored for a whole year.
How to prepare grape leaves for dolma for the winter
Grape leaves have long been popular in oriental cuisine, due to their specific pleasant taste and beneficial properties. It has been proven that the consumption of such an ingredient relieves pain from varicose veins, relieves swelling, stimulates blood circulation, and enriches the body with valuable vitamins and microelements.
It is important that during long-term storage the product retains the maximum amount of useful substances in its composition, therefore, of the existing methods, many housewives prefer freezing.
Interesting: If the boiled mushrooms are not left in the refrigerator overnight
For these purposes, it is better to choose young specimens of medium size with small veins. It is better to choose the 5th–7th leaf from the top of the vine.
The following foliage is considered unsuitable for cooking:
- from wild (maiden and ornamental) grapes;
- affected by sunburn, mold, fungi and pests;
- with a suspicious yellowish, whitish or cream color;
- old (dangerous due to components harmful to human health);
- growing on a vine near busy roads and industrial production.
Did you know? Dolma has become the source of international controversy: the Azerbaijan National Culinary Center has accused Armenia of “appropriating” the dish, and recently the UNESCO Intergovernmental Committee recognized the traditions of its preparation in Azerbaijan as one of the elements of the intangible cultural heritage of humanity.
Before freezing, it is advisable to prepare the necessary containers. Remember that thin polyethylene and cling film are subject to crumbling under prolonged conditions of low temperatures. In this regard, dense bags are preferred.
Preparing the leaves
To properly freeze grape leaves, you need:
- cut off the ponytails completely;
- thoroughly rinse the workpiece on both sides;
- dry.
Packaging
Dry leaves are stacked on top of each other in 10 pieces and rolled into a roll. In this form, it is packed into bags and sent to the freezer. It is important that there is as little air as possible inside the package. This will protect the product from foreign odors, allow it to cool faster and be better preserved.
Did you know? Dolma was a dish of the court cuisine of the Ottoman Empire.
For proper harvesting, you need to know when to collect and where best to get grape leaves. For dolma, it is preferable to use white grape varieties. Their plate does not have such a jagged edge as the red varieties, and therefore it is easier to wrap minced meat in it. The foliage is collected when the bush is flowering, in late spring or early summer.
Tender leaf blades five through seven are best, if you start counting from the top of the vine. The average size roughly corresponds to the size of the palm: this will be the most convenient way to wrap the filling.
Leaves are cut off before spraying grapes with chemicals. During the summer, you can also carry out pruning, making sure that after treating the plant with fungicides and insecticides, the period specified in the instructions for the drug passes.
Important! Do not eat products from bushes located along highways!
As with any preparation, the quality of the raw materials plays a crucial role, so it is important to understand which leaves can be used for cooking. They should be a uniform green color, without yellowing, spots or signs of pest damage.
There are several ways to prepare food for the winter, the simplest of which is freezing. But the pickled shell has an additional original flavor. Let's consider all possible ways of harvesting grape leaves.
Freezing
Prepared leaves for freezing must be completely dry. Then they do this:
- Place 10–15 leaves and roll them into a tight roll.
- The roll is wrapped in cling film.
- The rolls are placed in a plastic box, since the product will be fragile after freezing.
To prepare dolma, the pieces will need to be defrosted at room temperature or doused with boiling water.
Important! The number of leaves in one roll should correspond to the amount of dolma that is usually prepared at a time.
Bottled storage
This is an original way to keep leaves fresh for a long time. For it you need to prepare empty plastic bottles. The further procedure is as follows:
- Pour a teaspoon of salt and soda into each bottle, add a little water and shake thoroughly so that the mixture covers the entire inner surface. Then the bottle is rinsed with clean water and dried.
- Small stacks of leaves (3–5 pieces) are rolled into tubes and placed very tightly in the bottle, carefully tamping them down with a stick. The bottle must be completely filled. Sometimes a little salt is added at this stage.
- The bottle is pressed down to release all the air and securely closed with a lid.
This container is stored in a dark, cool place for up to 2 years. To prepare, you need to cut the bottle, remove the leaves and fill with cold water. Sometimes a yellowish coating may appear on the surface, which is not a sign of spoilage.
Did you know? In some regions, fig and quince leaves are used to prepare dolma.
Canning
For preservation, it is necessary to properly prepare glass jars and lids. Sterilization of dishes can be done in a pan of boiling water, in a double boiler or slow cooker, in a microwave or oven. Each jar should be treated with hot steam for 20–25 minutes. With this method, the cuttings do not need to be cut; it will be convenient to use them to pull the workpiece out of the jar. Proceed with the prepared leaves as follows:
- The leaves are rolled into a tube and placed tightly in jars, which are then filled with boiling water for 10 minutes. Afterwards, drain the water and fill the jar with boiling water again.
- Add 1 tbsp per liter of water. l. salt and sugar. Bring the mixture to a boil, stirring to dissolve the salt and sugar.
- The water from the cans is drained and filled with a boiling solution.
- The jar is rolled up and gradually cooled.
Interesting: You can restore frozen cooked icing
This product should be stored in a cool and dark place.
Pickling
Containers for pickling are processed in the same way as for canning. Then do this:
- Place 4-5 peppercorns, 1-2 buds of dried cloves, 1-2 bay leaves at the bottom of the jar.
- Rolled leaves are placed tightly on top of the spices and filled with the same solution as for preservation, with the addition of 2 tbsp. l. 9% vinegar.
- The jar is closed and stored in a cool place for up to three months, and dolma can be prepared from such a preparation in just a few days.
Pickling
Salting consists of placing the product in a solution of table salt. To pickle grape leaves, do this:
- The rolled rolls are placed tightly in a clean container and poured with boiling water. After 10 minutes, the water is drained.
- The saline solution is prepared based on the proportion: 20 g of salt per 1 liter of water. Add the required amount of salt to the drained water, bring the solution to a boil and pour it into the jar.
- Cover the container tightly, cool and store in the refrigerator.
Dry storage
For this method, brine filling is not used, but the container must be sterilized beforehand. The sequence of further preparation of the workpiece is as follows:
- Place 10–12 leaves at the bottom of the jar, press down and lightly sprinkle with salt.
- The next layer is compacted tightly and salted again.
- The filled jar is sterilized for 10–15 minutes in the oven or steamed, and then closed with a lid using a special key.
Grape leaves are an integral part of dolma. And although this oriental dish is in many ways reminiscent of cabbage rolls, traditional for Slavic cuisine, they cannot be replaced with white cabbage. In order to enjoy the spicy taste of the dish all year round, you should prepare the future “wrapper” for the rice and meat filling in advance for the winter. Is it possible to freeze it, and how to do it correctly, find out further from the article.
Grape leaves have long been popular in oriental cuisine, due to their specific pleasant taste and beneficial properties. It has been proven that the consumption of such an ingredient relieves pain from varicose veins, relieves swelling, stimulates blood circulation, and enriches the body with valuable vitamins and microelements.
For these purposes, it is better to choose young specimens of medium size with small veins. It is better to choose the 5th–7th leaf from the top of the vine. This wrapper is easy to work with, which is not the case with wrappers that are too small or too large. Leaves should be picked between late spring and mid-June, when they reach their peak growth. Healthy, well-developed specimens of regular shape without damage or signs of disease are preferred.
Oriental dishes have long been part of our lives. For example, dolma, beloved by many. It is very similar to our cabbage rolls. Only for its preparation they use grape leaves instead of cabbage leaves. Fans of this unusual dish for our area may be interested in how to store grape leaves for dolma so that it can be prepared even in winter.
Let's take a closer look at each of them.
The easiest way to store grape leaves for dolma is to sterilize them and roll them into jars.
- In order for them to retain their qualities for a long time, they are collected in 10-15 pieces and rolled into a tight roll.
- Then, the leaves folded in this way are placed in a glass jar and sterilized for 20 - 25 minutes, having previously closed the lid tightly.
- After the jars have cooled, they are rolled up and placed in a dark and dry place.
- The optimal period for collecting grape leaves is the time when the vine begins to flower.
- It is recommended to use leaves of white grape varieties for preservation, since they differ favorably from others in their sweet and sour taste, which will positively affect the taste properties of dolma, giving the dish a wonderful piquancy. If you decide to use red grape leaves for harvesting for the winter, remember that their disadvantage is their uneven surface and hardness.
- Only young leaves are suitable for dolma, and it is important to cut them from the vine, which is located as far as possible from the roadway.
- Never use damaged or torn grape leaves for preservation. Take only smooth, whole leaves, preferably the same size.
- Cooking time: approximately 35-50 minutes.
- Number of blanks: 3 blanks of 20 leaves.
Interesting: How to serve pickled saffron milk caps
How to make powder from dried rowan berries
Well-dried berries can be ground in a meat grinder or blender.
If you need to make powder from rowan berries, harvested in bunches, then it is recommended to brown the berries in an oven heated to 150°C and then cool.
Ground rowan berries are stored in glass or plastic containers with a screw cap.
Dried rowan is stored in a dry, cool, dark place until next year.
If you decide to dry the berries in the oven, then when drying you need to set the temperature from 40 to 60 degrees and monitor the uniformity of drying, constantly stirring the rowan fruits. Drying needs to be done in several stages. After 5-6 hours in the oven, the berries need to be allowed to cool for 12-20 hours. Then, if necessary, continue drying in the oven again, lowering the temperature by 5-10 degrees each time.
Gorloder: boiled recipe, canning
For preservation, you can use the following recipe.
Interesting: Is it possible to leave boiled mushrooms in water overnight?
- tomatoes - two and a half kilograms;
- apples - half a kilo;
- sweet pepper - half a kilo;
- garlic – one hundred and twenty grams;
- dill - fifty grams;
- vinegar - two large spoons;
- hot pepper – one hundred grams;
- parsley - fifty grams;
- sunflower oil - one glass;
- black pepper and salt to taste.
- Sterilize and heat the container before storing.
- Wash vegetables under running water.
- Remove seeds and core from peppers and apples.
- Cut the tomatoes into cubes.
- Grind the remaining ingredients in a blender or meat grinder.
Pour the resulting mass into a container, add vinegar, spices and vegetable oil. Place the pan over medium heat and cook for at least 2 hours. Dill and parsley can also be ground in a blender or finely chopped, then added to the sauce before the end of cooking.
The hot seasoning is poured into jars and rolled up.
Jars can be stored in a pantry or basement.
How to dry rowan berries at home.
Red rowan is usually dried in two ways - natural (indoors) and forced (in an electric dryer or oven).
When choosing the first option, remember that the room in which the red rowan will dry should be well ventilated.
With the second option, if you use a dryer, then everything is very simple. Just follow the instructions that come with it.
If you decide to dry the berries in the oven, then when drying you need to set the temperature from 40 to 60 degrees and monitor the uniformity of drying, constantly stirring the rowan fruits. Drying needs to be done in several stages. After 5-6 hours in the oven, the berries need to be allowed to cool for 12-20 hours. Then, if necessary, continue drying in the oven again, lowering the temperature by 5-10 degrees each time.
It is good to store dried red rowan berries in fabric bags, jars or boxes. From such a simple preparation for the winter you can make healthy desserts, brew tea, add to compotes or decoctions. Thus, knowing how to dry correctly, you can benefit from red rowan berries all year round.
How to properly store fresh plums?
- It is forbidden to store in plastic bags, this leads to rot.
- Large fruits are best stored in egg cartons in the refrigerator. This storage method will help preserve the fruit for three weeks.
- To store in the refrigerator, the temperature must be at least 5 degrees. At low temperatures, the pulp darkens, the taste and aroma are lost.
- Despite the fact that you want to save the fruit, it is better to eat it as early as possible. This is due to the fact that over time the taste, appearance, aroma and pulp become less intense.
- You can freeze the fruit, but you must first remove the seed.
- You can store it on the balcony in a dark place in wooden boxes. The number of layers in the box should be minimal.
We recommend reading: Why mushroom caviar went sour
You can save the harvest in the following ways:
- You can store plums in the refrigerator for two weeks.
- In the cellar, a fruit with a stone can be preserved for more than a month, but if during storage the fruits are regularly inspected.
- Dried plums can be stored for several months. The process of preparing fruits includes several stages. Washing, blanching, drying in the oven.
- Storage in the refrigerator can be extended to three weeks. Unripe and hard varieties of plums are suitable for this. Place the fruits in the refrigerator, keep for 15 hours at a temperature of 0 degrees, then increase the temperature to 5 degrees. Thanks to this difference, the fruit will not lose its taste and will be able to last longer.
- Plums can be frozen . It is worth noting that you only need to freeze it once; the fruit will not withstand repeated procedures. Choose ripe, fragrant, undamaged fruits for freezing; unripe fruit will not be tasty when you defrost it. Before freezing fruits, they must be washed and dried. Remove the pit, place the plum on a tray, and freeze. Then place the frozen fruit in a container.
- You also need to prepare plums in a sweet form. Therefore, we will prepare plum jam, which is suitable for baking. It can be stored for more than six months. To prepare, you will need ripe plums, sugar, pectin and lemon juice. Peel the plums, boil a little, rub through a sieve, add sugar, pectin and a little lemon juice. Boil for half an hour. Place the finished jam into clean jars.
Fresh plums picked in autumn
- Properly dried plums are not only tasty, but also healthy. Let's prepare prunes. It is better to use varieties such as: “Renklod Karbysheva”, “Anna Shpet”, “Blue-free”, “D'Ente”. Drying is carried out in several ways. Electric dryers are used for drying, but in a regular oven you can also get a product with good taste. Begin:
- Select the largest fruits, remove the stems and seeds, and wash well.
- The plum must be blanched for a couple of minutes in a solution of baking soda. Small cracks should form on the skin, which will help moisture evaporate.
- Preheat the oven to a temperature of 50 degrees;
- We will dry on a baking sheet, which must be covered with paper. Place dried plums on the surface.
- Dry for at least five hours. Then let them cool at room temperature.
- Turn the fruits over and put them back into the oven at 70 degrees for another five hours.
- Store dried fruits in a ventilated area in boxes or wooden crates.
- Many people do not like frozen and dry fruits, so there is an alternative. Prepare pickled plums for the winter. The product can be stored for six months. You will need the following ingredients: plums, 500 ml water, 300 grams of sugar, half a teaspoon of cinnamon, a teaspoon of salt, allspice and black pepper. Wash the plums and pack them into jars. Prepare the marinade from all ingredients; after it boils, add 100 ml of vinegar. Pour the marinade over the fruits and leave the jars to sterilize for 15 minutes.
Plums are a fleshy, aromatic and tasty summer fruit, and also a storehouse of vitamins and microelements. Proper harvesting affects the safety of plums. Preserving fruit at home is easy; choose a simple way to preserve fruit.
- Description of the Ural red plum.
- When is the right time to harvest plums?
- What is the difference between plum and prune?
- How to make prunes at home?
How to dry rowan
Photo © Regina Lipnyagova
A lot has been said about the beneficial properties of red rowan more than once. But the fruiting period of this berry is not the longest, so you need to know how to preserve all the beneficial properties for the maximum period. It is most optimal to dry rowan, and then prepare healthy drinks from it all winter.
You can dry rowan in different ways. It dries well in the open air; you can also use an electric dryer, oven, or even a microwave for this. Rowan berries should be dried in the open air either in clusters upside down in a well-ventilated place, or scattered in one layer on a tray or fine wire rack.
We offer you detailed step-by-step instructions with photos on how to properly dry rowan at home.
Step-by-step instructions on how to dry rowan:
To dry rowan, we need the berries themselves and paper napkins.
Spread a paper napkin.
Place clean rowan berries in one layer.
Cover with a napkin and microwave at 400 W for 10-12 minutes.
Dried rowan is ready.
To dry rowan berries in the oven, you need to scatter the berries in one layer on a baking sheet lined with baking paper. Place in the oven at 40-50°C for 50 minutes, then increase the temperature to 70°C and dry with the door ajar for 16-20 hours.
On the pages of the Mail.Ru Children project, comments that violate the legislation of the Russian Federation, as well as propaganda and anti-scientific statements, advertising, and insults to the authors of publications, other discussion participants and moderators are not allowed. All messages with hyperlinks are also deleted.
How to preserve the suitability of unprocessed rowan at home
The optimal place to store red or chokeberry fresh is a cellar, basement or refrigerator.
In a cellar or basement
Having collected a medicinal harvest, it must be carefully sorted, removing all leaves, twigs, insects, spoiled and crumpled specimens. You cannot wash the berries before storing them, otherwise their natural protective cover will be damaged.
Then, the rowan bunches must be strung on twine, so that they do not touch each other, and hung from a dry ceiling.
Another harvest of fresh rowan berries can be placed in balls in boxes made of cardboard or wood, making a layer of paper between each one. Holes must be made in the container in order to create good ventilation.
Taking into account temperature indicators, rowan berries can be suitable for consumption:
- until spring at 0 °C;
- for 3-4 months at 7-10 °C;
- up to one month (black) and up to two months (red) at 10-15 °C.
It is very important to monitor the air humidity in the room, which should not exceed 70%.
See the video “Preparing red rowan berries Drying and freezing”:
See also: how to dry rowan.
In a refrigeration device
If there is no suitable room, rowan berries can be successfully stored in the refrigerator compartment. To do this, they should be picked from the brushes, sorted, dried and placed in a clean, dry form in a paper or plastic bag and sent to the compartment where vegetables and fruits are usually stored. In this condition, rowan will be suitable for consumption for 1 month.
You can extend this period using granulated sugar. You need to sprinkle the bottom of a plastic container with it, then lay out the rowan berries and thus alternate the ingredients to the very top.
You can preserve rowan berries by sprinkling them with sugar:
- in the area between the refrigerator compartment and freezer for up to six months;
- in the compartment where it is customary to keep fruits and vegetables for up to 3 months.
You can also extend the usefulness of the rowan harvest if it is ground with sugar (2:1). The resulting puree must be transferred to sterile dry jars, tightly closed with lids and placed on the middle shelf of the refrigerator. This dessert can be stored for no more than 1 year. It’s better to do this with chokeberry; it’s juicier and sweeter.
If there are other plans for rowan, but there is no time to implement them yet, then the non-wet bunches can be placed in a plastic or paper bag and the fruits can be placed in the refrigerator on the shelf for fruits and vegetables. They will be valid for 30 days.
In the freezer
The ideal way to preserve the beneficial qualities of fresh rowan is “shock” freezing (-18 °C and below). Under such conditions, the amount of carotene (it is found in red rowan) even increases. After sorting and washing the fruits, they should be laid out on a towel to dry at room temperature, and then placed in one ball on a tray and placed in the freezer. After 4 hours, the berries must be put into bags and stored in the freezer for a whole year.
Frozen puree can also be stored for 1 year (the proportion of berries and granulated sugar is 1:0.5).
how to preserve rowan for crafts?
Shine and elasticity at the same time
But my son and I had a “cute soap” gift set
part of it was used
On the pages of the Mail.Ru Children project, comments that violate the legislation of the Russian Federation, as well as propaganda and anti-scientific statements, advertising, and insults to the authors of publications, other discussion participants and moderators are not allowed. All messages with hyperlinks are also deleted.
The accounts of users who systematically violate the rules will be blocked, and all messages left will be deleted.
You can contact the project editors using the feedback form.
So, you decided to collect natural materials for creativity... And that's great! After all, creating small and large masterpieces from materials that Mother Nature herself gives us is a great pleasure! Carefully collected with your own hands, they keep the warmth of sunny days.
To do this, we should arm ourselves with bags, pruning shears and a good mood.
You can find materials not only in the forest or field, but also in the park or on your own plot. It is at this time that bushes and trees are pruned in autumn.
There is no need to collect too much; be careful not to fill the whole apartment with these gifts of nature. Because I know from myself – “just start”!
Keep in mind that everything you collect will have to be processed immediately. That is, package it in boxes, in books, cover something with semolina or sand. In general, this process can be compared to picking mushrooms - it’s fun to pick, but they need to be processed afterwards, otherwise all the work is in vain. Remember, everything needs a place in the apartment.
Let's say you put all the materials in a large box, then you shouldn't hide it too far. Because there is a chance that you will never use what is stored in it.
One year, I stored all the materials on the balcony, and I really didn’t want to go out there every time in the cold to get some kind of lump, I avoided it in every possible way. Materials should be at hand, but also not get in the way, much less fall on your head when opening the cabinet door :)
Think about where you will put them?
Cones. So you brought home a whole bag of pine cones! You should not leave the pine cones in the bag, they may become moldy. You need to spread the newspaper on the floor or windowsill and scatter them in one layer. From the warmth of home, the cones will definitely open and dry out in a few days. Then they can be put away in a box for further storage.
You can collect all kinds of cones: spruce, pine, cypress, alder, juniper, etc.
Preparations of autumn materials for creativity
Autumn time is rich in natural materials, from which you can make a lot of things with your children or decorate your home. In this small selection I will tell you what can be done with leaves, flowers, cones, etc., so that they retain their original appearance longer.
Collected autumn leaves can be preserved in 3 ways. In any case, they need to be washed well and laid out to dry easily.
3. The fastest way is to dip the leaves in melted wax. To do this, melt a candle in the oven or on the stove and dip a leaf into liquid wax, let it drip and put it on paper to harden. It is important here not to overheat the wax so that it does not burn (do not allow white bubbles to appear in the liquid wax), and you also need to remove the leaves from the wax quickly, otherwise the layer of wax will be very thick. The leaves turn out to be moderately soft, over time they harden a little, but still remain suitable for various crafts
Or decoration for a room. Glue a piece of paper to one end of the thread or fishing line with a glue gun, and to the other end a paper clip straightened into a hook shape. Use a paper clip to hang leaves from a chandelier or curtains.