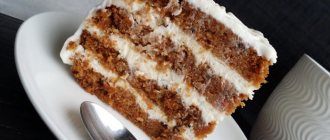
Tender, spicy, moist... simple ingredients you can buy at almost any grocery store. It's not difficult and doesn't take that long to prepare. And, if you have absolutely no time, you don’t even have to wait for it to infuse and soak: it will be delicious anyway! It’s not surprising that this cake conquered everyone I’ve ever treated to it or to whom I’ve recommended this recipe. Best carrot cake! In general, I thought and decided that it is worthy of step-by-step photographs that reveal all sorts of secrets of its preparation, assembly and decoration.
Let me immediately note that you can decorate this carrot cake in different ways. I decided to make it in a fashionable, very common version today: with a berry-fruit top, chocolate smudges and practically... naked, that is, with the sides not completely covered with cream. At the same time, I’ll tell you (and, as far as possible, show you) how these smudges are made. I know many novice home confectioners are interested in this question. There will be a lot of photos, because I really want to show all the details. And if you still have questions, write comments, we will look for answers together!
Let's go!
Turn on the oven and preheat it to 160 degrees. And then, before we start kneading the dough for the cakes, we’ll do a couple of important little things. First…
...grind the almonds!
I do this in the simplest meat grinder. I scroll through the raw nuts once, put them in a storage container and use them as needed. For this cake with a diameter of 18 cm, we will need half a glass (we mean 250 ml glasses) of ground almonds. This is approximately 70 g of nuts. It’s better to buy a little more and prepare for future use: almonds are a frequent guest in delicious baked goods.
Description of preparation:
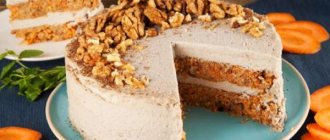
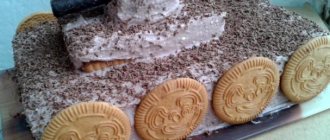
Many people like the Snickers bar, but a cake prepared according to this recipe will please everyone!
Airy chocolate cakes combined with buttercream, roasted peanuts and salted caramel can easily be called exquisite pastries. This cake is well worth the hours of preparation - it will be the best one in your recipe collection. For a richer flavor, you can soak the cakes in peanut or chocolate syrup. Purpose: For the holiday table Main ingredient: Dairy products / Nuts / Dough / Biscuit dough / Cream / Peanuts Dish: Baking / Cakes / Sweet
And now - the dough!
Pour a glass of sugar into the mixer bowl.
Add 180 ml of odorless vegetable oil.
Let's beat! Not long, about 1-2 minutes.
Add 2 eggs one at a time, beating well each time.
Many who rarely prepare sweets are interested in the correct consistency. It will be quite pleasant, medium density.
Sift 1 cup of flour into a separate clean and dry bowl.
Add 1 tsp. baking powder.
2/3 tsp. soda, a pinch of salt.
We also put 0.5 tsp there. cinnamon and nutmeg.
Mix the dry ingredients thoroughly in a bowl and carefully, preferably with a silicone spatula, fold them into the egg-butter mixture.
Pour half a glass of chopped nuts into it.
Now we mix them in. The dough turns out viscous, not too liquid.
Put grated carrots in it.
Well, of course, we mix it in! In the same way, carefully, using a spatula, folding movements from bottom to top. Carrots will immediately make our dough a little thinner. But it will still seem to drag on. Now…
To prepare we will need (cake diameter 16cm):
Chocolate sponge cake:
- Flour-175g
- Sugar-200g
- Cocoa-40g
- Baking powder-10g
- Salt-4g
- Eggs-2pcs
- Milk-200ml
- Vegetable oil-40ml
- Butter-45g
Chocolate mousse:
- Milk chocolate-90g
- Milk-50g
- Cream (fat content more than 33%) - 100g
- Gelatin-4g (plus cold water-20g)
Salted caramel:
- Sugar-150g
- Cream (fat content more than 33%) - 120ml
- Butter-70g
- Salt-1/3 tsp.
Caramel Cheesecake:
- Cream cheese-200g
- Sugar-20g
- Egg-1 piece
- Cream (fat content more than 33%) - 40ml
- Corn starch-3g
- Salted caramel-70g
Peanut praline:
- Peanuts-50g
- Sugar-20g
Peanuts, in a caramel layer:
- Peanuts-50g
Cream cheese with peanut butter:
- Cream cheese-600g
- Cream (fat content more than 33%) - 150g
- Sugar-80g
- Peanut butter-2 tbsp.
...baking.
You can do this in any form you have. Metal detachable, silicone or sliding ring for baking and assembling cakes. I have just such a ring, it, of course, without a bottom, and I will show you how I adapted to bake cakes in it. I just remember very well how some time ago I was tormented by the question of whether it’s even possible to cook something in such a ring, whether the dough will leak out, etc. It’s possible! :) Moreover, I like cakes from the ring even more than baked ones in other forms, for some reason they turn out taller and smoother.
I set the diameter I need. In this case it is 18 cm.
I place a piece of foil on a baking sheet with a flat bottom, and on it - a square of baking paper, such that the mold fits on it.
I put the whole form on it and kind of wrap it in foil. I try to press the foil tightly to the base of the mold, making a kind of “cover”. This way I know for sure that the dough will not leak.
It is advisable to weigh our dough (taking into account the weight of the bowl) and divide it into 4 parts. I got 915 g of dough. Round up, and it comes out to 229 g for each cake. Place the prepared pan on the scale and pour a portion of the dough into it. You don’t have to weigh it, just do what is called “by eye,” but then the chances are very high that the cakes will be too different in thickness and the cut will not be as neat as you want.
Place the crust in the oven for about 15-20 minutes. I say “approximately” because everyone’s oven is different. You can check the readiness with a dry splinter. It may come out with crumbs, because the cakes turn out a little damp, but there should be no traces of wet dough! The color is pleasant, rich yellow, closer to orange, golden.
We took it out of the oven, let it sit for a couple of minutes and carefully ran a knife between the walls of the pan and the edge of the cake. If the pan is non-stick or silicone, you don't need a knife.
Remove from the mold.
Let cool without removing from the paper.
We wash the pan, wipe it dry (I do this with disposable paper towels, it’s very convenient!), pour in the next portion of dough, put it in the oven... In general, bake the remaining three cake layers in this way and cool them completely. Moreover, we still need to do...
Mamacrazy.ru: culinary blog, Kazakhstan
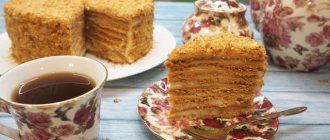
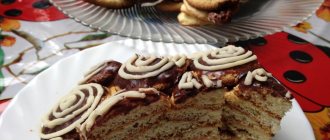
Well, let's bake a cake based on “sea crackers” - classic and chocolate? Intrigued? Yes, yes, that’s what we all called our favorite biscuit - 500 years ago. Back then, butter was not added to the biscuit; it was stored for a long time and was a favorite delicacy of sea travelers. Since then, French, English and Australian chefs have worked hard on the recipe and we have a great opportunity to repeat their experience. Today I will show you how to make a sponge cake using the hot method and talk about the nuances of preparation. And to make our cake original and combine flavors, I added chocolate cake layers. They turn out porous, moist and perfectly highlight the notes of a classic sponge cake.
Let's take six large eggs: they are marked C1 and weigh at least 50 g. In this recipe we do not use soda or baking powder; the fluffiness of the sponge cake will be achieved due to the proteins whipped into a tight foam: the larger the egg in size, the more protein it contains . Also remember that it is better to use eggs at room temperature; remove them from the refrigerator in advance. We also need sugar (180 g) and flour (200 g).
Beat the eggs into the pan; it should not be too small; during cooking, the mass will increase 2-3 times. Prepare your mixer and temperature probe. If you have not yet purchased this device for the kitchen, I highly recommend it, it will come in handy in preparing not only desserts, but also meat dishes. The price is quite low, and you can buy it at any specialized confectionery store.
Place the pan in a water bath (I immersed the smaller pan in the larger one), beat continuously with a mixer and control the degree of heating of the eggs with a temperature probe. Beat until the eggs warm up to a temperature of 40-50 degrees.
Remove the eggs from the bath and add sugar (180 g) in a thin stream. Continue beating until the mixture doubles in volume and cools to room temperature.
Next, add flour (200 g) and gently knead with a spatula or wooden spatula from bottom to top until smooth, the dough is ready.
The bottom of the mold should be covered with parchment, and the walls should be greased with butter, but not higher than 1 cm. Otherwise, the edges of the sponge cake will not be able to rise, and the middle will grow and then it will crack. Dust the greased edges with flour, turn the pan upside down and tap lightly to remove excess flour - this method is called the “French shirt”.
Fill the prepared form 2/3 full and place in an oven preheated to 180 degrees. You cannot open the barrel for the first 10-15 minutes, otherwise the dough will fall off. Check the readiness with a wooden skewer in the center; it should be dry. My cake took 40 minutes to bake.
After removing the cake from the oven, allow it to cool in the baking pan before turning it out onto a wire rack. If you start to take it out right away, it will settle. I always try to bake the sponge cake in advance so that it rests overnight in the refrigerator, wrapped in cling film. Then the moisture inside the biscuit will be evenly distributed, it will become even tastier, will not crumble and can be easily cut into cakes.
This is what you should get!
Now let's prepare the chocolate cakes. We will need: eggs - (3 pcs), sugar - (300 g), cocoa - (30 g), vegetable oil - (180 g), kefir, fat content at your discretion - (280 ml), flour - (340 g) , baking powder - (2 tsp), I try to use German, as experience has shown, others give the product a specific smell and aftertaste. Soda – (1 tsp), salt – (1/4 tsp)
Mix all dry ingredients in a bowl. Be sure to sift the soda and baking powder through a sieve to avoid the slightest lumps.
Beat eggs (3 pcs) into the dry mixture, pour in oil (180 g).
Mix everything thoroughly until smooth, you should get a silky, not liquid, but not thick dough.
Fill the prepared form 2/3 full, bake at 180 degrees, after 15-20 minutes, start checking the dough for doneness with a skewer. These cakes do not need to be cooled in the pan; remove the dough from the oven and let it sit for a couple of minutes. Then run a sharp knife around the edges of the cake to pry up the dough and place the cake on the rack. When it has cooled, wrap it in cling film and put it in the refrigerator overnight.
Our cakes are ready, it's time to start preparing salted caramel with peanuts, which will become a layer in the cake. Peanuts go well with caramel and chocolate, so the additional flavor notes will complement chocolate and classic sponge cake well. For work, prepare: sugar - (200 g), cream 33% - (100 ml), butter - (125 g), dark chocolate 55-65% - (40 g), chopped peanuts - (30 g), fine salt – (1/4 tsp).
Combine cream and butter. They need to be heated in the microwave until hot. Do this before you start melting the sugar, everything needs to be done quickly and you won’t have time for it later. Place a cup of hot butter and cream next to the stove so that you have it at hand during the process.
Pour sugar into a saucepan with a thick bottom, add salt there.
Place the pan over medium heat and stir all the time until the sugar melts, watch how it happens...
When the sugar becomes liquid with a beautiful caramel shade, pour hot cream and butter into it. Be careful and don’t be alarmed, the mass will begin to bubble and hiss – this is how it should be.
Pour in without ceasing to stir vigorously.
Then remove the caramel from the heat and add chocolate - (40 g). ATTENTION! If the sugar begins to crystallize and you feel lumps in the mass, strain the caramel through a sieve before adding the chocolate. Making caramel requires skill, so don’t worry if it doesn’t go so smoothly the first time.
Mix vigorously.
Add peanuts - (30 g). By the way, you can chop the peanuts yourself or buy them ready-made at a culinary store.
Set aside the finished caramel; gradually it will begin to cool and thicken. Let's start preparing the cream for the cake. Prepare chilled cream 33% - (800 ml). You can also put the mixer bowl and attachments in the refrigerator for a few minutes. Cold cream will whip faster in a cold bowl. We will also need: cream cheese (Almette, Cremette) - (420 g), powdered sugar - (70 g), gel coloring of any color, it all depends on your imagination in decorating the cake.
In a mixer bowl, beat the cream - (800 ml) at medium speed. At first they are liquid and splashing, but gradually the consistency will begin to change. As soon as you notice thickening, begin to slowly add powdered sugar one spoon at a time - (70 g), then beat at maximum speed until an airy, stable mass, but not longer, otherwise you will get it to butter. At the last stage, add cheese - (420 g) and gently mix with a spatula from bottom to top.
The result is a stable, non-spreading cream.
Here are our preparations: two types of cakes, caramel for the layer and cream.
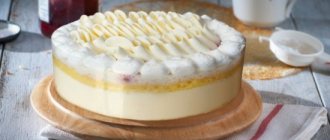
The next stage is assembling the cake, decorating, a fascinating and creative process. Between two cake layers I applied caramel with peanuts, and assembled the others with white uncolored cream. I rolled the cake with cream and blue dye. Decorated with small marshmallows, fresh strawberries, macarons and tilde topping, which I printed out on a color printer.
...cream cheese!
This cream, in my opinion, is one of the simplest, most delicious and convenient.
It is very easy and quick to make, it holds its shape perfectly and - most importantly - it is very tasty, not as fatty as the butter cream family, not as sweet as protein creams. And it stores better than custard. Although these creams have their own wonderful properties! Our “half-naked” cake with a diameter of 18 cm will require 500 g of curd cheese (I used Violette), 100 g of butter and 50 g of powdered sugar. If you want to completely cover the sides with cream, take at least 1 pack more cheese and, accordingly, increase the amount of other ingredients. If you need a sweeter cream, add more powder.
The butter should be at room temperature and the cheese fresh from the refrigerator.
Using a mixer at high speed, beat the butter and powdered sugar.
Beat for about 3 minutes until the mixture becomes homogeneous and fluffy.
Add curd cheese and beat well again. Not very long, 3-5 minutes.
This is what the finished cream looks like.
We take a pastry bag (I use disposable ones; if desired and necessary, they can be thoroughly washed, dried and reused, like plastic bags during our Soviet childhood, remember? :)), insert a “Tube” nozzle into it with an outlet diameter of about 1 cm and cut off the tip.
Fill our pastry bag with cream. This is convenient to do with a tall glass.
Take the first cake layer and begin to carefully spread the cream in a spiral.
These are the kind of alien circles you get! :)
If necessary, use a spatula to level the surface so that there are no voids left.
Place the next layer on top.
And we repeat.
For greater evenness, you can use a pastry spatula (scraper).
Well, we've almost finished the cake.
Apply cream to the top cake layer and smooth it out.
Apply the cream a little at a time onto a spatula, place it perpendicular to the base (table) and level the sides of the cake with the cream. Periodically remove excess cream from the spatula, for example, on the edge of the bowl; you can wash it from time to time, then wipe it dry. This will make the sides of the cake smoother and cleaner. Remember also that with the first layers we “nail” the crumbs so that they do not interfere with us and do not spoil the subsequent picture.
Leveling, as confectioners admit, is an endless process :)
I forced myself to stop here, deciding that this was enough for my idea. If you want a "dressed" cake, continue applying the cream and spreading it with a spatula along the sides of the cake. You can periodically freeze the cake. Apply a layer and put it in the refrigerator for half an hour. Then another layer of cream. Etc. When you realize that it’s enough, put the cake in the refrigerator, and let’s move on to the next step...
Preparation
| First of all, wash the carrots and peel them with a paring knife. Grate on a coarse grater, add 5 tbsp. l. Sahara. |
| Add sunflower oil to carrots. I use IDEAL sunflower oil |
| Mix everything well and set aside for 10 minutes. |
| Meanwhile, add butter and 2 tbsp to a saucepan. l. Sahara. Cooking caramel. |
| When the color begins to change, add 1 tbsp. l. water, mix well and add carrots to the mixture. |
| In a separate bowl, combine flour with spices: nutmeg and cinnamon. |
| Add the dry ingredient to the carrot mixture and mix well with a spatula. |
| We separate the yolks from the whites and add them to our mixture. Add milk there too. Mix well again. |
| Beat the whites to stable peaks and add them to our dough. Gently mix with a spatula and add baking soda, quenched with a few drops of freshly squeezed lemon juice. |
| Transfer the dough into a buttered multicooker bowl (or into a baking dish). Place the bowl in the multicooker and set the BAKE mode for 60 minutes. If you cook in the oven, then place the pan in an oven preheated to 180 degrees and bake for 40-45 minutes until dry. |
| After the beep, remove the bowl from the multicooker and let it stand for a while. The biscuit will come away from the walls and come out well using a double boiler. Leave the biscuit to cool completely. |
| For the cream, beat the butter with mascarpone and powdered sugar until fluffy. |
| We fix our sponge cake in a ring and put the cream on top, level it with a spatula. We send it to the refrigerator. |
| Let's prepare the caramel: add powdered sugar, starch and pink salt in a saucepan to create caramel. While stirring the mixture, add heated cream and half the water. Then add the gelatin swollen in the remaining water and stir until completely dissolved. Strain the caramel through a strainer and let cool. |
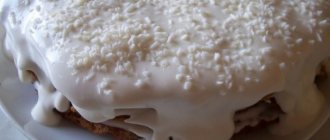
| Pour the cooled caramel over our cake and put it in the refrigerator to harden. |
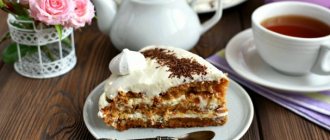
We decorate the cake according to your taste and desire. I had a cocktail cherry, and I also decided to practice making a caramel web...
...chocolate smudges.
For them we need to prepare chocolate ganache.
Take 70 g of cream 33%. Pour them into a saucepan. And bring to a boil, but do not boil.
Remove from heat, add 90 g of dark chocolate (from 50%).
Mix. It won't look very attractive at first.
But gradually the mass will become homogeneous, glossy and quite attractive.
For shine, add 40 g of butter to it.
Stir thoroughly until the butter has completely melted. The mass should not be completely liquid, but flowing. For chocolate drips, you should also pay attention to the temperature of the ganache. Optimal is about 33 degrees. Below - the ganache becomes too thick to easily flow from the edge of the cake, above - it will flow to the substrate, remain a puddle on it, and on the cake itself it will look like a flat stripe, and not an alluring convex smudge.
Little by little, using a tablespoon, spread the ganache onto the edge of the very cooled cake (you can first keep it in the freezer for about half an hour) so that the chocolate drips from it. Don't pour all the ganache into the middle of the cake at once and don't expect it to spread nicely on its own. This is a mistake many novice home pastry chefs make. Play it safe and go around the entire edge of the cake first...
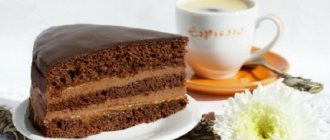
...and then apply the rest to the middle.
Well, then there is a huge scope for imagination! Take any seasonal (or not so seasonal) berries and fruits and place them on the cake in any order. You can sprinkle all this richness with powdered sugar, as I did. I really like the way it looks in such cases: fruits and berries seem to be dusted with snow. If you are afraid that it will melt, use a special non-melting powder, it is sold in large supermarkets.
The best carrot cake is ready! Delicious and beautiful! If you love spice, this will definitely become your favorite! By the way, for those who cook to order: I specially weighed the finished cake. Taking into account the decor, it turned out to be 1745.
Have fun adventures in the kitchen, inspiration and, of course, bon appetit!
Many thanks to Alesya for the recipe, in whose wonderful magazine I saw this super cake! And for advice on drips - cake to Anya! https://cook-hobby.ru/solenaya-karamel-ot-pera-erme.html
Ingredients:
- Butter 82% - 420 grams (120g for dough, 60g for caramel, 240g for cream)
- Milk – 460 grams
- Chicken egg - 4 pieces
- Proteins - 4 pieces
- Sugar - 660 grams (300g for dough, 170g for caramel, 190g for cream)
- Vanilla sugar - 30 grams (20g for dough, 10g for cream)
- Flour - 380 grams
- Cocoa powder – 140 grams
- Baking powder - 15 grams
- Soda – 4 Grams
- Salt - 7 grams (2g for dough, 1g for peanut butter, 4g for caramel)
- Roasted peanuts – 100 grams
- Honey – 30 grams
- Invert syrup – 30 grams
- Water – 30 Grams
- Cream 33% – 240 grams
- Peanut butter – 80 grams
- Peanuts - 150 grams (100g for filling, 50g for decoration)
Number of servings: 7-9