Only a homemade loaf can smell and crunch so wonderfully. Nobody argues that you can buy the most unusual bread product in a store, but it will not have the most important component - love. After all, it is precisely this component that makes homemade baked goods so incredibly tasty. So, time to make a homemade loaf.
Both children and adults know what a loaf is. This is one of the varieties of baked goods that is very popular. Its calorie content ranges from 250 to 270 kcal. The loaf contains a lot of iodine, magnesium, potassium and other nutritional vitamins and microelements.
There are many cooking options and baking technologies for this baked product. Housewives also like to prepare loaves of bread with a variety of fillings. In our article you will find recipes for classic baked goods, a loaf filled with cheese, vegetables and ham, minced meat and garlic butter.
General cooking principles
A beautiful, tasty loaf with a crispy crust will be obtained if you know the intricacies of working with dough and adhere to the following rules:
| Rule | Execution nuances |
| Use fresh, high-quality products. | Flour should be free of lumps, free of foreign odors, and suitable for shelf life. To obtain a fluffy, well-rising dough, the flour must be sifted through a sieve. “Fresh” yeast should be really fresh: beige in color, without dark spots or unpleasant odor. Milk, eggs, butter - the quality of these products directly affects the taste of baked goods. |
| Cook in a warm, draft-free room. | Then the dough rises more actively and faster. In order for the bread to be soft and fluffy, the dough needs to be kneaded 2 and sometimes 3 times (unless otherwise indicated in the recipe). |
| Monitor baking temperature. | This is necessary so that the loaf has a beautiful golden crust and a tender, not overdried crumb. To check readiness, you can use a thin wooden stick (for example, a toothpick). You need to pierce the bread with it to the bottom of the baking sheet or mold - if the loaf is baked, the stick will remain clean. An important point: do not open the oven for the first 10-15 minutes so that the dough does not settle. |
| Cool the baked loaf properly. | After removing from the oven, place it on a wire rack. As the bread cools, it will release excess moisture and retain its crispy crust. |
A loaf in the oven (simple and tasty recipes with a detailed description of the preparation are presented below) can be yeast, whole grain, sourdough, with spices and additives - there are many bread recipes.
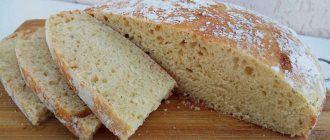
Simple loaf sliced in the oven
The simplest and most classic version of bread made from wheat flour with a minimum of ingredients. The preparation technology and composition of products are given according to the state standard of 1940.
Ingredients
You will need the following products:
- Flour – 500 g.
- Yeast (pressed, fresh) – 5 g.
- Salt – 8 g (1 tsp).
- Sugar – 30 g (1.5 tbsp.).
- Margarine (butter) – 18 g.
- Water – 270 ml.
Classic loaf recipe in the oven
The quantity of products is designed for baking 2 loaves. Since margarine is now produced according to different standards, it is customary to replace it with butter. The entire cooking process takes a little more than 7 hours. The technology is not complicated, but to get a good result you need to strictly follow all the instructions.
Step-by-step cooking process
As a rule, preparing yeast dough begins with preparing the dough. Opara is a leaven for dough made from water (or milk), yeast, and flour.
- For the dough you will need: wheat flour - 220 g, yeast - 5 g, water - 154 ml. In a large container (taking into account the increase in dough volume), you need to measure water heated to 30 degrees and completely dissolve the yeast. They become active precisely at a given temperature, this is an important point.
- Then add flour sifted through a sieve in advance and knead the resulting dough well.
- The container with the dough should be covered with cling film and, covered with a towel, placed in a warm room for 3.5-4 hours.
- To knead the dough you will need the remaining ingredients: flour - 280 g, water - 116 ml, salt, sugar, butter. The sequence of actions is as follows: salt and sugar dissolve in water. The resulting solution is heated to 35 degrees and added to the dough.
- It is better to add the remaining sifted flour in 2 parts - this will make it easier and faster to knead a homogeneous and plastic dough.
- Butter softened at room temperature (heated butter cannot be used) is added last to the almost finished dough.
- The container with the dough must be covered as indicated in paragraph 3 and placed in a warm place for 2-2.5 hours.
- The risen dough should be kneaded and divided into 2 parts. Leave for 10 minutes, covered with a towel, to restore the structure of the dough.
- Form 2 loaves, 40 min. let them rise (under the towel).
- Using a sharp knife, make several cuts on top of each loaf. Before placing in the oven, moisten the surface of the bread with warm water. This can be done using a spray bottle.
- In an oven heated to 250 degrees, place a container of water downwards (with boiling water in a cast iron frying pan or heat-resistant glass container). Grease baking paper (or the baking tray itself) with vegetable oil and carefully transfer the formed loaf. Place the baking sheet in the middle of the oven. Bake the bread for 25 minutes. If there is a convection mode (fan), then this should be used for baking the sliced loaf.
- Carefully transfer the finished bread to a cooling rack.
Recipe for wheat flour loaves with vegetable oil
This cooking recipe is suitable even for novice bakers. Their preparation time is about 5 hours. However, this takes into account the approach of the dough and the baking process. In reality, it will take a little over half an hour to tinker with making the loaves. Well, to knead the dough you need to prepare the following products (for 2 loaves):
- wheat flour – 0.5 kg;
- water – 300 ml;
- vegetable oil – 4-5 tablespoons;
- yeast - approximately 7 g;
- sugar - tablespoon;
- salt - teaspoon.
Preheat the oven to approximately 50°C and turn off the heat. Pour the yeast and 250 g of flour into a bowl. Pour in 150 ml of slightly warmed water (about 30°C). Stir the mixture first with a spoon, and then knead thoroughly with your hands. Cover the resulting workpiece with film and place it in the cooling oven for an hour.
Take out the bowl with the dough, add the remaining ingredients into it (the water temperature is again about 30°C) and knead the dough again. It is considered ready when it stops sticking to the table and hands. This usually takes about 10 minutes. Place the finished lump back into the switched off oven. Now for 40 minutes.
Divide the dough into two parts. Roll each into a thin enough layer to squeeze out all the fermentation bubbles. Roll each layer into a roll and form two loaves. Place the pieces on a greased baking sheet, make cuts as on a sliced loaf and leave for 40 minutes. After 40 minutes, turn on the oven and preheat it to 220°C. This is approximately 10 minutes. Place a baking dish with boiling water poured into it at the very bottom of the oven. Using a brush, generously coat the loaves with water and place in the oven. After 10 minutes, remove the container with water and reduce the temperature to 180°C. Bake the loaves for another 20 minutes. Let the finished bread stand on a wire rack (so that the lower part does not come into contact with the surface) under a towel for half an hour. For everyone who prefers homemade bread to store-bought bread, we have carefully selected the best homemade flatbread recipes.
Loaf without yeast
A loaf in the oven (simple and tasty recipes will help you bake it without yeast) with the addition of soda is one of the easiest recipes to prepare. There are many variations of it, depending on the set of ingredients. The required components are: flour, soda, fermented milk product (kefir, buttermilk, curdled milk, natural yogurt) or brine, salt.
Kefir loaf
To bake yeast-free bread, you will need 1 hour and the following recipe:
- Wheat flour (you can mix premium flour with whole grain flour) – 450 g.
- Soda, salt - 1 tsp each.
- Kefir – about 400 ml.
- Sugar – 20-25 g (1 heaped tablespoon).
- Spices - to taste.
The dough must be prepared quickly.
- First you need to mix all the dry ingredients: sifted flour with soda, salt and spices.
- Then pour kefir into the container (preferably slightly heated, not from the refrigerator), stir the mixture, quickly kneading the dough.
- Form a round loaf and transfer it to a greased baking sheet.
- Before putting the pan in the oven, you need to make notches on the surface so that the bread bakes better.
- Baking mode: 200 degrees (preheat the oven in advance), 40-45 minutes. Readiness is checked with a thin splinter.
Sourdough is a useful replacement for yeast
Another option for bread without yeast is bread made with sourdough. It is very useful and lasts much longer than store-bought. This cooking method is convenient for regularly baking homemade bread.
The fact is that the starter is used partially and repeatedly. It is enough to make the starter once, to use ½ for the dough, and “feed” the rest and keep it in the refrigerator until the next baking.
A simple and so-called “Eternal” leaven is made like this:
- In a deep bowl (for example, a 0.8-1 liter glass jar) you will need to combine flour (100 g) and about 100 ml of purified water into a mixture similar to thick sour cream. Next, you need to cover the jar with gauze or cotton cloth and leave it in a warm room to ferment for 1 day. The mixture must be stirred 2-3 times.
- After a day, add flour (the same 100 g) and clean water, again until the mixture becomes thicker than sour cream. Then it is necessary to keep the starter in a warm place for another 1 day.
- After 2 days, the starter will increase in volume due to bubbles from fermentation. Now you need to add flour (100 g) and water for the last time to the desired consistency and, putting it in a warm place, do not miss an important point. When the starter becomes most active and ready for use, its volume will double. It is then that the starter should be divided and half can be put into the dough, and the second can be put in a cold place. The starter should be stored in a jar covered with gauze. Or use a lid with slots.
- Before you start baking again, you will need to activate the starter by “feeding” it and keeping it in a warm place (this is discussed in detail above).
Recipe for wheat bread with “Eternal” sourdough
Ingredients:
- Wheat flour - about 600 g.
- Salt – 1.5 tsp. (fine) or 2 tsp. (coarse grind)
- Oil (vegetable, olive, sesame, to taste) – 40 g (2 tbsp.).
- Sugar (or honey) – 2 tbsp. l.
- Water – 250 ml.
- Sourdough – 7 tbsp. l.
The sourdough loaf turns out tender and soft, with a pleasant aroma.
- The flour must be sifted and, adding salt, sugar (or honey) and butter, mix thoroughly.
- Next, add the starter, stir and pour in warm water. Knead the dough well so that it does not stick to your hands.
- Covered and left in a warm room, the dough should double in volume. You can speed up the rise of the dough by placing the container with it in a bowl of warm water.
- The risen dough must be kneaded and placed in a proofing pan. You need to wait for the dough to rise again.
- Then, without kneading, put the dough to bake, after moistening the surface with warm water. Bake for the first 10 minutes. at 240 degrees and another 30 minutes. at 190 degrees (temperature conditions must be selected based on the characteristics of the oven). It is better to bake bread “with light steam” by placing a container of water in the oven.
Sliced loaf - step-by-step recipe for home cooking
Ingredients:
- Flour - 300 grams
- Chicken eggs - 2 pcs.
- Butter - 50 grams;
- Dry yeast - 1 teaspoon;
- Milk - 150 ml;
- Sugar - 1 teaspoon;
- Salt - 1 handful.
Preparation:
- Take a small saucepan, pour half of the available milk into it and heat it on the stove for literally 1 minute. Pour into a bowl for kneading the dough, add dry yeast, sugar, mix and leave for 10-20 minutes.
- When the foam has risen, add butter to the rest of the milk and leave for 5 minutes.
- Combine the mixture from two vessels, add salt, beat 1 chicken egg and knead into a homogeneous dough, adding a little flour at a time, for at least 10 minutes. The dough should be elastic, so depending on the type of flour, its amount can be reduced or increased. Let it sit for at least an hour.
- Break one chicken egg into a bowl and beat with a fork or whisk.
- Now the dough needs to be rolled out on a board into a circle, the thickness of which is about 0.5 cm. This circle needs to be tightly rolled into a kind of roll, and the edges should be pinched. Using a sharp knife, make slanted cuts and brush with egg.
- Cover a baking sheet with parchment, place our “roll” on it and leave for half an hour.
- Place the dough in an oven preheated to 180 degrees. Bake for 45 minutes until the loaf is golden brown.
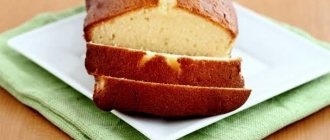
Milk loaf
The loaf according to this recipe is very tasty, with a delicate crumb and a golden crust. Cooking time: about 3 hours.
- Water – 50 ml.
- Sugar – 1 tbsp. l.
- Yeast (fast-acting, dry) – 1 tsp.
- Flour - about 450 g.
- Milk – 200 ml.
- Vegetable oil (refined) – 2 tbsp. l.
- Salt – 1 tsp.
- Yolk of 1 egg.
The sequence of actions is as follows:
- It is necessary to dissolve sugar in warm water and add yeast, mix well. Wait (about 15 minutes) for the dough to rise.
- In a large container, mix warm milk, salt, vegetable oil and suitable dough. Then, gradually adding sifted flour, you need to knead an elastic dough.
- Place the dough in a greased bowl under cling film and leave in a warm place for 30-40 minutes.
- The risen dough should be kneaded and left to rise again for 1 hour.
- Next, form a loaf from the finished dough. To do this, you need to roll out the dough so that you get a circle 0.5-1 cm thick. And roll the dough (as for a roll), quite tightly: after each turn of the dough, pinch its edge to the rest of the rolled sheet.
- Having carefully secured the edge, place the loaf on a greased baking sheet (or on baking paper), seam side down. Then you need to cover it with a towel and leave it to rise for 30 minutes.
- To obtain a characteristic crust, you need to make several cuts with a knife and grease the loaf with yolk mixed with milk (1 tablespoon).
- The loaf is baked at 200 degrees (in a preheated oven) for about 30 minutes. In order for the bread to release excess moisture, cool it by placing it on a wire rack.
Making homemade loaves
1. Heat the water to 45 degrees (in order to understand what the water should be like without a thermometer, mothers used to bathe their babies in such water, check it with their elbow. They lowered their elbow into the water, if it tolerates it, it means 45 degrees). Pour water into a dry, clean cup and add sugar and salt. Mix.
2. Next add yeast to the water.
3. Cover the cup with a towel and place in a warm, draft-free place for about 20-30 minutes. The dough rises well in the oven with the light on (light only, no fire!).
4. When the dough has risen, pour it into a large cup for kneading the dough. Add sifted flour.
5. Knead the dough first in the bowl.
6. Then put it on the table and continue kneading for another 5-7 minutes. You can use a mixer with a special hook attachment.
7. Transfer the dough to a bowl, cover again with a towel and place in a warm, draft-free place for 1 hour.
8. After an hour, when the base has risen, divide it into two equal parts (for baking two loaves), round it up and let it stand for another 10 minutes so that the dough “rests”. Don't leave the dough out in the air for too long, I left it and it got crusty. It's okay, but it doesn't look so appetizing)
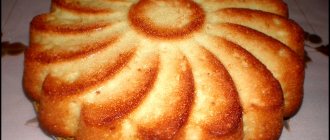
9. Form loaves and place on a baking sheet. For products without filling, you can make notches on the top, but with filling we leave them whole. You can prepare such homemade baked goods with various fillings: stewed cabbage, liver pate, ham, mushrooms and cheese, fried cracklings and onions. Various spices, herbs, seeds, and nuts go well with this pastry. For example, consider the option of preparing loaves stuffed with butter, dill and garlic. Our family's favorite recipe.
- 100 grams butter at room temperature
- half a bunch of dill
- 6 cloves garlic
Finely chop the garlic and dill. Place in a cup along with the butter.
mix
10. Roll out the dough into a rectangle and spread the filling over the surface, leaving 2 cm from all edges.
11. Twist the roll tightly.
12. Place on a baking sheet, seam side down, fold the edges. Leave for 1 hour before placing in the oven.
13. Bake at 220 degrees. Place the baking sheet in the preheated oven. Place a metal bowl on them in the oven (it will come in handy later). The loaves are baked for approximately 30 minutes. 10-15 minutes after the baking sheet has been sent to the preheated oven, pour 20-30 ml of water into the same metal bowl that was placed down. Repeat 2 more times. This is done so that the baked goods have a fragrant golden brown crust. And so that this crust is not matte, but shiny, lubricate the surface of the finished products, which have just been removed from the oven, with jelly (mix 1/4 cup of water with 1 teaspoon of starch, bring to a boil over low heat). And place in the cooling oven for 5-7 minutes. Oh, if it weren’t for these crusts due to leaving the dough in the air, my baked goods would be absolutely beautiful. Well. It doesn’t matter, the taste hasn’t suffered at all.
Soft, airy with a crispy golden brown crust! This is how the homemade loaves with filling turned out, see the cross-sectional photo.
Loaf with cheese filling
A loaf in the oven (simple and tasty recipes will allow you to prepare an unusual dish) can be used as a savory snack. For this dish, you can take any bread: wheat or rye, baked yourself or purchased. “Yesterday’s”, slightly hardened, is the best option.
- Loaf – 1 pc.
- Cheese – 150 g.
- Butter – 100 g.
- Garlic – 2-3 cloves.
- Greens - to taste.
If you cook without garlic, the dish will not be as spicy, but no less tasty. Cooking time – only 30 minutes.
- To prepare the filling, put the butter in advance and heat until softened. Grate the cheese on a coarse grater, finely chop the garlic or squeeze it using a press, chop the herbs. Thoroughly mix all filling ingredients with butter.
- The loaf should be cut into transverse cuts, but not cut all the way through. The cuts can be made obliquely or in the form of cages. The filling should be evenly distributed along the cuts of the loaf.
- The loaf should be wrapped in foil and baked at 200 degrees for 15 to 20 minutes. Then you need to open the foil and keep the loaf in the oven until golden brown for another 5-7 minutes.
A loaf with cheese filling can be served with soup or tea. Flavorful and nutritious, it goes well with kebabs and barbecue dishes.
Unusual and very tasty loaf
Cook the garlic loaf in the oven. You can use a ready-made French baguette as a basis or bake a loaf according to the recipe suggested above. Its alluring aroma will immediately spread throughout the house. Such pastries can be served as a snack dish, or instead of bread.
Ingredients:
- French baguette – 1 piece;
- garlic head;
- parsley;
- soft butter – 170 g;
- blend of Italian herbs.
On a note! These baked goods can be supplemented with olives or pieces of bell peppers. And if you insert slices of bacon into the cuts, you get a complete snack dish.
Preparation:
- Melt the soft butter. This can be done using a water bath or in a microwave oven.
- Wash the parsley, dry it and finely chop it with a knife.
- Add the greens to the oil mixture.
- Peel the garlic and squeeze it through a hand press.
- Add the garlic mass to the rest of the ingredients. Lightly salt and stir.
- We will make neat, not too deep cuts on the baguette. For this we need a fairly sharp knife.
- Rub the baguette thoroughly with a mixture of Italian herbs. You can choose any spices and seasonings to your taste.
- Fill the slits on the baguette with the previously prepared mixture.
- Wrap the baguette with a sheet of foil.
- Bake it for fifteen minutes at a temperature of one hundred and eighty degrees. Ready!
With tomatoes and ham
To prepare an unusual and very tasty dish - a casserole - from simple ingredients, you should use this recipe:
- Loaf – 1 pc.
- Ham – 250-300 g.
- Cherry/regular tomatoes – 6 pcs./2 pcs.
- Egg – 6 pcs.
- Milk – 600 ml.
- Cheese – 300 g.
- Salt, spices - to taste.
- Butter for greasing the mold.
The casserole takes about 1 hour 30 minutes to prepare. Or in 2 stages in the evening so that you can serve it for breakfast.
- Preparation of ingredients. It is necessary to cut the ham into cubes, tomatoes into thin slices, and grate the cheese. The loaf is not cut into thick slices or triangles. Pour milk into a separate bowl, add eggs, salt and spices, beat the mixture well.
- In a deep baking dish, greased with oil, carefully place the ingredients in layers in the following order: slices of bread in 1 layer, ½ cheese, ½ tomatoes, ½ ham; again bread in 1 layer, ½ of the remaining cheese, tomatoes, ham. Place a third layer of bread on top, pour the milk-egg mixture over everything and press a little with a spoon for better soaking. The last layer is the remaining cheese. You can stop at this stage if you prepare the casserole for breakfast the night before. All that remains is to cover the mold with film and put it in the refrigerator. If you cook in the usual way, then after forming the casserole it is important to let it soak for 15 minutes.
- Before baking, allow the workpiece to warm up (20 minutes if from the refrigerator). Bake at 190 degrees for 40-50 minutes.
- Cool the baked goods for 10 minutes. and, having cut, serve.
Stuffed with minced meat
By combining meat filling ingredients with spices and herbs, you can diversify the taste of the dish. The meat component can be different: chicken, turkey, liver, minced meat (pork with beef, beef with lamb or just beef).
- Loaf – 1 pc.
- Homemade minced meat (pork and beef) – 300 g.
- Cheese – 100 g.
- Onion (turnip) – 1 pc.
- Tomatoes – 2 pcs.
- Pickled cucumbers – 2 pcs.
- Vegetable oil (for frying) – 2 tbsp. l.
- Milk (for soaking the bread crumb).
- Salt, herbs, spices - to taste.
A fragrant and tasty stuffed loaf can be prepared in just 1 hour.
- To prepare the loaf for stuffing, you should cut it lengthwise, dividing it into the main part (3/4 of the loaf) and a thin “lid”. The loaf must be freed from the soft part so as to obtain a “shape” with walls no thicker than 1-2 cm. Immediately pour milk over the crumb pieces.
- The onion is fried in vegetable oil until transparent, then the minced meat is added. It is necessary to fry with constant stirring so that the minced meat becomes almost ready and crumbly. Then you need to add the diced tomato and simmer with the minced meat for a few minutes.
- After removing from the stove, you need to season the mixture with salt and spices; add finely chopped cucumbers and herbs.
- Next, squeeze out the bread crumb soaked in milk a little and add it to the filling, thoroughly mixing everything until smooth. Fill the loaf, place it in a greased pan, sprinkle with 1/2 of the grated cheese and cover with a lid. Sprinkle the remaining cheese evenly over the top of the entire loaf.
- The loaf should be baked at 180 degrees for about 30 minutes.
Forming baked goods correctly!
Many housewives believe that giving a beautiful and correct shape to a homemade loaf is quite simple. And it is precisely because of this misconception that the end result is a collapsed dish or baked goods with empty spaces inside. We propose to consider step by step the process of forming the product from the moment the dough is made:
- After you have divided the mass into 2 halves, each of them needs to be rolled back into a ball. The workpiece will “bubble”, since the dough has already become quite airy.
- Carefully roll out each ball on a board using a rolling pin. The thickness of the cake should vary between 1–2 cm.
- We roll the layer into a sausage, and the resulting seam needs to be pinched, as when preparing pies.
- When transferring the dough to a baking sheet, pay attention to the position of the seam - it should be adjacent to the bottom. If the loaf doesn’t turn out to be a beautiful enough shape, you can correct it with your hands.
- At the last stage, the baked goods are decorated with characteristic cuts. They should be made deep enough, but not through (approximately 2–2.5 cm deep).
For those who don’t like simple solutions: if you have already mastered the original recipe for making a loaf, you can try pampering yourself and your loved ones with several unusual dishes based on such baked goods. We are sure that the results will definitely impress you!
With garlic in the oven
Delicious with a delicate crumb, with a light aroma of garlic and spices - this is how you get a loaf of simple sourdough, baked in the oven according to the following recipe:
- Flour – 400 g.
- Sourdough – 6-7 tbsp. l.
- Salt – 1.5 tsp. (fine), 2 tsp. (coarse grind).
- Vegetable oil – 3 tbsp. l.
- Sugar – 1 tbsp. l.
- Garlic – 6-8 cloves.
- Spices - to taste.
- Water – 240 ml.
- Olive oil for roasting garlic.
Garlic is introduced into the dough in an unusual, baked form. If you don’t have ready-made starter, you can replace it with yeast (4 g fresh or 2 g dry).
- Add starter, warm water and dissolved sugar to the sifted flour and mix until smooth. Cover with a towel and leave in a warm place for 30-40 minutes.
- To prepare the garlic, without peeling it, sprinkle it with oil and, wrap it in foil, bake in the oven for 20 minutes. at 200 degrees and the same at 180. Squeeze out the garlic that has become soft and mash it with a fork.
- Knead the dough. To do this, you need to add salt, spices, vegetable oil and softened garlic to the preparation. Then, placing the dough in a warm place, wait until its volume doubles. The risen dough is kneaded 2 times.
- Then you can form a loaf and transfer it to a baking sheet (or put the dough in a deep form) for the last rise.
- Optimal baking mode: 10-15 minutes. at 250 degrees (with steam), then 30-35 minutes. at 200 degrees (without steam).
Recipe for homemade rye flour loaves
As a rule, rye loaves are not baked exclusively from rye flour. In most cases, a mixture of rye and wheat products is used. In general, to prepare such bread you will need the following ingredients:
- wheat flour – 0.6 kg;
- rye flour – 0.2 kg;
- water – 0.5 l;
- vegetable oil – 4 tablespoons;
- yeast - approximately 10 g;
- sugar - tablespoon;
- salt - teaspoon.
First you need to revive the yeast. To do this, mix them with 100 ml of warm water in which sugar is diluted. After 10-20 minutes you can start kneading the dough. To do this, add all the other ingredients to the bowl and mix them, first with a spoon and then with your hands. The result should be a lump that does not stick to your hands. The finished dough should be allowed to rise for 1.5 hours. During this time, it should increase in volume by about 2 times.
Roll the prepared dough into a rope, divide into several parts and form into loaves. Cover the semi-finished products with a towel and leave for 20 minutes. Then they need to be moistened with water and placed on a greased baking sheet. Cover the products again with a towel and leave for another 20 minutes. The loaves should be baked at 220°C. Baking time – 15-20 minutes.
By the way, such loaves can be made with garlic. To do this, at the kneading stage, you need to add three crushed cloves of garlic to the dough.
Useful tips and tricks
The quality and taste of homemade bread largely depends on the flour from which it is made. If the flour is in lumps, but there is no unpleasant odor, it means that it has not spoiled, but has simply become damp. To dry, the flour is heated in the oven at low temperatures. When kneading dough, professional bread bakers specially heat the flour and use a warm bowl for the dough.
When baking bread, you can and should combine different varieties and types of flour, for example, premium with whole grain, wheat with rye or corn.
Spices, dried fruits, seeds, bran - these components will add taste and benefits to homemade bread. Interesting fact: if 10-30% of the flour in the recipe is replaced with flaxseed, the bread will turn out very soft and tender, and will also remain fresh for a long time.
To determine the exact moment the dough is ready, use the following test: a small piece is placed in a glass of cold water. When the ball of dough rises to the surface of the water from the bottom of the glass, it’s time to start baking. To obtain a beautiful and crispy crust, various techniques are used.
A proven recipe is this: during the last rise, do not cover the already formed loaf, let it air out a little. Then make cuts, moisten with warm water and place the bread to bake on a hot baking sheet in a preheated oven.
The crust will remain just as tasty and crispy after the loaf has cooled. An easy way to get a soft crust is to wrap the bread, which is not yet cooled, in a towel.
Author: Sofya Prokhorova
Useful tips
If you follow the recipe, the butter loaf will be soft and airy inside, and the outside will please the eye with a beautiful golden and crispy crust. However, before preparing amazing baked goods, we advise you to familiarize yourself with useful recommendations, namely:
- The dough will be more airy if you do not knead it immediately. Wait a little until foam begins to form on the surface of the yeast solution.
- Chicken yolk will help create a beautiful golden brown crust on baked goods. They need to coat the loaf evenly before putting it in the oven.
- If the dough begins to stick to your hands while kneading, treat them with a small amount of vegetable oil and continue cooking.
- Homemade baked goods can be served either separately or by preparing mouth-watering snacks from them. For example, if you cut the product in half, put your favorite filling inside and keep it in the oven for another 10–20 minutes, you will get an unusually tasty dish.
- Try not to open the oven door for the first 5–7 minutes, otherwise the baked goods may fall and lose their appearance and some of their taste.
Making a homemade loaf, the recipe for which is quite simple, will not work the first time if you have not worked with yeast dough before. But don’t be upset - if you follow the recommendations and follow the instructions, you will soon begin to delight your loved ones with a fragrant dish.