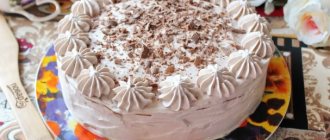
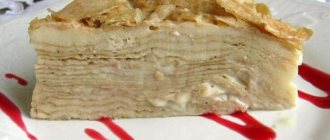
Classic cake “Milk Girl” with filling cream
Condensed milk-based cakes may seem cloying, but the taste of neutral buttercream will correct the situation.
Ingredients:
- 380 g condensed milk (a whole can);
- 160 g flour;
- two eggs;
- 15 g baking powder.
All ingredients are mixed in a mixer. It turns out to be a liquid dough. After a quarter of an hour, bubbles appear in it - this is how the baking powder works. Now you can start baking.
- On the wrong side of the baking paper, draw a circle of the desired size.
- Line a baking sheet with this sheet.
- Pour two tablespoons of dough into the center of the circle and distribute it in the outline.
- The cakes should not be too thick. From the specified quantity of products you should get 7 - 8 pieces.
- Bake for 4 – 5 minutes at 180 ºС. The finished cake does not stick to your fingers.
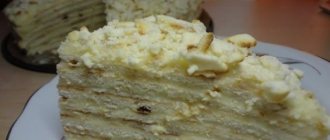
The cake is assembled by coating the cake layers, top and sides with “Plombir” cream. Decorate and immediately put away in the cold.
Classic step-by-step recipe
The preparation stages boil down to kneading the dough for the cakes, baking them, preparing the cream, assembling and decorating the dessert. Try to choose only natural products. Condensed milk without vegetable fat and starch, and the packaging should indicate o. It's better to take it in a tin can rather than in a bag. 33% fat cream made from natural milk is perfect. There are vegetable creams, which, according to reviews, behave well in cream. But you shouldn't harm your health. In general, the cake should be moderately high in calories. So, the classic version is the one that was originally baked by German housewives. Let's get started!
The correct recipe for filling cream
Cream “Ice cream” in the classic version is a mixture of custard and whipped cream.
For the custard base:
- 400 ml milk of any fat content;
- 200 g sugar;
- 30 g starch;
- 100 g flour;
- vanilla extract.
The amount of sugar is an individual matter; this ingredient will not affect the consistency. The cake is made from very sweet cake layers, so the cream can be made completely without sugar.
- Sift flour and starch.
- Stir in sugar and vanilla extract.
- Add the milk little by little, whisking the mixture constantly to break up any lumps.
- Heat over low heat, without bringing to a boil. Do not stop actively working with the whisk.
- Remove from heat as soon as the liquid thickens a little. The process will continue while the base cools.
- To prevent the surface from becoming windy, place cling film on it and smooth it, expelling the air.
For the whipped cream:
- 150 g whipping cream 33% fat;
- ice.
You will also need a whisk or mixer, a deep bowl for cream and a wide bowl for ice.
- The cream is pre-cooled in the refrigerator. It's best to buy them the night before. Do not keep the package in the freezer, otherwise the cream will freeze and not whip. The whisk and dishes, on the contrary, can be cooled in the freezer for half an hour.
- Place the bowl of cream in a container with ice.
- Beat for 3 – 4 minutes at low speed so as not to “catch” the cream.
- Another 5 minutes on full power until stiff peaks begin to rise behind the mixer.
To stabilize the cream in consistency, make it smooth and airy at the same time, add 100 g of softened whipped butter. The cream combines well if the cream, butter and custard base are at the same temperature.
- Beat the base thoroughly with a mixer, adding butter one spoon at a time.
- Cream is also added in parts. Now you can't beat it! The cream is gently stirred from bottom to top with a spoon to maintain the whipped cream texture.
Note to the pastry genius
You have already familiarized yourself with the classic method of preparing the “Milk Girl” dessert. The recipe for a mastic cake is almost the same, but there are still a couple of nuances. Of course, we won’t hide anything and will tell you how to make a “Milk Girl” cake. Step by step recipe? Please! Write it down quickly. Please note that we will have to spend money on purchasing Marshmallows. For what? You'll find out now.
Compound:
- 0.5 kg of sifted flour;
- 0.4 kg of Marshmallow candies;
- 5 eggs;
- vanilla - to taste;
- 1 kg of powdered sugar;
- 0.5 liters of sour cream;
- baking powder – 1 sachet;
- 1 chocolate bar;
- 0.2 kg butter;
- 100 g food starch;
- 1 can of condensed milk.
Preparation:
- Place the marshmallow candies in a glass bowl and place in the microwave oven for exactly 1 minute. The result is a homogeneous viscous mixture.
- Now gradually add sifted powdered sugar to this mixture.
- As soon as you notice that the marshmallows come in clumps and do not stick to the walls of the bowl, proceed as follows. Sprinkle starch onto a horizontal surface.
- Lay out this mass and continue kneading, adding powdered sugar.
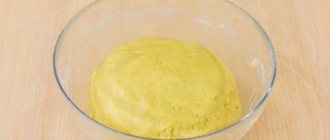
- The elastic mass is ready. Dough? No, it's mastic.
- We'll wrap it in food grade film and put it in the refrigerator.
- In a separate bowl we will prepare the classic dough for the German dessert.
- You already know that we only need four components.
- Read the previous recipe carefully. We will bake cakes using this algorithm.
- Prepare the cream: mix sour cream with powdered sugar. We will need approximately 300 g of sweet dust.
- Add vanilla for flavor.
- Remember that it is better to whip dairy products for cream when chilled?
- Now let's prepare the ganache.
- To do this, melt the butter in a bowl and combine it with the chocolate.
- As soon as the chocolate and butter come together in a single dance, remove the mass from the heat and cool.
- Let's collect our dessert.
- Coat the cakes with sour cream and treat the sides with chocolate-butter ganache.
- A little trick: place the cake in the freezer for half an hour.
- Time has passed and we continue decorating.
- Wet our hands with water and smooth out all the roughness on the surface of the cake.
- Cover the top of the cake with mastic.
- Secret: you need to roll out the mastic with a rolling pin on the table. Sprinkle the surface with powdered sugar.
- The remaining mastic can be used to create figures.
- Decorate a romantic cake with lovers' figures.
With ice cream flavored custard
Cream “Ice cream” has several variations of preparation with different bases.
“Ice cream” on yolks:
- 4 yolks;
- 250 ml milk;
- 50 g starch;
- 150 g sugar;
- vanilla extract.
The base is supplemented with 100 g of butter and 250 ml of whipped cream.
- Pounded yolks, starch and sugar are brewed by pouring into hot milk.
- When the thickened mass begins to separate from the walls when stirred, the base is removed from the heat to cool.
- Butter and cream are added to the custard base according to the same principle as in the first recipe.
Sour cream “ice cream”:
- 500 g fat sour cream;
- 3 eggs;
- 20 g flour;
- 200 g sugar;
- vanilla extract;
- 250 g butter.
Store-bought 20% sour cream adds a slight sourness to the cream. The farm's fatty product will give the cream a softer taste. Whipped cream is not added to sour cream “Plombir”.
- All ingredients, except butter, are whisked and brewed in a water bath.
- The mixture is continuously stirred so that it does not boil and the eggs do not curdle.
- Add the whipped butter one spoon at a time into the cooled base.
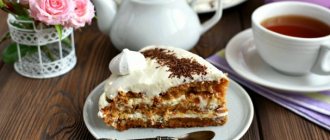
Classic recipe for cake with ice cream
I really love this custard ice cream! With a rich ice cream taste. It also holds its shape well, ideal for layering, leveling and decorating the finished product.
To prepare the cream we will need:
Step 7. For this cream recipe we need hot milk. In advance, bring it to a boil on the stove.
Step 8. In a bowl, beat the egg with sugar.
Step 9. To thicken, add starch and rub well again.
Chocolate cooking option
Options are always possible: make chocolate cakes or chocolate cream. Cocoa fans will prefer both.
Ingredients for cream:
- 180 g milk;
- 100 g sugar;
- 3 yolks;
- 100 g chocolate;
- 50 g starch;
- vanilla extract;
- 100 g butter;
- 250 ml whipping cream 33-35%.
The cream is brewed in milk:
- Grind the yolks with sugar.
- Grate or melt the chocolate.
- Add all ingredients to hot milk.
- Stirring, heat until thickened.
- Add butter and cream gradually into the cooled mixture according to the general principle.
Cocoa powder is added to the crust dough. The amount of dough indicated in the first recipe will require at least 3 - 4 spoons.
In the assortment of some manufacturers you can find ready-made condensed milk with chocolate. It will not add a rich taste to a cake with classic cream. You will still have to add cocoa to the dough or brew chocolate cream.
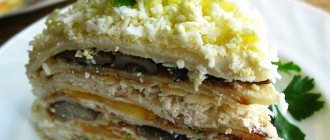
With added fruit to dessert
The cake acquires a special taste when adding fresh or canned fruit. Any combination to taste is possible: peach, banana, kiwi, strawberry and so on. Each cake is topped with a layer of cream and thin slices of fruit or berries. To enhance the taste, you can prepare strawberry ice cream.
Required:
- 200 g of cream cheese, such as Mascarpone or Philadelphia;
- 150 g strawberries;
- vanilla extract;
- 100 g butter;
- 150 g powdered sugar;
- 10 g starch;
- 250 ml heavy cream for whipping.
The berries must be clean and dry so that no water gets into the cream.
- Puree the berries. There should be no seeds or large pieces of skin in the cream.
- Add starch to the puree.
- Heat in a water bath until thickened.
- Beat softened butter and cheese.
- Combine with cooled strawberry puree.
- Beat the cream with powdered sugar and vanilla extract.
- Add the cheese and berry mixture into the cream in parts, carefully stirring the airy cream with a spoon. Do not re-beat!
By standard, homemade quiche only lasts 6 hours in the refrigerator. A cake with ice cream and fruit lasts even less than the classic version. He shouldn't insist. This cake is assembled immediately before the feast. Of course, after drinking tea you shouldn’t leave a piece for the next day.
Required:
for biscuit:
— for our cake we increase the amount of ingredients by 1.5 times. Below are the ingredients for a smaller cake (1 time).
— it’s best to knead the dough once, then, once you’ve baked everything, just make a second batch of dough again so that the dough doesn’t sit for a long time.
- Chicken egg - 2 pcs.
- Condensed milk - 1 b.
- Premium wheat flour - 160 gr.
- Baking powder - 1 pack.
- Vanillin - 1 gr.
for “Ice cream”: for our cake, the amount of ingredients needs to be increased by 1.5 times.
- Sour cream - 350 gr.
- Egg - 1 pc.
- Flour - 3 tbsp.
- Sugar - 110 gr.
- Butter - 120 gr.
for the protein custard:
- Raw protein - 3 pcs.
- Sugar - 300 gr.
- Water - 100 ml.
- Vanillin - 1/2 sachet,
- Lemon juice or citric acid - 1 tsp.
For filling:
- Fresh strawberries
- Bananas
for finishing:
- Sugar figurines (wolf, hare and figure) - made to order in a confectionery shop
Recipe for “Milk Girl” cake with mastic
Decorating cakes with mastic begins with leveling the surface and sides. The question immediately arises of how to make the filling cream thick so that it fills all the unevenness well, does not drip, and the “Girl” does not become deformed after covering with mastic.
Ingredients:
- 350 g sour cream;
- egg;
- 100 g sugar;
- 100 g flour;
- vanilla extract;
- 200 g butter.
The sour cream “Ice cream” prepared according to this recipe has a dense, thick texture. It is not suitable for soaking cakes.
- The mixture of ingredients (except oil) is brewed over low heat. Don’t be afraid of metamorphoses: first the cream will become liquid, then it will thicken near the walls, and lumps will form in it. The main thing is to continuously knead the entire mass from the very bottom.
- After 3 – 4 minutes the cream will acquire a homogeneous, smooth consistency. As it cools, it will become pudding-like.
- The cream is cooled under the film, supplemented with softened whipped butter. It is important to combine the cream and butter in parts.
To create a super-strong surface, you can use Ganache cream with cream for leveling, and soak the cakes with custard “Ice cream”.
In Ganache cream:
- 300 g chocolate;
- 200 g heavy cream;
- 30 g butter;
- 40 g powdered sugar.
You can use white chocolate if you don't want a strong cocoa taste. You will need twice as much white chocolate as dark chocolate.
- Melt chocolate in hot cream.
- Add oil and powder.
- Beat.
- Cover with film in contact and cool.
- Apply and level the Ganache with a hot knife.
An important feature of the “mastic” recipe: the cakes need to be trimmed with a pastry ring. Firstly, they will be even, and secondly, they will be better saturated. It is better to assemble the cake in the same ring.
DIY dessert decoration
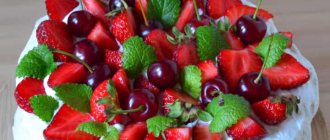
A delicate homemade “Milk Girl” is best decorated with fruits and berries, fresh mint leaves, natural whipped cream, stencil designs or chocolate figures. Such decorations are quickly made with your own hands. Moreover, they are sure to be eaten, and elaborate decorative elements - flowers made of isomalt, gelatin balls, or tooth-crushing confectionery beads - are only good for appearance and usually remain on the plates.
- The drawings are applied to the dry cake layer so that the rich cream does not “eat” them. The surface is thickly powdered with powder of the same color: powdered sugar or cocoa.
- A stencil is laid on top - a direct drawing or a negative - and the entire surface is again powdered with a different color.
- The stencil is very carefully removed along with the excess of the second layer.
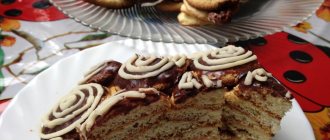
Chocolate figures can be made flat or voluminous.
- The board is covered with cling film.
- Melted chocolate, dark or white, in any combination, in the form of clear figures or abstract strokes, lattices, and so on, is squeezed onto it from a pastry bag.
- If you cover the spread of a thick book with film, you can achieve a 3D effect. For example, this is how butterflies with curved wings are made.
- The drawing is cooled in the refrigerator. The frozen chocolate will easily separate from the film.
To create a three-dimensional figure, you need a “blank” lubricated with oil. The oil will help remove the chocolate impression.
- The base is dipped in melted chocolate and cooled. The simplest option is a small inflatable ball.
- Warm chocolate can be decorated with any sprinkles or nut crumbs.
- When the chocolate hardens, pierce the base. The remains of the ball shrink, separating themselves from the chocolate wall.
- The edge of the ball is melted with a hot knife so that it is even.
Any pastry chef knows that a cake is greeted “by its clothes.” With a little effort, the simplest homemade dessert can turn into a masterpiece of food art.
How to decorate a cake at home
Decorating with your own hands is quite simple, using mastic, glaze, icing, chocolate, whipped cream, marshmallows, food coloring, cookies, waffles, seasonal berries and fruits.
The simplest decoration made from confectionery sprinkles, grated chocolate, marmalade, nuts...
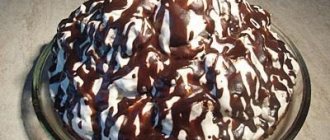
The decor decorated with drips of glaze looks great
Chocolate milk girl with cherries is a real decoration for any holiday table.
Decorations with fruits and berries
Dessert with berry layer
Baby girl design ideas for kids
An original sweet dessert for men
The best ideas on how to assemble and decorate a two-tier cake
Friends, write what useful information you received from the article, share your ideas. Write what other cake recipes you would like to see next time.
Source