12
Prepared by: Alexey Marchuk
10/15/2016 Cooking time: 1 hour 0 min
| Save | I cooked) | Estimate |
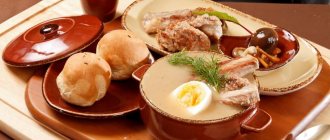
Appetizing Ukrainian palyanitsa is a great alternative to bread on the home table. A special feature of these palyanits is the filling, which you can choose to suit your taste. Simple and affordable!
Cooking steps
Prepare 100 ml of warm water (water temperature approximately 35-37 degrees), yeast and 150 grams of flour for the dough.
Combine warm water, yeast and flour, knead the dough, it will be sticky and viscous. Cover the bowl with the dough with a towel or cling film. It is better to make the dough in the evening and leave it overnight at room temperature. If you don’t have time, you need to let the dough rise for at least 3-4 hours.
In the morning, the dough will look voluminous, bubbly and loose.
I kneaded the dough in a bread machine. Pour warm milk and 125 ml of water into a bucket. Add sugar, dough and vegetable oil.
Then add 350 grams of flour and salt. Set the “Kneading dough” mode, it takes me 1 hour 30 minutes.
If you knead the dough by hand: prepare the dough as indicated in the recipe, then combine 125 ml of water, warm milk and dough in a deep bowl. Add vegetable oil, sugar and salt. Then add the sifted flour and knead into a tight, non-sticky dough. It should turn out smooth and shiny. Leave the dough in a bowl greased with vegetable oil for 1-1.5 hours.
The dough for Ukrainian palyanitsa will rise well.
Place the finished dough on a silicone mat and knead. Line a baking pan with parchment paper.
Form the dough into a log and place it on parchment. Cover the dough with a towel and place in a warm place for 2 hours.
The dough will rise well.
Carefully, directly on the paper, transfer the dough onto a baking tray. Use a knife to make a deep cut.
Gently lubricate the surface of the Ukrainian palyanitsa with hot water. Place the baking sheet with bread in an oven preheated to 220 degrees. Bake for 10 minutes, then reduce the temperature to 180 degrees and bake for about 35 minutes until golden brown.
Carefully transfer the finished Ukrainian palyanitsa to a wire rack and cool completely. The bread turns out finely porous, beautiful, very tasty, tender and airy.
Source
Trot Woodpile
Good day, Alexander and everyone who visits this wonderful culinary blog! Tomorrow (November 1) is my son’s birthday. Anniversary. I’ll be honest, at first I wanted to order my son a beautiful cake in the shape of a laptop from some craftswoman.
Nowadays they create such cakes - they are simply a sight for sore eyes!.. But that was not the case. My son, by the way, said that he would really like the cake that I baked for our wedding anniversary...
Well, the wish of my beloved birthday boy is the law for my mother, and here I am at the stove and oven. And already in the process of preparation, I thought: my cake “Woodpile” could well be sent to the Alexander Abalakov competition. Maybe they'll let me into the last carriage?..
The Woodpile cake is called that for a reason. It is based on tubes of choux pastry, which are stacked on top of each other, like firewood in a woodpile. It turns out beautiful and very tasty and tender!
For the choux pastry you will need:
- 1.5 cups flour
- 1.5 glasses of water
- 150 g butter
- 6 eggs
- salt
We begin to cook the dough for the Woodpile cake. Pour water into the pan, add a pinch of salt and oil. Stir and bring to a boil. Then gradually add the sifted flour, without ceasing to stir.
After pouring out all the flour, mix thoroughly until the lumps of flour disappear. Then heat for a couple of minutes and remove from heat.
Having beaten in all the eggs and mixed until smooth, proceed to baking. Heat the oven to 220 degrees. Lightly grease the sheets with oil or cover with parchment paper. Squeeze out strips of dough using a pastry syringe or bag.
Preparing cream for the Woodpile cake
My cream is also custard, and for it I used the following ingredients:
- 1 glass of milk
- 1.5 cups sugar
- 1 egg
- 2 tbsp flour or starch
- 200 g butter
- vanillin
Pour milk into a saucepan, add sugar, butter and break the egg. Mix everything thoroughly and barely bring to a boil over low heat. Now add a couple of tablespoons of starch to make the cream thicker. Another minute and the cream is ready! We stack the firewood in the form of a woodpile, coating each layer with cream. Sprinkle the finished Woodpile cake with chocolate chips.
This is the birthday cake I made! I hope the hero of the occasion and his guests enjoy it! Thanks for the wonderful competition! Sincerely, Lyudmila Potsepun, mother of beautiful sons and owner of the blog “Flowers of Life”
Other articles from the competition participants:
- Appetizer "Crab balls"
- Pork recipe in the oven
- Mashed potato casserole with fish
- Delicious pancakes in German
- Carp baked in the oven with apples
Total:
| Composition weight: | 100 gr |
| Calorie composition: | 227 kcal |
| Belkov: | 4 g |
| Zhirov: | 13 g |
| Carbohydrates: | 44 g |
| Used: | 7 / 21 / 72 |
| H56 / C0 / B44 |
Cooking time: 12 hours
Published by: lenaI
Remove the cherries from the jar and drain in a colander. Let it drain. Sift the flour into a bowl. Make a well in the center and pour in sour cream, add soft butter and mix thoroughly. We achieve a homogeneous mass. When the dough does not stick to your hands or the walls of the dish, it is ready. You should get an elastic, soft dough. Divide into 10 pieces and roll each into balls. We roll them into rectangular layers with edges: the long one is a couple of cm longer than the baking sheet, and the short one is 7 cm. The thinner you roll it, the more layered the tubes will be. Place the cherries in one row along the long side. Make 1 turn of the dough to cover the cherries. The end edges were folded inward, like an envelope. Then we wrap the rest of the dough in a roll. Carefully pinch the edge. Cover a baking sheet with parchment and place the tubes on it. Bake at 180 degrees until the tubes become rosy and golden brown. This will take 30 minutes. Remove from the baking sheet, but not immediately, but wait 7 minutes to cool a little, otherwise they will break. You need to carefully pry it with two spatulas. For the cream, you need to beat the sour cream with granulated sugar. Now we form the cake. Place four tubes on a plate and fill them with cream, then 3 tubes and cream, two and one tube. At the end, grease the entire cake and ends with cream. When soaked, the cream will drain; it must be collected with a spoon and poured onto the top of the “woodpile”. The cake should steep for 8 hours.
Ukrainian palyanitsa
For the recipe you will need:
For 1 stick weighing about 1 kg
For the dough:
174 g of lukewarm water according to GOST, but also be guided by the moisture capacity of your flour, this time I needed 195 g of water
1.5 teaspoons of dry instant / high-speed yeast (according to GOST 14 g of fresh domestic)
For the main batch:
208 g of water according to GOST, I added 220 g
Vegetable oil for greasing the dough
COOKING:
For the dough, mix flour with dry instant yeast (this yeast is added directly to the flour, without first dissolving in water)
The requirements for the dough are minimal - you don’t need to knead or knead it for a long time, you just need to achieve homogeneity. This is the dough I ended up with.
Cover the dough and leave it warm for 3 – 4 hours. The readiness of the dough can be judged by its appearance - its surface will be covered with burst bubbles, folds and a very pleasant bready aroma will appear.
For the main batch, add the remaining flour and water to the dough, in which you first dissolve the amount of salt required by the recipe.
Knead a fairly dense, but not hard or dry dough. During the kneading process, again focus on GOST standards, but adjusted for the moisture content of your flour. Instead of the prescribed 208 g, I took 220 g.
Knead the kneaded dough thoroughly until smooth. You need to knead the dough for quite a long time - 7 - 10 minutes.
This is the dough I ended up with.
Round the prepared dough, lightly grease with vegetable oil, cover and leave in a warm place until it doubles in volume (about 1.5 hours).
Place the risen dough on a lightly floured table and gather into a ball. To do this, fold the edges of the dough towards the center until a smooth surface forms on the outside.
The most winter cake
“Monastery hut”, “Firewood under the snow”, “Woodpile with cherries”, “Shalash”, “Cherry in a honeycomb”, “Honeycomb”, “Cherry hill”, “Nuns’ monastery” - and by what name is this cake known in your country? family? The many names indicate the extraordinary popularity of the dessert - it is prepared in home kitchens, served in cafes and restaurants, recipes are exchanged between friends and colleagues, and passed down from generation to generation in families.
Of course, to prepare the Woodpile, you will have to tinker. Knead the dough, roll out thinly. Manage to seal the cherries so that all the berries remain inside, and even lie in even rows. And then there are these games with cream - they need to not only smear the tubes, but also periodically curtsey, “lifting” the one that has flowed down to the top. There's still a lot of red tape, yeah. But! As a result, you will get a delicious cake, extraordinary, amazing.
“Polennitsa” has the perfect taste – sourish filling, sweet cream, restrained-neutral dough. This is complete harmony. The cake has a magnificent appearance - at first glance it really seems that the uneven mountain of firewood that was stacked at my grandmother’s in the village, behind the chicken coop, where drafts are always blowing and field mice scurry about, was sprinkled with generous December snow. There is an unusual silence and tranquility all around, and only in the distance someone’s dogs occasionally sound... and here, next to you, the water in the kettle is already boiling, you brew tea and, cutting off a soft, juicy piece of cake, are ready to enjoy the perfect taste of “Woodpile”, having received a lot of pleasure, once again falling in love with your present, again and again deciding that living, baking homemade cakes, dreaming, drinking tea, inviting friends to visit, delighting children with your baking, trying for your husband, treating colleagues - this is so wonderful!
Ukrainian bread Palyanitsa
In Ukrainian cuisine, bread is everything. In villages, bread used to be called “papa”; it participated in all celebrations and rituals. Bread and any other baked goods receive great attention; there are many recipes, from simple to the most complex. It could be a whole ritual.
Ukraine is famous for its pies, loaves and palyanitsa. In this recipe I want to show you how to prepare Ukrainian palyanitsa. The recipe is taken from the Ukrainian cookbook, from the GOST section. The bread itself turns out very beautiful, with a dense crust and elastic crumb. And yet, it should be noted that the scoop itself is quite large in size.
How to cook “Ukrainian palyanitsa” step by step with photos at home
Let's start preparing Ukrainian palyanitsa with dough. For it we take flour, dry yeast, warm water.
Mix yeast with flour. Read the instructions on the package. If it says that the yeast needs to be activated, then dilute it in warm water and then mix it with flour.
Pour in warm water.
And knead the dough. The dough for the dough should have the consistency of dumplings. There are no special requirements for this test; it simply must be uniform.
Cover the dough with cling film and leave it warm for 3-4 hours. If a lot of bubbles appear on the surface of the dough, then you can continue to work with it.
Similar Recipes
To prevent the cake from falling...
Do not close the oven door with a loud noise, this will cause the cake or pie to sink.
- Read completely
How to prevent the dough from burning?
To prevent the dough from burning, you need to put a bowl of water in the oven. It does not matter what test we are talking about. It can be any dough: unleavened, yeast, biscuit, shortbread, choux,…
- Read completely
How to make colored glaze?
For colored glaze, you can use natural dyes. The red color of the products is given by beets, orange by carrots, yellow by orange juice, green by parsley, brown by…
- Read completely
How to preserve sponge cake longer?
Place half an apple in the box with the sponge cake to prevent the cake from drying out.
- Read completely
How to prepare mastic for a cake.
To prepare the cake fondant, you will need marshmallow marshmallows and a microwave oven. Place marshmallows in a porcelain or glass bowl, add a spoonful of butter and melt slightly...
- Read completely
How to cover a cake with fondant.
If you already have ready-made cake mastic, roll it out on the work surface with a rolling pin to the desired thickness, greasing the table and rolling pin with starch. Then transfer the suit using the same rolling pin...
- Read completely
How to decorate a children's cake with fondant.
In order to decorate a children's cake with beautiful mastic figures, you can use various books that tell you how to make figures from plasticine. Modeling from mastic for a cake...
- Read completely
Reviews (18):
wonderful bread, such a porous structure) what can I say? just fantastic) I really wanted the bread)))))))))))))))))))
Tanyusha, another delicious piece of bread!