There are so many housewives with so many opinions about how, where and what to use to prepare various dishes. Some people prefer ceramic, glass, refractory utensils for baking, others prefer cast iron or even disposable ones, but the popularity of silicone utensils is increasingly gaining momentum. A large selection of sizes and shapes provides the opportunity to use your imagination. For those who are still new to this wonderful invention, here is our selection of information about the properties, types and rules for using silicone molds.
Are silicone molds harmful to health?
Some housewives are still afraid to use silicone utensils, but in vain, because they are very convenient and practical to use. In order to confirm or dispel some myths about whether silicone molds are safe, we suggest taking a closer look at the properties of the material from which such products are made.
- Upon careful inspection, make sure that the form, although flexible, is elastic, then it will not “float” when the temperature changes.
- A pungent odor and very bright color of the product indicate low-quality raw materials that should not be used for contact with food.
- Choose silicone utensils that are neutral in color, such as medical grade silicone. It does not oxidize when interacting with foods, does not react with food acids, does not emit toxic substances when heated, and therefore does not harm human health.
- If the molds are made without any violations of technological processes, all rules are followed, and only high-quality materials are used as raw materials, you don’t have to worry about your health.
- Choose products from well-known manufacturers TVS, Ballarini, Tescoma, Vinzer, Moneta, Ikea, Lurch, who guarantee and confirm with quality certificates that their products are safe.
Types of silicone molds
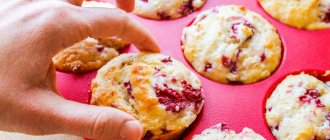
Silicone baking molds come in different shapes and sizes: round, oval, square, cup, heart, crescent. Some are suitable for baking small muffin cupcakes, then one general form can contain from 4 to 12 cells. Larger pies, hot dog buns, breads, waffles and muffins are baked in individual pans that may have smooth or ridged sides. For baked goods that will be intended for children, shapes in the form of animals and flowers are provided. Among all children's forms, Barney Bear and Baby Dragon are very popular.
How to properly use silicone baking pans
In order for silicone baking dishes to serve you for a long time and be reliable assistants in the kitchen, you need to follow a few simple but mandatory rules for caring for such specific utensils. Step-by-step recommendations on how to clean and store the molds will help you obtain the necessary information that will be useful so that you can use simple and convenient utensils at the right time.
What to do before first use
After purchasing a new silicone mold, be sure to wash it under running water using detergents: it is necessary to wash off any possible dust. Dry completely so that not a drop of moisture remains. Lubricate the entire surface with vegetable oil and leave for a while so that it is absorbed in the right amount.
Do I need to grease the pan before baking?
When the first stage before use has completely passed, then in the future you no longer need to think about how to lubricate the mold; there is no need for this. When you plan to bake a large pie, you can lightly moisten the pan with water.
Do not allow the mold to come into contact with open fire, as this may cause it to melt. Too high temperatures are also contraindicated; the optimal temperature is from 180 to 210 degrees, which often corresponds to the recipe for a culinary product. Sometimes the mold itself indicates the temperature of use - up to 260 degrees.
How to remove baked goods
After the baking process is completed, the pan should be carefully removed from the oven and allowed to cool slightly for 5-7 minutes. The edges come off easily if you peel them off a little by hand. By turning the pan over or tilting it to one side, remove the baked goods without problems or breaks. Do not use cutting or sharp objects that could damage or puncture the mold. The best helpers will be wooden, plastic, and silicone spatulas.
How to clean after baking
After finishing baking, wash the pan immediately or immerse it in water for a while. Residues of dough can be easily removed from the smooth surface of the silicone (with a sponge and detergent).
How to properly store silicone molds
More convenient to store dishes have not yet been invented. Silicone products are easily folded, placed inside each other, when unfolded they immediately take their original shape, and are not afraid of temperature changes.
Cookies for tea
Sandy, crumbly, soft, with glaze, still warm... Homemade cookies have their own indescribable aroma that spreads throughout the apartment and says that guests are always welcome in this house!
After all, cookies are an ideal dessert for a tea party... After all, cookies, as a rule, are not as high in calories and fat as a cake, and not as sickly sweet as candies. At the same time, cookies can be made in a variety of shapes, because a good housewife always has in her arsenal many different molds for culinary masterpieces. We all remember “mushrooms” and “nuts” from childhood... Today’s kitchen gadgets help you create “angels”, “cars”, “flowers”, “fruits”, “houses”, “Christmas trees” - you can’t list everything, you can only fantasize!
After tea, don’t forget to put some of the baked goods in a small paper bag for each guest - “on the path.” Read how to make quick homemade cookies on WomanJournal.ru!
What to cook in silicone molds - recipes with photos
Cooking in silicone molds is a real pleasure. Such dishes are useful for both the oven and the microwave with a multicooker. Original forms of dishes (cup and saucer, fruit-shaped) add variety to kitchen life. Prepare delicious baked goods with your own hands in convenient silicone containers according to our recipes, which we have selected especially for you.
In the oven
Recipe No. 1 – Chocolate muffins
Ingredients:
- Flour.
- Cocoa powder.
- Baking powder.
- Butter.
- Sugar.
- Eggs.
- Vanilla sugar.
- Kefir.
Preparation:
- Mix the dry ingredients - 100 grams of cocoa, 250 grams of wheat flour, 1 teaspoon of baking powder, salt and soda, half a teaspoon of vanilla sugar.
- In a separate bowl, melt 100 grams of butter, add 250 grams of sugar, 2 eggs and 200 grams of kefir.
- After mixing all the products, add 200 grams of chocolate and mix again.
- Pour the dough into the prepared silicone molds and bake for 25 minutes in the oven, which is heated to 200 degrees.
Recipe No. 2 – Marble Cake
Ingredients:
- Flour.
- Butter.
- Sugar.
- Milk.
- Eggs.
- Baking powder.
- Cocoa.
Preparation:
- Soften 250 grams of butter and beat well with 1 cup of sugar and vanilla.
- Gradually add 4 eggs and half a glass of warm milk.
- Add one packet of baking powder and 2.5 cups of flour and mix well.
- Divide the dough into two parts, add three tablespoons of cocoa to one.
- Place the liquid white and chocolate dough alternately into the silicone mold, 1 spoon at a time, without mixing.
- Place in the oven when the temperature reaches 200 degrees. Baking lasts 40-45 minutes.
In the microwave
Recipe No. 1 – Cupcake “Curd Tale”
Ingredients:
- Semolina.
- Cottage cheese.
- Sugar.
- Sour cream.
- Eggs.
- Soda.
- Flavored alcohol.
Preparation:
- Mix 200 grams of cottage cheese and semolina and leave for 10-15 minutes for the cereal to swell.
- Add 2 eggs and 2-3 tablespoons of sour cream to the resulting mass. Stir thoroughly, whisking, add 80 grams of sugar.
- Separately mix half a spoon of soda and one tablespoon of alcohol, add everything to the dough. Beat with a mixer at high speed.
- Fill silicone molds a little more than half the volume. Small muffins will be ready in 4-5 minutes, large muffins will take 8-12 minutes.
Recipe No. 2 – Five Minute Cake
Ingredients:
- Flour.
- Starch.
- Egg.
- Vegetable oil.
- Sugar.
- Baking powder.
- Milk.
- Cocoa.
- Sour cream 10%
- Powdered sugar.
Preparation:
- Beat one egg with four tablespoons of sugar, add two tablespoons of cocoa. Add a mixture of flour (4 spoons), baking powder (0.5 teaspoon) and starch (1 spoon), stirring.
- Pour in 5 tablespoons of milk and 3 tablespoons of butter.
- Bake at maximum power of 1000 W for 3-5 minutes.
- Grease with sour cream and powdered sugar.
In a slow cooker
Recipe No. 1 – Cupcake with jam
Ingredients:
- Sugar.
- Sour cream.
- Baking powder.
- Sour cream.
- Eggs.
- Butter.
- Flour.
- Jam or preserves.
Preparation:
- Mix fat sour cream (25-30%, 200 grams) with one chicken egg and two tablespoons of sugar.
- Add 50 grams of softened butter to the mixture. Beating with a mixer will make the cake more tender.
- Mix one teaspoon of baking powder and a glass of flour. Mix with liquid mixture.
- Select the desired silicone mold so that it fits into the multicooker, fill it with half the dough.
- Place jam or marmalade on top, then the remaining dough.
- “Baking” mode, after 1 hour the cake with jam is ready.
Recipe No. 2 – Cottage cheese casserole
Ingredients:
- Cottage cheese.
- Sugar.
- Eggs.
- Vanillin.
- Starch.
- Citrus zest, nuts.
- Milk.
Preparation:
- Beat the whites of two eggs into a thick foam.
- Mix 600 grams of cottage cheese, 100 grams of sugar, 250 ml of milk, two chicken yolks, 50 grams of starch and half a bag of vanilla sugar.
- Add chopped nuts and candied fruits to the mixture.
- Stirring carefully, add the whites.
- Set the “Baking” mode for 50 minutes.
Oatmeal banana raisin cookies
SimplyBakings YouTube channel
Ingredients
- 2 ripe bananas;
- 80–100 g oatmeal;
- 50 g raisins.
Preparation
Mash the bananas with a fork. Mix them with oatmeal and raisins. Cover a baking sheet with parchment and place about 1 teaspoon of the prepared mixture.
Flatten the cookies slightly and place in an oven preheated to 180°C for about 15 minutes.
Remember