Each nation is rich in its traditional and unique recipes. Some can boast of salads, some of hot dishes, some of drinks, but there is one dish that no everyday or holiday table can do without. What is this? And this is bread.
Once you look into any corner of the world, you will undoubtedly be offered to try their bread. For example, in Mexico everything is about tortillas, in France - baguette, in Ireland - farce, in Uzbekistan - Uzbek flatbreads, which will be discussed below.
Uzbek flatbreads: traditions and rituals
Uzbek flatbread has no equal; it is baked in a tandoor oven and is considered an independent dish.
It is worth noting right away that in Uzbekistan bread (non) is revered from an early age; it is not touched with a knife, but carefully broken with hands. Uzbek flatbreads are placed face up only. They cannot do without the participation of the main dish and tradition. If a loved one has a long journey ahead, then at the beginning of the journey he eats a small part of the flatbread, and the rest is wrapped and stored until his return. According to this ritual, they believe that the road will be easy, comfortable and well-fed.
They also make serious promises on bread. This led to a beautiful pre-wedding ritual: parents from both sides gather to discuss the future of their children, and at the end they seal the agreement by breaking a cake. After all, there is nothing worse than not keeping a promise made on bread.
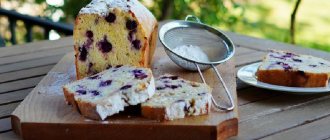
Non goes well with sweet dishes (a divine combination, for example, with sweet grapes), as well as at lunch with hot dishes. Many Uzbeks prefer to start the morning with flatbread as a snack for tea.
Description of preparation:
These flatbreads have gained popularity far beyond their homeland for their unique taste and aroma.
Since tandoor is a rarity in our region, I recommend preparing Uzbek flatbreads in the oven. I've made this recipe many times already, and the results are always pleasing. My family loves to eat these pastries instead of bread and even on their own. So, see how to prepare Uzbek flatbreads with yeast dough. Purpose: For breakfast / Afternoon snack Main ingredient: Dairy products / Milk / Flour Dish: Baking / Flatbread Geography of cuisine: Uzbek / Eastern
Samarkand and Kokand flatbreads
The flatbread has a round shape, and in the center there is a pattern that is baked until a crispy thin crust, but the sides of the flatbread are fluffy. There are many varieties of Uzbek flatbreads. Each region of Uzbekistan is ready to boast of its own unique recipe, or even two.
For comparison, let's take Samarkand and Kokand patyrs. The former can be classified as heavy and very filling medium-sized flatbreads, their center decorated with sesame seeds. The second ones are quite wide, thin, the pattern is spread over the entire flat cake. The secret of Samarkand flatbreads is still not revealed; they joke that it is the air that gives them their uniqueness. These patyrs are simply a real find for guests of Central Asia due to the fact that they remain soft and tasty for a long time; they are chosen as a gift for their relatives, friends and acquaintances.
Uzbek flatbreads are the trump card of their cities. But local residents have been experimenting for a long time and inventing more and more culinary masterpieces of flatbread from the tandoor (for example, flatbread with meat, with cracklings).
Recipe with greens
To make puff pastries with herbs, you will need:
- 200 wheat flour;
- 150 ml water;
- 50 cm vegetable oil;
- a bunch of greenery;
- a pinch of salt.
Sift the flour through a fine sieve, boil water, pour into a bowl with flour and quickly knead the dough. It will turn out soft and elastic, you need to ensure that it does not stick to your hands.
Roll the dough into a ball, wrap in cling film and leave for 15-20 minutes.
Wash the greens (dill, parsley, green onions) well, dry on a paper towel, chop (not very finely), add salt.
Form a roll from the dough, cut it into pieces 3-4 cm wide. Roll each one in flour and roll into a thin flat cake. Sweep away excess flour and brush the surface of the cake with vegetable oil. Place chopped herbs on top of the oil.
Roll the flatbread into a thin rope, which is then rolled into a spiral and rolled out again into a flatbread about 1 cm thick.
The flatbread should be baked in a frying pan greased with vegetable oil until golden brown on each side.
How Uzbek flatbreads are baked
According to the classics, the flatbread is baked in a tandoor. A tandoor is a cauldron-shaped oven, the walls of which are paved with clay. Uzbek flatbreads stick to the walls and absorb their heat. If one of the cakes leaves the wall and falls into the ashes, then it is considered sacred. They bake for an average of six minutes, remove the flatbreads with a special shovel or thick mitten, and help with a slotted spoon.
Everyone knows that a woman on a ship means trouble, and Uzbeks adhere to the same principle in bakeries. The work of making flatbreads is assigned strictly to men. The process is organized clearly and without unnecessary fuss.
As a rule, three people cook: one rolls the dough into a ball (takes care of the weight), the second forms the flatbread according to all its traditions (gives shape and design), the third moves the semi-finished product into the tandoor (“sticks” it to the hot walls) and takes out the ready-made crispy and unique Uzbek flatbreads.
Guests of the country are in for a pleasant surprise in the form of unusual decorations on the flatbread - bakers are always happy to put an exclusive inscription on it or add piquancy with sesame seeds.
Also, those who have visited the East say that Uzbek flatbreads can easily replace a plate - local residents put barbecue or fruit in them.
This is surprising, but the dough is prepared in a variety of ways. It could be baked goods, or it could be unleavened dough, it could be high in calories from milk, sour cream and eggs, or it could be made with herbal dough.
No yeast was added to the first flatbreads. The way out of the situation was this: they took part of the previous batch, that is, they pinched off the dough and used it in the next batch.
Uzbek-style flatbreads in the oven like from a tandoor - homemade recipe
And so, today we are preparing Uzbek flatbreads using yeast dough and kefir. Yeast can be used either dry or fresh. I'll talk about the proportions below. The recipe is not capricious, it works. It always produces baked goods with 100% results. Subject to following some rules, recommendations and step-by-step preparation.
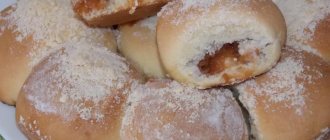
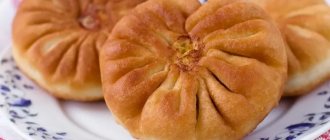
Ready-made Uzbek flatbreads
We'll talk about them below. Friends, take a closer look at this recipe, it is very good. By the way, there will also be a video at the end of the article as a bonus. But also read the description, there are many nuances here that are not mentioned in the video.
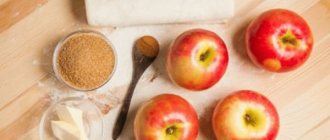
We will need:
- kefir – 200 ml
- water – 200 ml
- flour – 700 gr
- dry yeast - 1 tbsp. spoon (7-8 g)
- salt – 1 tbsp. the spoon is not full
- sugar – 0.5 tbsp. spoons
- vegetable oil – 100 ml
For lubrication and sprinkling:
- egg yolk – 1 pc.
- milk – 1 teaspoon
- sesame – 0.5-1 tbsp. spoon
From this amount of ingredients we will get 4 products with a diameter of 18-19 cm.
Although, if you wish, you can bake three larger pieces.
Preparation:
1. Prepare a deep bowl where we will knead the dough. Heat the kefir and water slightly; you can use a microwave for this. The temperature of liquids should not be higher than 30 degrees. And pour one and the other into the dishes.
A warm environment is needed for the yeast to work best, so don't skip this step. You can also remove the dairy product from the refrigerator in advance and give it the opportunity to warm up to room temperature under natural conditions.
In addition to kefir, you can use the same amount of milk and even fermented baked milk for kneading.
I once had the opportunity to cook with her, and they were probably the most delicious flatbreads I have ever made. Maybe it was just the mood of that day, but the finished bread remained in my memory to this day. In general, I don’t specifically buy dairy products, whatever is in the refrigerator, that’s what I use.
If you cook with kefir, it is better to use one that has already stood in the refrigerator for 4 days. The finished bread will turn out especially fluffy!
2. Pour salt, sugar and yeast into a bowl, all at once, and stir with a whisk until the flavors are dissolved and the yeast is incorporated into the mixture.
You can also cook with live yeast. The proportions in this case will be 1*3, that is, if we took 7-8 grams of dry ones, then we will need 21-24 grams of live ones. The main thing is that both are fresh. Be sure to choose them from a trusted manufacturer. The class of all baked goods will directly depend on their quality.
I really like the products of the brand “Dr. Oetker." With her, all baked goods turn out simply magical.
3. The mixture we prepared is called dough. She needs to be given time to “come up.” To do this, you need to put it in a warm place for 10-15 minutes. Everything will depend on the freshness and quality of the yeast.
When bursting bubbles or a trembling cap appear on the surface of the mixture, you can proceed to the next stage.
4. Pour vegetable oil into a bowl. Make sure it is free of unnecessary odors. Mix with a spoon or whisk. The bubble formation process will continue. He may not be too active, but he is coming.
5. Gradually add flour. It can all be measured and sifted in advance. Or you can only measure it and sift it in batches directly into the mixing bowl. Mix each batch thoroughly with a spoon, and so on until you have poured it all out. That is 700 grams.
At some point, it will become difficult to knead with a spoon, and you will need to switch to hand kneading.
First, gather the dough in a bowl, and then place it on a work surface lightly sprinkled with flour. When kneading, when all the prepared flour has been poured in, at first the dough will stick to your hands.
But there is no need to add more flour. You just need to keep kneading and soon the dough will stop sticking.
6. It will take 5-7 minutes to knead it on the table. During this time, do not add any more flour, so as not to clog it with excess. After time has passed, you will see that it has become more pliable and uniform. It is slightly sticky, but at the same time it does not stick to your hands or to the table at all.
7. Grease the bowl in which the kneading was done with vegetable oil, both the bottom and the walls. Then put our beautiful soft dough into it and lightly grease it with oil along the top.
Cover the top of the bowl with cling film and make three or four punctures in it. This way, we will give the contents an influx of oxygen for the yeast to work, and the film will not allow the dough to dry out.
8. Place the bowl with the contents in a warm place for about an hour. Depending on the warmth of the room and the quality of the yeast, this process may increase or decrease. You will need to monitor the test so that it does not run away. It took me one hour and 15 minutes to get up.
9. After an hour and a half, the dough should rise well, at least doubling in size, and sometimes even three times. It should be kneaded thoroughly, thereby releasing air bubbles. Then put it back on the work table; in this case, flour will no longer be needed.
The dough turned out incredibly tender, lively, smooth and pliable, and it does not stick to your hands at all.
10. Divide it into four equal parts and form even balls.
You can level them right on the table, or you can level them in your hands, depending on how convenient it is for you to do this. It is clear that the dough is alive. Even now, individual air bubbles may appear on it.
Cover the pieces with a towel again and let the dough rest again and rise slightly for another 10-15 minutes.
11. Take one of them and place it in the center of the table, where it will be convenient to form the product into the desired shape. To do this, you need to press the middle with your fingers, making it thin, and thereby the sides will rise.
You can also lift the cake from one of the edges and knead the middle while it hangs, gently turning the workpiece. Then, under its own weight, it will take the desired shape.
It is difficult to explain in words how to do this. Below is a video, watch in it how the formation process occurs.
12. To ensure that the center remains flat and the sides remain fluffy, it is pressed down with a special device. It is called a dough stamp, or “chekich” (chakich). Unfortunately, I don’t have one, so I use a regular cookie cutter. It is shaped like a snowflake and is perfect for this occasion.
And the junction of the flat bottom with the fluffy side can be passed with a fork. In this way, the dough seems to be pricked, and in this place it does not rise while in the oven. Therefore, the product retains its given shape.
The flatbreads are not too large, their size is no more than 18-19 cm. You can divide the dough into 3 parts and make 3 larger pieces.
The size I suggested is convenient because you can place all four products on one baking sheet at once.
13. To ensure everything fits, place the finished pieces in a checkerboard pattern on a baking sheet covered with baking paper and greased with oil.
By the way, so that the design does not move, you can first lay out the formed workpiece on a sheet, and only then work with a stamp and a fork. This way it will be expressed more clearly.
14. Let the dough stand for 10-20 minutes so that the dough rises again. To create an additional heat source, you can turn on the oven to preheat in advance and place the baking sheet on the hob.
15. In order for our bread, “non” in Uzbek, to turn out appetizing and rosy, it needs to be greased. I will do this using egg yolk mixed with milk. All you need to do is shake it well with a fork and the mixture is ready. Take a silicone brush and carefully coat the future cake without crushing the surface.
One yolk and a teaspoon of milk is enough for all four products.
16. According to tradition, Uzbek bread is usually sprinkled with sesame seeds. White is usually used. Although designs can be created from grains of two colors, that is, black is also added.
You will need to sprinkle only the middle with grains, leaving the sides untouched. Nothing should stop them from rising.
17. The temperature for baking needs to be high - 220 degrees. The oven should be warmed up in advance; we place the baking sheet in the oven at the desired temperature.
15. Bake for only 15 minutes. We like our flatbreads not too pale, so I keep them in the oven for a couple of minutes longer. But you monitor this parameter yourself. Everyone's oven bakes differently, so it's very difficult to say for sure.
After the time has elapsed, take them out, check readiness with a toothpick and cover with a towel, leaving them for 5-10 minutes to rest. You can eat it either hot or cold. They will be tasty, tender and airy both on the first day and on the second. Although, as a rule, they do not lie until the second day.
Uzbek flatbread on a platter
The dough is very soft and pliable. We can say that it turns out like fluff. There are many holes and sinuses inside. Eating these is such a pleasure! And it’s incredibly pleasant to treat your loved ones!
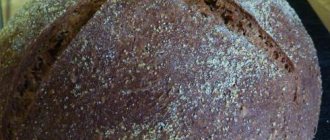
Obi-non
Thus, obi-non is considered one of the most popular types of flatbread. It is this flatbread that passes on a piece of itself to its followers for leavening, or the yeast is prepared independently. From generation to generation, the sourdough recipe is carefully preserved.
When making it yourself, you take a concentrated broth, to which you add chopped onions and yogurt (needless to say, yogurt is also prepared independently with the addition of certain bacteria), and knead the flour on this basis.
The mixture ferments for about fifteen hours. Next, it is diluted with warm water to a liquid consistency. Then add flour and the required amount of water. Again they are left to ferment for an average of five hours. After five hours, water and flour are added one last time. The dough is left to ferment for another forty minutes, after which it can be used to create flat cakes of a unique taste. The starter is renewed on average after nine days.
It is worth noting that this is an ancient recipe, but there is also secret knowledge that wise bakers pass on to their students.
An interesting fact is that among the Uzbeks, not only non, but also sourdough is considered sacred. She is placed in a clean, hidden corner of the home. It is not allowed to dirty it with your feet (step over it, or even sit with your feet pointing in its direction), for this is a sin.
The dough is divided into equal parts, rolled into a ball and then flat cakes are made. The center of the dough is stamped with a pattern and sprinkled with seeds (poppy, sesame, cumin, etc.). After the flatbread is shaped and decorated, it is baked in the tandoor.
The fastest cakes
If you suddenly don’t have bread at home, kefir flatbreads in the oven will always help you out - airy, with a crispy crust. You can take a fermented milk product even from the day before yesterday - the more sour it is, the better.
To prepare flatbreads without yeast in the oven, pour 450 ml of kefir into a deep bowl. Pour 1 teaspoon of baking soda into it. Stir and let it sit for about five minutes. Add 1.5 teaspoons of sugar and salt. Pour in 2 table. tablespoons vegetable oil (unflavored). Beat in the egg. Mix this whole mass thoroughly.
Add 700 g of sifted flour in parts. Knead until the dough stops sticking. Leave it for 20 minutes under a napkin. Make flat cakes with a diameter of 10 cm and a thickness of 3 mm. Place them on a parchment-lined baking sheet and brush the top with whipped
Gala-osiegi-non
The name of the flatbread comes from the name of the village of Gala Osie. This species is widespread near Samarkand and has fifteen varieties. The recipe is complex due to the special sourdough starter. The starter is made from cream, sesame oil and finely chopped onions. Even a “lying” flatbread is attractive in appearance, but as soon as it is heated, all its beneficial properties return to it.
There are many more types of flatbreads, for example, made from corn (zogora-non), with herbal tincture (kuk-patyr), smeared with sour cream (katalama), with the addition of fried lard (zhizzali-non).
Without yeast
- For the dough you will need 0.5 liters of warm milk, add 2 tsp to it. salt and baking powder. Melt a pack of margarine (200 g), cool, and combine with milk.
- Sift 1 kg of wheat flour, add portions to the liquid ingredients, kneading the soft dough.
- Option two: Cut the soft butter into cubes. Sift the flour and mix with baking powder, add salt. Combine butter and flour, knead the dough (by hand or in a food processor).
Form the dough into a ball, coat it with vegetable oil and leave for 15 minutes. Then everything goes according to plan: make thick cakes with sides, prick them in the center, sprinkle with flaxseed, sesame or pumpkin seeds and bake in a preheated oven. Bake for 20 minutes at 2000C.
Options for additives and fillings for flatbreads
Once you learn how to prepare flatbreads according to the classic recipe, you can experiment with the recipe.
You can add various spices to the dough for flatbreads: coriander, sesame, any herbs, bird cherry seeds - this is done in many Eastern countries. The seeds need to be soaked in water and then sprinkled thickly over the finished cakes before placing in the oven.
Sometimes, instead of water, you can use warm milk or ayran, then the flatbread will change its taste and become tender and fluffy.
Ready-made hot flatbreads can be sprinkled with any herbs, grated cheese or caraway seeds.
Uzbek housewives prepare such flatbreads with onions; they place finely chopped onions on the flatbread, roll it into a roll and roll out the wide flatbread again.
You should eat tandoor flatbreads by breaking off small pieces, and you can dip them in your favorite sauce. In the Caucasus, garlic-nut sauce or tkemali sauce is especially revered; you can eat it with shurpa, pilaf, shish kebab and other dishes.
Ak-nan or hot pita bread is an excellent substitute for various confectionery products; they can be served with tea along with dried fruits and nuts.
Don’t be afraid to experiment in the kitchen, try to come up with your own recipe for tandoori flatbreads with the additives that are most loved by your household.
Classic dough for Uzbek flatbread
There are a great many recipes according to which flatbreads are prepared in Uzbekistan. Each area boasts its own unique recipe, which is not used anywhere else.
Flatbreads are prepared from different types of dough:
- yeast;
- fresh;
- puff pastry
For flatbreads, various types of sourdough are used, which are prepared according to ancient recipes. For special and special occasions, sweet flatbreads are baked in milk with the addition of butter and eggs. Puff pastries are baked with sour cream, lamb fat, meat and onions, and cracklings.
The classic dough for Uzbek flatbread is kneaded in water.
Main ingredients:
- flour;
- yeast;
- salt;
- sugar;
- water.
And then everything depends on the skill and skill of the baker. Water can be replaced with milk or whey, eggs, butter or creamy margarine can be added.
Added to the dough:
- spices;
- fried onion;
- greenery;
- cheese;
- cottage cheese.
Important tips for those who are just starting to get acquainted with yeast dough:
- You should choose the simplest and most uncomplicated recipes.
- Before starting work, all products must be removed from the refrigerator in advance, and the liquid used for kneading must be heated.
- The dough will rise faster and increase in volume in a warm, draft-free place.
Meat cakes without yeast on kefir
These flatbreads can be eaten as an independent dish - they taste like a pie, but still have their own characteristics. You'll love this nutritious treat that's perfect for lunch or breakfast.
- Number of servings: 3
- Cooking time : 120 minutes
- Calorie content : 360 Kcal
- Ingredients:
- A liter of low-fat kefir
- Two hundred grams of minced meat from any meat
- Two glasses of flour
- Two hundred grams of cheese
- A pinch of tea soda
- A little sugar to taste
- A pinch of salt
Video recipe from Irina Khlebnikova
- Step 1: First, grate the cheese. It is better if it is a hard variety. Mix grated cheese with sifted flour, pour room temperature kefir into the mixture and add sugar, salt and soda, and there is no need to quench it.
- Step 2. Moisten your hands a little with odorless sunflower oil, place the dough on a table sprinkled with flour and start kneading. Knead the dough, divide it into several parts, form into balls.
- Step 3. Using your hands, form each ball into a cake. And put minced meat on each flatbread. It is advisable to salt and pepper it in advance, lightly fry it with onions, but you can also take it raw. Cover it with a second tortilla on top, seal the edges and place on a baking sheet.
- Step 4. Bake the cakes with meat in the oven for about half an hour. You can also fry them in a frying pan - then they will be more golden, but also higher in calories, because you will have to use oil. As a result, you will get soft and rosy flatbreads with meat and cheese splashes, which are perfect for breakfast or lunch with tea.
In addition to meat, you can use cheese mixed with herbs, cottage cheese with grated garlic and dill, vegetables, ham and cheese, mushrooms, and so on as fillings. During fasting, you can bake the same flat cakes in water. You can eat the dish with sauces and all sorts of side dishes.
With milk
Cakes made with milk turn out especially tender and tasty.
They are very easy to make - any housewife can handle it.
- Number of servings: 6
- Cooking time : 100 minutes
- Calorie content : 345 Kcal
- Ingredients:
- Two hundred grams of milk
- Two hundred milliliters of water
- Fifty grams of butter
- Kilogram of flour
- teaspoon salt
- Two teaspoons of dry yeast
- Step 1. Heat the milk slightly, combine with yeast, salt and butter, stir everything well. Add flour gradually while kneading the dough. You can wet your hands or lubricate them with sunflower oil. When the dough begins to separate well from your hands, cover it with a napkin and leave to “rest” for two hours.
- Step 2. When the dough has doubled in size, divide it into pieces, turn them into circles and leave for another ten minutes.
- Step 3. Turn each circle into a flat cake with your hands; in the middle it should be thinner than at the edges. You can use a fork to apply patterns to the dough.
- Step 4. Grease a baking sheet with oil, place the flatbreads on it and decorate them with sesame seeds. Leave them for another ten minutes.
- Step 5. Place a baking sheet in an oven preheated to two hundred degrees. When the cakes are golden, sprinkle water on them and leave for a while. They should turn out golden brown and tasty. These flatbreads can be stored for several days.
Share with friends
Let's summarize
- To prepare Uzbek flatbreads you need flour and water, yeast, salt, and, if desired, a pinch of sesame seeds for decoration.
- When shaping bread, Uzbek housewives use a stamp - chekich, but it can easily be replaced with a glass or a potato masher.
- The flatbreads are baked for only 12-15 minutes, but the dough takes a long time to rise - about 2 hours.
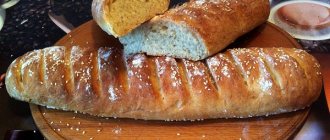
But this is not the only famous Uzbek pastry with a worldwide reputation. samsa in your oven - puff pastries with meat filling.
Here's how the famous culinary blogger Grandma Emma makes them: When using materials from thebestvideo.ru, a link to the source is required.
Features and rules for preparing flatbreads in tandoor
A tandoor is an oven for preparing special flatbreads. Its specificity is cooking food in a specific way. You can buy such a stove in a store, or you can make it yourself to feed your family tasty and healthy.
The main feature of this oven is the cooking of dishes without the use of fat by consuming heat from the heating walls. The flame inside the oven does not fan out, but evenly heats the walls and retains this heat for a long time. But in this oven you can not only bake bread on the walls, but also cook dishes over an open fire.
At the bottom of the tandoor there is a hole through which fuel is added and ash is removed. The walls of the furnace are made of special fireclay clay, capable of maintaining uniform heat for a long time.
The flatbreads are prepared either on a special grid, or stuck to the walls of the tandoor, or on wide skewers that are attached to the oven lid.
All dishes prepared in this way retain their juiciness; they are much healthier than fried or stewed dishes. In a tandoor, dishes never burn due to the uniform distribution of heat.
Flatbreads are attached to the walls of the tandoor
Tandoor dishes will delight even people with the most refined taste; they stimulate the appetite and give a sea of positive emotions.
Necessary baking equipment
In order to cook dishes in an Asian oven, you need to use special devices.
The tandoor oven kit includes a cover that protects the oven from moisture and dust, a heat-resistant apron and mittens, a multi-tiered grill for preparing various dishes, as well as skewers and a Christmas tree designed for stringing cape or fish, as well as vegetables for roasting on coals.
In addition, there are additional accessories that allow you to increase the range of dishes prepared in the tandoor:
- Steak grill, which allows you to cook juicy and flavorful meat;
- Ceramic cocotte makers are used for baking;
- Two-tier plates that are used for preparing large carcasses of goose, rabbit, and duck. It can also be used as a tandoor frying pan;
- The shelf is universal, which allows you to prepare a large number of different dishes at the same time.
Some craftsmen are able to independently make all the accessories needed for a tandoor from steel and fittings.
Preparing the tandoor for work
One of the most important points is to properly light the tandoor for the first time. Asian kilns made in factories are industrially fired. But if you made a tandoor with your own hands, then you need to properly burn it before you start using it.
During initial lighting, the material from which the stove is made expands and microscopic cracks appear on the walls. Therefore, do not be alarmed if you hear characteristic sounds: crackling, clicking, etc.
The readiness of the furnace for operation can only be determined visually. When the soot burns out and the walls become clean again, you can load food into the oven for cooking.
Cooking sequence
A portable tandoor that is heated with wood must first be installed on a flat surface. Try to insulate the stove from the cold ground. Gas burners, if the tandoor is gas, are installed in advance. An electric oven will require an electrical outlet and an extension cord;
- Open the air vent;
- Gas and electric tandoors heat up gradually, but in a wood-burning tandoor, place a little dry bark and wood chips on the grate, and then gradually add finely chopped firewood.
Important: lighter fluid should not be used for tandoors; it has an unpleasant odor that can remain in the oven and then transfer to the food being prepared.
- When the walls of the stove have warmed up well, you can add thicker firewood, but the flame should not rise above the edges of the stove. When the strong flame disappears, cover the oven with a lid, leaving a small hole for the smoke to escape.
- After thick wood begins to burn, the walls of the stove will become covered with soot, but gradually the soot will begin to burn out, and the walls will become clean again.
Cooking with onions
To make these flatbreads you will need:
- flour – 600 g:
- water;
- vegetable oil – 50 g for dough and 100 g for frying;
- 2 onions;
- salt.
Cooking algorithm:
- Knead the dough like dumplings, not too tight so that it is easy to roll out.
- Divide the finished dough into 2 parts. Set one part aside and cover with a towel. Roll out the second part of the dough into a thin layer, roll it up like a roll and roll it in a spiral, make it in the shape of a “snail”, roll it out again. Do the same steps with the other half of the dough.
- Chop the onion as finely as possible and distribute over the dough. Roll the leaf into a tube and cut into portions 4-5 cm wide. Place each piece on the cut and roll over it with a rolling pin, forming a flat cake.
- Fry the flatbreads in vegetable oil on both sides until golden brown. To ensure they cook evenly and well, turn them over several times.
Cooking Uzbek bread with dry yeast
As mentioned above, Uzbek flatbreads can be baked in the oven from different doughs. But the most popular in our country are products made with yeast.
It should be noted that the recipe for creating Uzbek bread is so simple that even the most inexperienced cook can use it correctly. By strictly following the requirements of this method, you will definitely get very soft and tender cakes with a delicious taste.
So, how is homemade Uzbek flatbread prepared? The recipe for creating such flour products requires the use of the following components:
- high-grade light flour - about 700 g;
- fresh milk of maximum fat content – 350 ml;
- granulated sugar - a full large spoon;
- salted margarine for baking - approximately 50 g;
- dry yeast - dessert spoon;
- large country egg – 1 pc.;
- table salt - a medium pinch.