Bee's classic recipe
Ingredients for making the dough:
- Eggs – 3
- Flour - 3 cups
- Butter – 100 g
- Sugar – 1 cup
- Salt – 0.5 tsp.
- Honey – 2 tbsp.
- Cognac (vodka) – 2 tbsp.
How to cook?
- In a small saucepan over low heat, heat the butter, honey and sugar, stirring. This base will give the cake an incomparable honey taste.
- Eggs need to be beaten with salt. Next comes one of the most crucial moments for the entire recipe: you need to pour this mixture directly into the container over the fire in a stream. The stream should be thin and the stirring constant, otherwise the protein will simply cook into the mass, and the cake recipe will disappoint you with the presence of protein streaks in the dough. Add cognac or vodka, as well as soda, to the same mixture.
- The mixture needs to be stirred for a couple more minutes, during which time abundant foam will appear (this should not bother you) and the mass will double in volume. Now you can add flour, stirring it thoroughly, turning off the heat on the stove. Cover the saucepan with a lid and let it sit on the stove for another 5 minutes (with the burner off).
- The dough is ready, as you can see, the recipe turned out to be not at all complicated. To check if you have the right dough, take a portion of it with a spoon: the dough should not be a lump, but be separated by elastic bands. If the dough is lumpy, this will affect the taste; they will taste like honey, but their density will not be the same as the recipe prescribes.
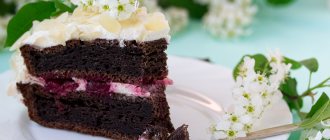
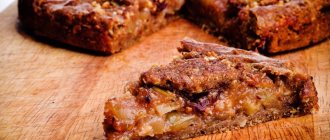
- What makes a cake a cake is the layers. Therefore, we need to make several cake layers from the dough. Since we have a honey recipe, this dough needs to be rolled out especially carefully, as it tends to stick. Therefore, the surface for rolling must be generously sprinkled with flour. Transfer the dough with a large spoon to the surface and begin to knead it, sprinkling flour on top. Next, divide the large lump into 12-15 balls. If you look at the cross-sectional photo of the cake, you will see that this is exactly how many cake layers are used. Roll out the dough onto the cakes thinly, as if you were making pita bread. Roll out all the cakes at once and place them on top of each other so as not to stick together, sprinkling each with flour.
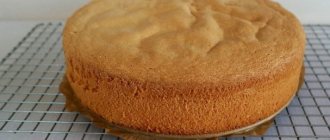
- Let's start baking the cake. We place the first cake on a baking sheet for 2-3 minutes at a temperature of 180. The recipe here also has secrets: so as not to tear the dough while you carry it, wrap it on a rolling pin sprinkled with flour. And after placing it on a baking sheet, pierce it with a knife at a distance of 3-5 cm over the entire surface (since honey cake dough tends to bubble).
- We will even out the edges of the finished cakes. You can use a lid from a pot or frying pan for this. However, do not throw away the scraps: the cake can be decorated with them.
Ingredients for making cream:
- Sour cream – 1 l
- Sugar – 2 cups
- Vanilla - on the tip of a knife
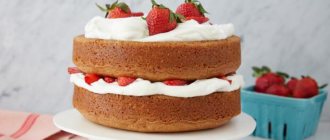
All ingredients must be beaten with a mixer at low speed. Please note that the cream should be thick. Therefore, take full-fat sour cream or add a thickener to the cream (according to the instructions on the thickener package). The cake is smeared with cream on top and sides, all cake layers are coated. Now the cake is ready, but it can only be served after 5 hours.
Decorations for the Bee
The bee is a birthday cake that has recognizable decorations. First of all, these are honeycombs. They are not difficult to make and do not require a special recipe.
It is only important to arm yourself with a means at hand, namely bubble wrap. You don’t even need to look at the photo to guess what you should do: after the Bee has stood in the refrigerator for a couple of hours, take it out and apply a film on top of the surface, hold it for about 15 minutes and remove it: it will leave a characteristic honeycomb imprint
There is another way to achieve a similar effect - using a dumpling maker. Then the honeycombs will turn out large.
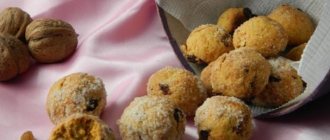
Previously, decorations were limited to honeycombs and a sprinkle of crushed leftover cakes. But you can go further by making bee figurines with your own hands. The recipe is simple: melt dark chocolate and, using a pastry bag or even a regular file, squeeze it into thin strips onto foil (like a bee's body). After the blanks have stood in the freezer for half an hour, add stripes of white chocolate to the body. But wings for bees are made from almond petals (ready-made) or almond slices.
In principle, the recipe for jewelry can be any other - look at photos of finished products on the Internet and use your imagination! Don’t forget to also take a photo of your beautiful and most importantly delicious Bee as a souvenir!
Video recipe for making “Bee” cake
Bee Honey Cake Recipe
- Prepare light cakes. In a heatproof bowl, combine butter, sugar, beaten eggs and honey. Place the bowl with the contents in a steam bath.
- Bring the mixture until smooth. Wait until the butter and sugar dissolve, then add the baking soda and baking powder. Stir and cook with constant stirring for about 5 minutes.
- At first, the dough will begin to foam slightly, gradually the foam will settle, and the dough will become light.
- Remove the dough from the water bath and let stand for 10 minutes. Then sift the flour in parts and knead into a dense, slightly sticky dough.
- Divide the dough into 4 parts and place on a board sprinkled with flour. Cover with cling film and place in the refrigerator for an hour.
- At this time, prepare the chocolate cakes. Chocolate cakes are prepared in the same way, only cocoa is added to a bowl with butter, sugar, eggs and honey. Place this entire mixture in a steam bath and prepare it in exactly the same way as for light cakes.
- When the sugar dissolves and the butter melts, add baking soda and baking powder. Cook for about 5 minutes.
- Sift flour into the dough in parts and knead the dough.
- Divide the chocolate part of the dough into 4 parts and place in the refrigerator for an hour. There will be 4 light cakes and 4 chocolate ones.
- Before baking the cakes, you need to preheat the oven and prepare 8 sheets of parchment paper for each cake separately. You also need to prepare a template for cutting the cakes. Roll out each piece of dough and transfer to parchment, prick well with a fork and bake at 180°C for about 5-7 minutes until golden brown.
- Hot cakes are still soft, and they need to be quickly cut according to the template. When the cakes cool, they will become hard and crispy, so cutting them evenly is unlikely to be possible.
The size of my template is 18 centimeters in diameter.Place the trimmed cakes on the table to cool.
- Once the cakes have cooled completely, they can be stacked.
- Prepare sour cream. The cream requires sour cream with at least 30% fat content. Add powdered sugar to taste to the sour cream and beat into cream.
- Coat all the cakes with cream. If you want to decorate the top of the cake with the same cream and coat the sides of the cake, then you need to prepare more cream. From these ingredients you get a quantity of cream that is only enough for a layer of cake.
- Place the assembled cake in the refrigerator.
- Prepare ganache for coating the cake. Melt the chocolate and let stand for 15 minutes at room temperature. Then add butter and stir everything until smooth.
- The ganache should be cooled to room temperature and beaten with a mixer for 1-2 minutes. It turns out to be a very tasty chocolate cream.
- Coat the cake with ganache and place in the refrigerator for 30 minutes.
- Use fondant to make a bow and ribbon around the cake.
The bow can be glued to the cake using regular cold water. How to make a beautiful bow from fondant for a cake is shown in detail in the Valentine's Day cake recipe. - Melt the white chocolate and place it in a piping bag. Cut off a small tip and paint on the cake.
- Place the finished cake in the refrigerator for soaking for 4 hours.
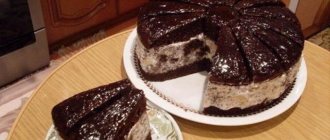
- And, of course, a delicious cut!
Bon appetit!
For the cakes you will need:
Beat the eggs with a broom, add room temperature milk, melted butter, sugar and honey. Then pour the resulting liquid consistency into flour, add baking powder or soda. Usually soda is quenched with vinegar or lemon juice, but not in this case. In this recipe, the soda will be extinguished with honey.
The dough should be put in the refrigerator for half an hour. Then remove the dough from the refrigerator and divide into 4-5 equal parts. Roll out each part on baking paper, bake your cake in the oven until a golden crust forms at a temperature of 175-180 degrees for 5-7 minutes, depending on the oven and the thickness of the cake.
Then don’t waste time and immediately give the cake a round shape. To do this, you will need to cut out a paper circle or square, depending on what shape you want to end up with. Cut the edge of the cake according to the contour of your figure. Thus, prepare 4-5 cakes.
Honey Bee
Amazing honey cake, I have never tried better! I found the recipe many years ago from Lapulka, and since then I have been baking this cake all the time! I recommend!
share the recipe on...
Ingredients:
For honey cakes:
- 500 grams of flour (maybe a little more or less, depending on the quality and gluten content of the flour)
- 2 eggs
- 200 g sugar (I used brown cane sugar, but any will do)
- 80 g butter
- 115 grams of honey (about 3 heaped tablespoons)
- 2 level teaspoons of soda
For cream:
- 400 g sour cream (fat content 25-30%)
- 150 ml cream 33%
- 1 can of boiled condensed milk (380-400 g)
- 2 heaped tablespoons of honey
- For the cream that will cover the top of the cake, you also need gelatin - 1 pack of 11 g. + 50-70 grams of cream (or milk or water) to soak the gelatin (for the cream inside the cake, gelatin is not needed)
How to make bees, see here BEES FOR DECORATION OF CAKES AND PASTRY
Preparation:
Cakes:
- Combine eggs with sugar. Beat lightly with a whisk.
- Add honey, butter, soda. Mix everything well and place in a water bath: pour water into a saucepan, put it on the stove, when the water boils, place the container with dough on top of the saucepan with water. Heat, with constant stirring, until the mass becomes dark golden brown, the mass has doubled.
- Remove the mass from the stove, add flour (sift into the mass). Knead the dough, it immediately turns out very sticky, but when it rests, it stops sticking to your hands, it is very convenient to roll it out.
- Cover the dough with film and leave to cool at room temperature (to speed up the process, you can put the dough in the refrigerator) - start rolling out the dough when it becomes slightly warm, not hot.
- We begin to roll out the cakes - lightly sprinkle the table with flour, pinch off a piece of the dough and roll it out with a rolling pin to a thickness of 5 mm, thinner if possible, the cakes will still rise during baking.
- Cut out the cakes using a plate of the required diameter (add dough to the scraps of cakes and roll out again - for the next cake, or bake together with the cakes - to then use for sprinkling the sides of the cake).
- Using a rolling pin, transfer the resulting cakes onto parchment paper greased with vegetable oil and bake at a temperature of 200 ºC. The cakes bake quickly, depending on the oven - 3-7 minutes. Place the baked cakes in a stack and cool at room temperature. While the cakes are cooling, let's make the cream.
Cream:
- Combine sour cream, cream, boiled condensed milk and honey. Beat with a mixer until smooth.
- Divide the cream into 2 unequal parts. The smaller part is for the top of the cake.
- Spread most of the cream over the cooled cake layers and place the cake in the refrigerator. At this time, prepare the cream for the top of the cake.
- Pour 1 pack of gelatin with cold cream (water or milk).
- Let it swell (with good microcrystalline gelatin this happens quickly - within 5-7 minutes)
- Transfer the gelatin mass into a saucepan and heat on the stove, stirring constantly and not bringing to a boil.
- When the gelatin has completely dissolved, remove it from the stove, let it cool for 2-3 minutes and add it to the remaining cream with constant stirring. Because The gelatin is still hot, then after adding it to the cream, the cream becomes quite liquid, as it should be.
- And immediately, without letting the cream “seize,” pour over the top and sides of the cake and smooth with a spatula.
- We make honeycombs. To do this, take a “magic” film with bubbles (pre-wash and wipe dry, carefully, without bursting the bubbles) and apply to the top of the cake.
- Using slight pressure, press over the entire surface so that the bubbles seem to be pressed into the cream.
- Place the cake in the refrigerator for 15-20 minutes to allow the honeycomb to set. Or, to be sure, you can immediately sprinkle the sides of the cake with honey layer crumbs, then attach the film and leave it to harden overnight in the refrigerator.
- To sprinkle the sides of the cake, chop the scraps of honey layers (in a food processor or put them in a bag and go over them with a rolling pin several times). You can also add muesli with pieces of fruit to the crumbs, it will turn out very beautiful!
- In the morning, carefully remove the film from the cake.
- Decorate with BEES FOR THE CAKE (recipe at link).
Bon appetit!
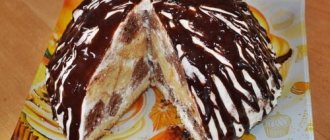
Homemade honey cake with original cut
Have you ever bought ready-made honey cake in modern supermarkets? Quite recently I purchased such a strip and was surprised at how interesting it was when cut. The honey cake is like a sponge, and resembles this particular piece of kitchen utensil. But only in appearance, the taste was excellent. I just didn’t have time to bake it myself, and that wasn’t the case, I took a strip cake on a visit to treat the kids, but I myself was a little flattered by the store-bought one.
After that, I searched for a recipe for this cake for a long time; I didn’t even know that it was so easy to bake at home. I didn’t decorate much, I used custard and crushed walnuts, since this recipe does not include scraps.
What's needed for the dough:
- Flour – 2 cups;
- Sugar – 1 glass;
- Chicken egg – 3 pcs.;
- Honey – 4 tbsp. spoons;
- Soda – 1 teaspoon;
- Vinegar or lemon juice – 1 tablespoon.
In cream:
- Flour – 1 tbsp. spoon;
- Sugar – 1 glass;
- Starch – 1 teaspoon;
- Milk – 1 glass;
- Sour cream – 200 gr.;
- Butter – 100 gr.
The dough turned out to be the simplest of those that I know using honey, but the cream, although custard, is somewhat complex.
For the dough, you need to mix all the ingredients except flour in a cup, including adding slaked soda and heat over medium heat for about 2 minutes, stirring constantly.
Then remove the cup from the heat and add flour in portions, thoroughly mixing each new portion. Then divide into approximately 3 equal parts and bake each in a springform pan for about 8-10 minutes until golden brown. As with any honey cake, preheat the oven to 180 degrees and cover the pan with parchment.
You can immediately start preparing the cream, since you can also coat warm cakes.
It is important to know!
A new federal program for women who want to lose weight, “I am for a healthy body!” has launched in Russia. You can get 1 jar of the fat-burning complex “Bee Slim”
Lose weight in 14 days...
For the cream, mix starch, flour and sugar and add a little milk. We rub everything very well, there should be no lumps. Next, pour in the remaining milk and place in a water bath or a regular burner. Cook, stirring continuously, and wait for the formation of a thick, beautiful cream. The mixture must be completely cooled; to speed it up, place it in a cup of ice water. Next, beat the butter in a separate bowl until fluffy and add the butter 1 spoon at a time into the creamy mass. Whisk immediately. The last step will be whipping the sour cream, which will also combine with the custard mass.
After this you can frost the cake.
It turns out very airy and beautiful. Coat each cake layer, cover the sides and top layer and sprinkle with crushed or crushed nuts.
You can drink tea or coffee with this cake immediately after cooking, but if you put it in the refrigerator for a couple of hours, it will become much richer. But sorry, it didn’t work out for me, so only a quarter survived in the refrigerator until the next day.
https://youtube.com/watch?v=2X5RD2Wo1Jg%3Ffeature%3Doembed
Making the Bee Cake
Preparing the cakes.
Beat eggs with sugar, add honey and softened butter, mix well. Mix flour, cocoa and baking powder, mix and add to the dough. Mix the dough.
Roll the finished dough into a sausage and cut into 8 pieces. We bake 8 thin cake layers, leaving 1 for topping the cake.
Preparing the cream
Mix milk with egg, add sugar, beat well. Bring the cream to a boil and cool. Add butter and vanilla to the cream, beat well.
Assembling the cake
Grease each cake with cream. Sprinkle crumbs and chopped walnuts on top of the cake.
***************
Cake decorations
What honey cake would be complete without bees? How can they be made? To prepare the decorations we will need two bars of white and milk chocolate.
- First you need to melt half a bar of milk chocolate and 1/3 of white.
- Then lay down special baking paper. Melted milk chocolate should be poured into a pastry bag and used to form the bodies of our bees. Give the chocolate some time to harden.
- After using white chocolate you need to draw stripes at the same distance and eyes.
- Wings for bees can be made from white chocolate slabs using a special pastry knife for decorating cakes, or from almonds.
- You need to randomly place the bees around the cake and sprinkle chocolate chips on top.
Honey cake “Bee” is ready. We wish you bon appetit!
Drawing a bee using a stencil
A great idea for quickly decorating a finished honey cake at home. Even a child can make such a drawing.
You will need:
- ready cake;
- a lot of sprinkles - crumbs from cookies, cakes;
- powdered sugar (or finely crushed nuts, coconut);
- stencil "bee".
Let's get started:
- Spread the finished cake generously with cream on top and sprinkle with crumbs on all sides. Press it lightly with your hands. Refrigerate for 1 hour.
- Then prepare your stencil. You can draw a bee on a regular sheet of paper and cut it out along the contours, or download and print the finished drawing and cut out the details.
- Sift the powdered sugar.
- Place the stencil on the surface of the cake exactly in the center, place the powder in a small strainer and carefully sift the powder from it onto the design, trying not to let the contents fall past the stencil.
- Quickly remove the stencil. The decoration is ready.
If using coconut flakes, choose white or light yellow. Sprinkling with nuts will look beautiful if you grind them in a blender finely enough, almost into flour.
Forming a cake
After you have finished preparing the cream and cake layers, you can begin to shape and decorate the cake. We provide the recipe for honey cake “Bee”:
- First, you need to coat each cake well with buttercream. Then send the cake to a cool place for a couple of hours so that it is well soaked.
- Next, you can move on to working on the cake decoration. First of all, add gelatin to the remaining cream. Leave the mixture for a while. The gelatin granules should swell.
- Then you need to put the mixture on low heat so that the grains completely dissolve in it.
- Now you need to add heated cream to the second part of the buttercream and mix everything thoroughly.
- Then spread the cream over the top layer of the cake. And finally, you should make a honeycomb using a bubble bag, pressing it into the cream.
- Then we need to put our dessert in the refrigerator for half an hour.
How to prepare cream for Honey cake
Lapulka’s honey cake “Pchelka” is very tender and tasty. You can prepare both the classic version and the original one - with the addition of various fruits, berries and even chocolate. In addition, for our dessert you can make caramel, chocolate or semolina cream. It all depends on your wishes and preferences. Below you will find a recipe for honey cake “Bee” with a photo.
- First you need to add boiled condensed milk, whipped cream (100 grams), and a spoonful of honey to the thick sour cream. Mix this mass thoroughly.
- Then you need to peel the banana, chop it and add it to the mixture.
- The finished cream should be divided into two equal parts. We will use one to soak the cakes, and the other to decorate the cake.
- The first portion should be placed in the refrigerator for a couple of minutes.
Characteristic
Taste
You can feel a sufficient amount of boiled condensed milk. There is no honey as such in the taste of the cake, perhaps due to the small amount.
Smell
Very fragrant. There are notes of fragrant honey, but most likely it is a flavoring.
Consistency
The shortbread cake crumbles and crumbles easily, its color is yellow or light brown. Biscuit, finely porous, with a soft, elastic crumb.
How to prepare shortbread dough correctly
The shortbread dough should be homogeneous, crumbly, but still hold its shape. It is very difficult to achieve an ideal result, but it is possible. We will tell you three main ways to prepare shortcrust pastry:
- Chopped. For it you will need: 400 grams of sifted flour, 250 grams of butter, a pinch of table salt, 100 milliliters of warm water. First you need to randomly chop the butter and then put it in the freezer for twenty minutes. Then add a pinch of table salt and pieces of cold butter to the sifted flour. Next, you need to quickly chop the dough using a large knife. You should end up with a crushed mass, into which you should gradually pour warm water and knead. Afterwards the dough must be refrigerated for 10-20 minutes.
- Cottage cheese. If chopped is more suitable for pies, then tender, curd can be used as a base for cakes. It requires: fresh cottage cheese - 150 grams, butter - 150 grams, sifted flour - 250 grams, a pinch of food and table salt. First you need to sift the cottage cheese through a special sieve. Next, grate the butter and then add it to the cottage cheese. Pour sifted flour into the creamy-curd mixture and add a pinch of salt and soda. Afterwards, knead the dough well and place it in a cool place for an hour, wrapping it in cling film.
- For the lazy. If you don't want to spend a lot of time preparing shortcrust pastry, then there is a simple method just for you. This mass is ideal for our “Bee” cake. For it you should stock up on the following ingredients: sifted flour - 300 grams, butter - 150 grams, one chicken egg, powdered sugar - 150 grams. First of all, you need to add powdered sugar to the bowl, then grate the butter there, preferably on a fine grater. Add flour to it. Mix the whole mass well with a spoon or food processor. Be sure to wrap the dough in cling film and put it in the freezer for an hour.
Shortbread dough is very finicky. All ingredients must be added strictly according to the recipe. If you overdo it with butter or flour, you may end up either very crumbly or too dense. However, you will have to master the recipe, because this particular type of dough is ideal for making “Bee” honey cake.
Description of dessert
A dessert with a summer name is an unusual alternative to the classic honey cake. What do we associate with honey? Of course bees. The dessert looks like a honeycomb decorated with homemade bees. It looks very original and beautiful. It will take you approximately two hours to cook. The base itself consists of shortcrust pastry.
To create the base of the honey cake “Bee” you will need to buy the following products:
- Sifted flour 750 grams.
- Five tablespoons of light honey.
- Chicken eggs 3 pieces.
- Butter 100 grams.
- A pinch of baking soda.
- Sugar 250 grams.