A little history
For some reason, it is believed that the birthplace of cheesecake is the USA.
But this is not true at all. They knew how to cook cheesecake back in the 6th century BC; it was one of the popular dishes back in Ancient Greece. Cheesecakes were given to athletes who participated in the Olympic Games to tone up and strengthen their strength. Rome borrowed the cake recipe from Greece (Caesar really liked cheesecakes), then the recipe was learned in the European colonies, including England, and then, together with emigrants, the cheesecake recipe came to the USA. There is another version of the history of the cheesecake recipe: it is believed that the recipe for this delicacy was brought from the Middle East by the Crusaders. The Russian loaf with cheese, by the way, can also be considered a kind of prototype of cheesecake. And, in fact, all the various cheesecakes, cheesecakes, cottage cheese loaves - all this is a very close “relative” of cheesecake.
Despite all the variety, cheesecake recipes can be divided into 2 large groups - raw and baked. For example, in the UK they don't bake cheesecakes. And the most famous recipe in the world, considered a classic, is the American New York cheesecake, which is made from Philadelphia cream cheese.
Making the right foundation
If you want to make a cake at home, it is best to take ready-made cookies - sweet crackers, “Yubileinoe”, “Baked milk” or shortbread. It could even be chocolate-covered cookies, stuffed like Oreos, or salty sticks. The cookies are whipped in a blender, mixed with soft or melted butter, and then placed on the bottom of the mold and compacted. For piquancy, you can add ground nuts, poppy seeds, wafer crumbs, corn flakes, granola or coconut flakes to the shortbread crumbs. The cake can be flat or with sides.
For a low-calorie cheesecake recipe, simply replace the butter with milk or juice. True, in this case the cake will lose its crumbly structure and become juicier and softer.
Vegans prepare a delicious cheesecake without cookies based on ground nuts mixed with dates, dried apricots, prunes, fruit puree, melted chocolate or banana. This crust can be sweetened with honey or maple syrup.
A simple homemade cheesecake recipe often involves baking a regular shortbread crust. If you have time, you can make a dessert on this basis, so that later you don’t have to worry about whether the cookies will set or whether the base will turn out to be too crumbly.
What is important to know in advance
Form for baking
Ideally, this is a springform pan that allows you to avoid damaging the cake when removing it. Of course, if you have a one-piece pan, you can try to remove the cheesecake by turning the pan over. But this trick is applicable only if you are not very concerned about the ideal external condition of the cake, because the likelihood of breaking or denting the cheesecake is quite high. There will be less loss if you cut the cake directly in the mold and take it out in pieces, immediately placing it on plates. But, again, there is a risk of scratching the pan, especially if it has a fragile non-stick coating.
Cheese
There is a chance that you will not find the Philadelphia cheese that the recipe calls for. What can replace it? Culinary experts recommend several options that give the desired result: Almette curd, Rama Cream Bonjour, Buko Classic, President Cream. Just make sure that the cheese is free of additives and various inappropriate flavors. Of course, these cheeses are not comparable to Philadelphia in terms of the quality of the result, but, nevertheless, they are quite usable in the recipe.
Filling
The final texture of the cheesecake depends on the technology used to prepare the cheesecake filling. The cheese must be at room temperature before cooking, otherwise the filling will not have a uniform creamy consistency. Most often, after the remaining ingredients are added to the whipped cheese, the filling is no longer whipped, but only stirred until smooth, so that air bubbles do not get into the filling, which can cause the surface of the pie to swell or even burst during baking. Eggs are added to the filling one at a time, and after each egg the mass must be thoroughly mixed. You can mix the mixture evenly without air bubbles using a whisk.
Baking
The optimal baking temperature for cheesecake is 160 degrees, the maximum is 175. In the oven, it is better to place the pan on the middle level and turn on the lower mode. In addition, baking in a water bath has proven itself well. The heat from the water is distributed more evenly, and the pies themselves turn out more tender. In addition, the top of the pie will definitely not burn, and this is an important point.
To bake in a water bath, wrap the pan with the cheesecake tightly in foil (in one large piece) and place it in another, larger pan. Pour boiling water into a large pan so that it reaches the middle of the sides of the pan with the cheesecake. If you add non-boiling water, the cooking time will be extended by the time required for the water to boil. If you do not have such a wide piece of foil, you can use a cut baking sleeve to wrap the pan. Well, if you nevertheless decide to bake the cheesecake simply in the oven, you can place a large container with boiling water inside on the bottom. But you should only do this if you are firmly confident in the capabilities of your oven.
Finish cooking
It is important not to overcook the cheesecake in the oven, otherwise it will crack when cooling. The readiness of the cheesecake is determined as follows: tap the side of the mold with a spoon, only the middle of the cake should tremble (5-6 centimeters in the center). Cooling of the finished cheesecake must be carried out in several stages. We do not immediately remove the pie from the oven, but leave it there for 40-60 minutes, with the door slightly open. Then we keep the cheesecake for another half hour at room temperature, then you need to run a knife along the walls of the mold and put the cake in the refrigerator. This gradual cooling will prevent cracks from appearing on the surface of the cake.
WE DEVELOP ALL MYTHS
Do I have to use room temperature ingredients to make the cheese filling?
No, it does not affect the taste, texture or appearance in any way. But when the cream cheese is at room temperature, it is much softer and it is physically easier for us to knead the mass until smooth and avoid lumps.
Is a water bath necessary?
Not always! This depends on the baking temperature and the features of your oven. If you bake the cheesecake at a very low temperature (90 -100°C), then steam is not needed. But I have had cases when the oven was so powerful that even at 90°C the cheesecake rose and browned. In this case, I put on a water bath, and it lowers the heat in the oven a little more.
If you open the oven, the cheesecake will fall.
Nonsense! The cheesecake shouldn't rise at all. If it still rises, then this is a sign that the temperature you set for it is too high.
Under no circumstances should you open the oven while the cheesecake is baking.
Also wrong. If you bake the cheesecake at low temperatures, then nothing bad will happen if you open the oven. But don't get carried away!
Classic New York cheesecake
You will need: 700 grams of Philadelphia cheese, 100 grams of sugar, 100 grams of cream (33% fat), 3 eggs, 3 teaspoons of full-fat sour cream, 1 teaspoon of vanilla extract, 500 grams of cookies, 150 grams of butter, 1 teaspoon of ground cinnamon and nutmeg.
Crumble the cookies, mix with melted butter, cinnamon, nutmeg, sugar until smooth, place on the bottom of a springform pan, distribute the mixture along the walls and place for 15 minutes on the upper level of the oven, preheated to 150 degrees, place a large container of water on the bottom . After 15 minutes, remove the dough from the oven and let cool.
Mix the ingredients for the filling, except for the eggs, which must be beaten separately, dividing into Christmas trees and yolks. Mix the eggs into the total mass carefully, constantly stirring thoroughly; you can pour in the beaten eggs in small portions, stirring each time. Place the finished filling on the base. Place the cheesecake in the oven, preheated to 150 degrees, bake for an hour, then turn off the oven and begin to gradually cool the cheesecake. At the final stage, the cake is put in the refrigerator for 6 hours.
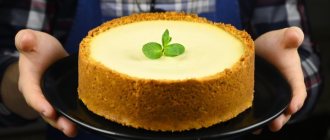
Cheesecake is a real delicacy that will please even the most sophisticated gourmets. And now you can cook it yourself.
Photo: www.youtube.com, alex-povar.blogspot.com, www.torty-vsem.ru, cutlife.ru, ivona.bigmir.net, www.smachno.ua
Classic step-by-step recipe with strawberries
We will need (for the base):
- cookies - 300 gr
- butter - 80 g
For filling:
- cream cheese - 600 gr
- eggs - 3 - 4 pcs
- sour cream 20% -500g
- sugar -150-200 gr
- lemon zest - 1 teaspoon
- vanilla sugar - 2 teaspoons
- salt - a pinch
For decoration:
- fresh strawberries - 1 - 1.5 cups
- lemon glaze - 1 packet
- mint - 2 sprigs
Inventory:
We will need a springform pan, a baking sheet (for the first option with high sides), baking paper, foil, and a sharp knife.
Preparing the base
1. Take it out of the refrigerator in advance and prepare all the products. Leave them at room temperature to keep warm. You need to get the butter out early so that it has time to melt. It is strictly not recommended to heat it in the microwave; this procedure destroys its structure. Such butter will not hold the cookies together well, that is, it will not perform its function. Exactly the one for which we use oil.
All products should be at room temperature. This is a must for making a delicious cheesecake.
2. Place the cookies in a blender bowl and grind everything into crumbs. Shortbread cookies are usually used. However, I have come across recipes that also mention sponge cookies - savoiardi, which is also used in the preparation of tiramisu; and almond, for example the famous “amaretti”.
I use regular shortbread cookies, which are sold in every store. If you can find cookies with butter, it will be very good. But yesterday I went to all the nearby stores and didn’t find anything like it. They say that the purchase price is very expensive. And no one will buy this. Well, what to do, I had to take what was offered.
3. Add the melted butter and mix it with the crumbs until smooth. Of course, the crumbs from the blender must first be transferred to a bowl.
4. Prepare a springform pan. I have it with a diameter of 24 cm. For a mold of this volume, we just need the specified amount of products. The cheesecake will be a good height. Accordingly, if your form is significantly smaller or larger, then the amount of ingredients should be proportionally reduced or increased.
5. Cut out a circle of the required diameter from baking paper. We line the bottom of the mold with it and grease it with vegetable oil to be sure. In this case, the finished dessert will definitely not stick to the bottom.
6. When everything is ready, spread the cookie crumbs and butter in an even layer. We make sides 3 cm high. I help myself with my hands. In general, they are not always made; there are recipes where only the bottom of the mold is lined with cookies. But I always make sides, and in this case the finished dessert turns out just like in the mold. In addition, I really like the combination of cookies and delicate soufflé, so the sides just increase the amount of this combination.
7. To prevent the bottom and sides from crumbling, they must be compacted tightly. I do this using a wooden potato masher. But you can use a glass or something similar for this.
8. When the bottom and walls are compacted, place the mold with the base in the refrigerator for 30-40 minutes. We need the butter to freeze so that we can easily assemble the dessert on this basis.
9. While the mold with the base is in the refrigerator, let's prepare the filling.
Preparing the filling
1. Place cream cheese in a bowl. Add sugar, you can grind it into powder in advance. But I don’t do this, since my sugar dissolves well when mixed with cheese. In the recipe I have two numbers for adding sugar. The first one is for those who like not too sweet pastries. The second is for those with a sweet tooth. Since I'm using frosting and berries today, I'm only adding 150 grams of sugar. If I were making cheesecake without this, I would put 200 grams.
2. Now you need to mix the cheese and sugar until it is completely dissolved. You can do this with a mixer, or with a whisk. I stir with a spoon. At this stage, you need to mix the sugar, but do not allow the mixture to become saturated with oxygen. When using a mixer, you can accidentally miss this moment, even if you mix at a very low speed. Namely, this is where you need to mix the contents if you decide to use a mixer.
When you stir with a spoon, you definitely won’t miss this moment. Firstly, I feel and hear “the sugar has dissolved or is not yet completely dissolved.” When you stir, you will also hear it through a characteristic sound. Sugar, if it has not yet completely dissolved, will crunch while clinging to the bowl. And when it is gone, the mass will be plastic and this sound will disappear.
In addition, it is clearly visible when bubbles begin to appear. We don't need them at all. The air will subsequently leave air bubbles in the soufflé. And we need to get a uniform texture, without any holes or bubbles.
The sugar must be stirred until completely dissolved, and not mixed with the cheese into foam. It is important!
3. Now adding one egg at a time, continue to mix the contents thoroughly. Add one egg and mix until smooth. Only then do we add the following. And so on. My recipe says 3-4 eggs. If the eggs are large, then you can add 3 of them, and if they are small, then you need to add 4.
Why this division? Because I added 4 because now I always try to buy small eggs. As they explained to me, these are eggs from first-year hens. By this time they have not yet been overfed with various chemicals. They lay small eggs, but they are useful. And adding an extra egg won't be difficult.
4. Now add vanilla sugar and lemon zest. To make the zest, you need to wash the lemon and wipe it with a paper towel. And grate only the yellow part on the finest grater. The required amount of zest came from one small lemon.
You don’t have to add the zest, but today I’m making it with lemon glaze, so the zest will also come in handy.
Add also a pinch of salt, just a little, just to indicate the taste. Not all recipes contain salt. But I add, acting on the principle - “add a little sugar to salty dishes, and a little salt to sweet dishes.” That's what my grandmother taught me.
5. Mix again and add sour cream, all at once. This is the last ingredient for our filling. After adding it, we mix everything thoroughly again. That's it, our filling is ready. It turned out to be plastic, moderately liquid, and moderately thick.
Instead of sour cream, cream is also added. That is, sour cream and cream are interchangeable. You can prepare one of the recipes by first choosing one of these products, and then prepare another, adding another one. Then choose what you like best.
If you decide to add cream, you need to add 200 ml.
6. Now that the base has cooled down after being in the refrigerator, you can take it out. You can also pour the prepared filling into the mold. Let it sit for a little while so that it is evenly distributed over the entire surface. You also need to lightly tap the mold on the table, two or three times will be enough. If insidious bubbles have crept into our filling, then this procedure will allow them to quickly jump out of there.
7. We will have several stages of baking and cooling. They are very important, as is everything when it comes to making a truly delicious cheesecake.
Baking and proper cooling
1. Preheat the oven to 200 degrees. At this stage, I always cover the mold with the filled filling with foil. So that the top does not brown, much less burn. The texture of the filling is very delicate, and the temperature is high, so it is better not to experiment and cover it.
2. Place the pan with the base on a baking sheet on the second shelf from the bottom. And bake for 15 minutes.
3. Then reduce the temperature to 110 degrees. You can remove the foil, but keep it ready. Everyone's oven bakes differently. If there is even a hint of burning on the top, immediately remove the pan and cover with foil.
We bake for an hour and a half, again due to the difference in oven capabilities. My version was ready in 1 hour 10 minutes. How to know if he is ready or not.
An hour after the second stage of baking, take out the mold, since it is very hot, I take it out along with the baking sheet. And I shake it slightly. If the center shakes slightly, like jelly, it's ready. If the center is still runny, put it back in the oven for a while. We check again after 10 minutes.
4. Now comes a very important point - proper cooling. Most often, mistakes happen here and the dessert cracks. It is a sign of skill to prevent such cracks. Therefore, we will do everything right, and we will not have any cracks.
In order for it to turn out without cracks, it must not only be baked correctly, but also cooled correctly. And this needs to be done gradually!
5. When we checked our culinary masterpiece once again and realized that it was ready, we need to slightly open the oven door. You should not take it out of the oven, as in this case it will certainly become covered with cracks, or even worse, with one, but large crack. You need to keep it in this mode for 1 hour.
6. Then you can take it out and keep it until it cools completely, but at room temperature. I also kept it for 1 hour.
7. Now we need to do another very important action. Use a sharp knife to run along the side of the mold, as if separating the finished cheesecake from the mold. Then cover it with cling film, which prevents moisture from being drawn out and unnecessary odors from being absorbed, and put it in the refrigerator. In the cold, the finished product will shrink slightly, and so that there is a “movement” for this, we perform this action. Otherwise, we may again end up with unnecessary cracks.
8. Keep in the refrigerator for at least 6-8 hours. It's best to time it, bake it and leave it in the refrigerator overnight.
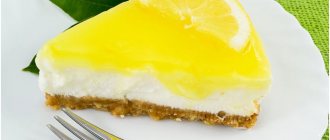
Decoration with lemon glaze and strawberries
1. In the morning the most pleasant action begins - this is the design of our miracle - dessert. Of course, you don’t have to decorate it, it’s already so good. New York cheesecake served with a little strawberry sauce and a mint leaf.
But our strawberries are ripe, and we can’t miss this event, so we’ll definitely decorate.
2. To make the berries stick better, we will use glaze. Lemon glaze is just what you need in this case. Its taste is unobtrusive, it will not interfere with either the dessert itself or the berries, but will be a kind of connecting link.
I already have the glaze ready in a bag. I mix the contents of the bag with three teaspoons of warm milk and the glaze is ready. It turned out to be quite a bit, and my task was to distribute it in a very thin layer over the entire surface. Although it was not easy, I succeeded.
3. My berries have already been washed and dried. I use them to decorate our dish in any form. Then I put it in the refrigerator again so that the glaze hardens a little.
4. After half an hour, in principle, you can already serve it, but here’s what’s interesting. Over time, the cheesecake seems to mature in the refrigerator, becoming saturated with the taste of the berries. Don't eat it all at once, save a little more for later.
It turned out tender, melting in the mouth, with a variety of taste sensations. Unlike any other dessert. At least for this alone it is worth preparing it! Since I added less sugar, the taste was not very sweet. Although, over time, the berries, glaze and “ripening” did their job. Its taste became even more intense, it was soaked and became sweeter.
Once again, everyone was completely delighted with both the appearance and taste of this culinary delight. Everyone was happy, but naturally, so was I. I sincerely wish the same for you.
And now, as I promised, I give you a second option for baking dessert in a water bath.
How to prepare a delicious dessert: recipe description
First of all, the cake is made. To do this, the cookies are turned into crumbs. It is convenient to do this using a meat grinder or just a mortar. Then the butter is melted in the microwave or in a water bath. Add it to the cookies and stir thoroughly.
You will need a springform pan. It allows you to quickly remove the cake without damaging it. You need to cut out a circle of parchment enough to cover the bottom and edges of the pan. A cookie base is placed on it. Pack tightly. A glass will help with this. Then the form is put into the cold for thirty minutes.
At this time, you can prepare the cream itself. To do this, curd cheese is combined with sugar, salt and starch. Mix thoroughly. Grind the lemon zest to crumbs, add it to the filling, and add three eggs. Mix everything again. Now you can add the remaining two yolks, mix the whole mass again. Now pour in the cream. Once again they mix all the ingredients. Finally, add lemon juice and stir.
When the cake has cooled, remove it from the refrigerator. Pour the cream base onto it. Preheat the oven to two hundred degrees, cook the cheesecake at this temperature for about ten minutes. Then reduce the temperature to one hundred and hold for another hour.
After cooking, do not remove the cheesecake from the oven immediately; let it sit for another ten minutes. This will help avoid settling. When you take the cake out, it seems a little runny, like jelly. But after cooling it becomes hard.
The completely cooled cake is served to the table. This is the most delicious cheesecake with cream cheese!
Cottage cheese cheesecake - recipe
To make cheesecake, ideally you will need soft Philadelphia or Mascarpone cheese, but you can use regular full-fat cottage cheese and even baby curds from the supermarket.
To prepare the dough you will need:
- 50 g powdered sugar
- 100 g butter
- 1 chicken egg
- 170 g flour
- salt
To prepare the cream you will need
- cottage cheese - 550 g
- sugar – 120 g
- cream 35% - 100 g
- egg yolks – 5 pcs.
- egg whites – 4 pcs.
- flour – 30 g
Grate the chilled butter, add flour and salt to it, grind thoroughly. Add egg and powdered sugar. Mix until a soft dough forms. Cover the mixture with cling film and put it in the refrigerator for at least half an hour.
Sift the cottage cheese or rub it through a sieve. If you are using ready-made cream cheese, this step is not required.
Separate the whites from the yolks. Add the yolks, one at a time, sugar and flour to the cottage cheese. Mix thoroughly or beat with a mixer. Pour cream into cottage cheese.
In a separate container, beat the whites and mix them with the curd mass.
Turn on the oven and heat to 170 degrees. Take out the dough and roll it out to about 4 mm thick. Distribute evenly in the pan.
Lay out and smooth the cream. Place the pie in the oven. It will take approximately one and a half hours of baking at a temperature of 120-170 degrees. Once ready, let the cheesecake cool in the oven for about an hour.
If desired, the pie can be sprinkled with powdered sugar or served with jam.
Cake recipe - cheesecake / ua.depositphotos.com