8
Prepared by: Anton Soroka
12/08/2016 Cooking time: 7 hours 0 minutes
| Save | I cooked) | Estimate |
Thanks to the leaven, the dough turns out airy and simply melts in your mouth. Step-by-step instructions with photographs will tell you how to prepare sourdough dough for pies. Amazing and lean pies.
How to make “Sourdough dough for pies”
1. Prepare the dough: mix the starter with 100 grams of flour. Leave to ferment at 30 degrees for three and a half hours.
2. After the time has passed, add the remaining flour, salt and a tablespoon of refined oil, make a knead and leave it for 1 hour at room temperature.
3. Mix everything and leave again for another hour.
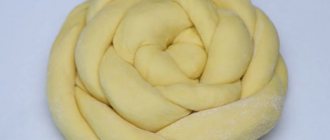
4. The dough turns out soft and loose. Pour oil onto the surface of the table and roll into balls, roll them out and put any filling inside.
5. We fasten the pies and roll them into oblong sausages.
6. Pour refined oil into the frying pan. Place the pies into hot oil.
7. Turn over for even frying. A golden crust should appear.
8. Place the finished pies on a paper towel to remove excess fat. Place the pies on a plate and serve.
Sourdough made from wheat flour
1 day
Mix 100 grams of water and 100 grams of flour - the dough should have the consistency of thick sour cream. Cover with gauze or a thin cloth towel and place in a warm place for a day. During this time, the dough needs to be mixed several times, and air bubbles should appear in it. It is most convenient to make sourdough in the morning.
Day 2
The next day you need to feed the dough: add another 100 grams of flour and 100 milliliters of water. The consistency of the starter should be like pancake dough. Cover the dough and return it to a warm place.
Day 3
On the third day, the starter should be fluffy, with many air bubbles, and a sour smell. It needs to be fed again: again add 100 grams of flour, 100 milliliters of water, mix and put in a warm place.
Now you need to keep an eye on the leaven - as soon as it has doubled in size, you can divide it into two halves. You can knead the dough with one, and put the second in the refrigerator for the future (we talk about all this below). Sourdough is suitable for baking bread, pies and pies. In the same way you can make sourdough with rye flour.
LiveInternetLiveInternet
First, about sourdough.
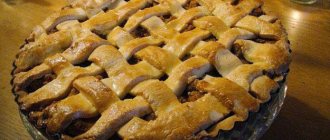
Sourdough has advantages over yeast; it neutralizes PHYTIC ACID present in bran and complicating the absorption of minerals in the human digestive tract. When using yeast, up to 90% of these acids are retained. Sourdough bread has a better shelf life and lasts longer; if stored properly, it will not mold for a long time. The filling was like this: 3/4 half-liter jar of apple jam + 2 bananas + a handful of raisins + 1-2 tsp starch (I used corn starch).
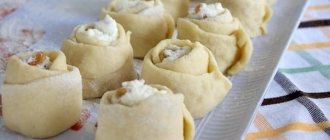
For the PIE dough: 200 grams of wheat sourdough (on “Eureka” - https://forum.say7.info/topic66047.html) 2 eggs 50 grams of butter 2 table. spoons of vegetable oil 150 ml milk 100 g sugar 500 g premium flour salt, vanillin. Place the starter and eggs beaten with sugar in a sealable container (jar). Put butter + vegetable oil into the milk and heat until the butter melts, let cool until barely warm. Pour into a jar. Leave in a warm place for 8-10 hours. Then pour everything from the jar into a bowl, add flour, salt and vanillin. Mix the dough. I kneaded it in HP (yeast dough mode). After kneading, immediately remove the dough and divide it into parts. I have 70 grams of 19 pieces of dough, and 50 grams made 22 pies. Cut the bananas, wash and dry the raisins, add jam + starch and mix everything. Pies before proofing
and 1 hour 15 minutes passed at 30 degrees Celsius
Grease the pies (yolk + milk) 25 minutes after baking https://forum.say7.info/topic74448.html
Phytic acid
Phytic acid in its pure form looks like a white amorphous powder without a distinct odor or taste. It is obtained in the laboratory and in production by acting on parts of plants containing phytin. Phytic acid molecule Use of phytic acid On an industrial scale, phytic acid is used as a food additive of natural origin, known as E391. In medicine, phytic acid is an intermediate substance in the synthesis of certain drugs that help with diseases of the nervous system and liver. Phytin peeling is quite widely known - skin cleansing using phytin. Phytic acid for these purposes is obtained from wheat grain cake. This acid gently and at the same time deeply exfoliates the skin, helps fight excess pigmentation and inflammatory changes. Phytin peeling is very effective in combating age spots on the face. The advantages of this procedure compared to other similar ones are the absence of side effects such as irritation and redness of the skin, and its increased sensitivity. Phytic acid does not cause damage to the deep layers of the epidermis, that is, it is safe for the skin. Until recently, phytic acid was actively used in winemaking and the production of other alcoholic beverages. The action was based on its ability to bind iron ions, purifying products from them, and thereby filtering and clarifying wine. After studies showing the dangers of phytic acid appeared, its use ceased. Until the clear harm of this compound is refuted, sanitary and epidemiological services do not recommend using it as a food additive. Content of phytic acid in products Phytic acid is found in cereals, legumes, and oilseeds. It is especially concentrated in the seeds and rhizomes of legumes and cereals. Small amounts of phytic acid can be found in the stems and roots of these plants, and only traces are found in the leaves. In plants, phytic acid fixes most of the total phosphorus. Up to 60–80% of it is contained in this acid. In the seeds of monocotyledonous plants, which include cereals, the distribution of phytic acid is heterogeneous - it is located in the aleurone layer of the grains. In dicotyledonous plants (legumes, oilseeds), phytin is evenly distributed throughout the grain. Phytic acid is found in cereals. Harm of phytic acid. Scientific studies have not been able to fully confirm or refute information about the dangers of phytic acid. And yet, phytic acid, when it enters the body, is not a completely harmless compound. The harm of phytic acid is that it is able to bind phosphorus, magnesium, calcium and other minerals in the digestive tract using ester bonds. Because of this, the intake of beneficial microelements into the body is significantly reduced, which negatively affects health. For the same reason, it is not recommended to include foods with phytic acid in young children with a deficiency of certain microelements, for example, with anemia (lack of iron), with rickets (lack of calcium and phosphorus).
Sourdough made from rye flour with kefir
For such a starter you need about 200 grams of kefir or katyk. It needs to sit for another 2-3 days until it starts to bubble and acquire a distinct sour smell.
1 day
Add 200 grams of rye flour to kefir - the consistency of the dough should be like thick sour cream. Stir, cover with gauze and leave at room temperature for a day. There is no need to interfere further; fermentation will begin on the same day.
Day 2
After a day, add another 150-200 grams of rye flour - the starter should have the consistency of pancake dough. Stir and leave until the dough doubles in volume. This will happen quite quickly, so check your starter periodically.
Now you can divide the starter - use part for dough, the other - put in the refrigerator until next time.
Ingredients:
- Wheat flour - 300 grams (60 grams for sourdough, 240 grams for dough)
- Sourdough – 120 grams
- Water – 60 Grams
- Milk – 40 Milliliters
- Sugar - 50 grams
- Soft butter – 80 grams
- Butter - 50 grams
- Cane sugar – 80 grams
- Salt - 1 pinch
- Wheat sourdough starter - 1 teaspoon
- Egg - 3 pieces (2 eggs - for the dough, 1 egg - for the filling)
- Sour cream - 2 tbsp. spoons
Number of servings: 7-8
Fried sourdough pies
Today we’ll take a break (but not for long) from bread and look at small-piece sourdough products. I present to you the original Russian pies made with sour dough. It is called sour not because of the taste, but precisely because it is sourdough. The pies turn out delicious, you can’t buy these from any grandmother! It has a thin crust, a bubbly crumb, and is easy to prepare. Come and try my pie!
Nutritional and energy value:
| Ready meals | |||
| kcal 1221.5 kcal | proteins 29 g | fat 14.9 g | carbohydrates 246.9 g |
| Portions | |||
| kcal 81.4 kcal | proteins 1.9 g | fat 1 g | carbohydrates 16.5 g |
| 100 g dish | |||
| kcal 172 kcal | proteins 4.1 g | fat 2.1 g | carbohydrates 34.8 g |
edimkashu.ru
Ingredients : sourdough starter - 250 g wheat flour - 500 g water - 170 g butter - 50 g vegetable oil - 30 g sugar - 25 g salt - 5 g For lean dough: vegetable oil only - 80 g
In this article I will tell you how you can make sourdough dough without eggs for pies, pies and other homemade baked goods. The dough can also be made lean if the butter is replaced with vegetable oil.
Any process of preparing dough or bread for me begins with preparing a sourdough starter . I have already prepared the sourdough starter today.
Other ingredients are ready. I sifted the flour, measured out water, salt, sugar and took the butter out of the refrigerator in advance. To prepare the dough, it is desirable that the oil is at room temperature.
Now I will add all the ingredients to the sourdough starter. Water, sugar, salt, 50 grams of butter and 30 grams of olive oil. I have two tablespoons. Instead of olive oil, you can use other vegetable oil. For example, unrefined sunflower. Or grape seed oil - according to your taste. (For lean dough, take 80 grams of vegetable oil.) All that remains is to add flour and mix. I mix everything with a spoon, and when the ingredients are combined with each other, you can knead the dough with your hand.
A lump of dough has formed. I'll keep kneading it until it's uniform and smooth. While kneading the dough, think about something positive and positive. This is transferred to the dough you prepare. You can also dream. You can remove the dough from the cup and continue kneading it with both hands. The dough is very soft to the touch, elastic and does not stick to your hands. I will put the finished dough in a cup and place it in a warm place. This could be a place near the radiator or stove. You can cover the cup with a cloth, cling film, or cover it with a bag.
I usually leave the dough to rise for two to three, sometimes 4 hours if the room is cool. Today I had it for a little over 3 hours. It turns out lush, soft, tender, elastic.
The dough is ready, I will transfer it to the board. I don't sprinkle the board with flour. I lubricate it with vegetable oil, as well as my palms. I'll take the dough out of the cup. I won't press him too hard. I will carefully form it into a ball and place it on the board. I'll let the dough sit on the board a little longer - 15-20 minutes.
After this, you can start baking pies, pizza , and all kinds of buns with and without filling. Enjoy your meal!
WHAT TO DO
The dough on our sourdough turned out to be correct: bubbles of carbon dioxide are visible throughout the entire volume, and judging by the rim of the dough just below the edge of the bowl, the dough rose and fell overnight (but even if this does not happen, there is no need to be upset - the main thing is that the bread rises; but if the bread does not loosen or rise, it means that something is wrong somewhere - either in the sourdough, or in the dough).
Add diluted salt, honey, oil (all at room temperature, of course).
We sift the flour through a sieve - and what to do with the bran, everyone decides for themselves. Bran is a controversial product, primarily due to phytic acid (a substance that binds various microelements in the intestines - iron, magnesium, calcium, zinc - and prevents their absorption, which leads to mineral starvation and a large number of related problems). So it is not at all necessary to add all the bran to the dough (and I must say, in the old days they didn’t do this - on the contrary, they carefully sifted the flour, which even became part of the saying “If only there were flour and a sieve, she would be full”), and at the dough stage It is quite possible, following tradition, to remove them.
Mix the dough: when it is no longer possible to mix it with a spoon, knead it with your hands - it will be very sticky (rye). When the dough reaches the consistency of VERY soft plasticine, we stop and leave it in this state for about 15 minutes. In the case of rye dough, this is necessary so that its moisture-absorbing flour absorbs as much water as it can, and we do not make a mistake with the consistency of the dough and discover it at the end of the kneading that all the water has gone somewhere and the dough is kneaded too thick. You can still prepare the mold by greasing it with oil.
After 15 minutes we continue - add more flour and mix with our hands, and the dough will remain sticky and reminiscent of cement. Well, this is not wheat flour, and it contains little gluten and, accordingly, the proteins glutenin and gliadin, which are responsible for the elasticity of the dough and its ability to hold its shape. It makes no sense to be overzealous with rye dough and knead it for too long in the hope of developing gluten, since it, one might say, has no gluten. More important information about the characteristics of rye and how important the acidity in it is for the formation of the correct crumb can be read here: https://vk.com/wall-83903602_1021. When the dough reaches the consistency of just soft plasticine and already behaves like a decent bun, turn it onto a flat surface and smooth out all the unevenness with wet hands - both on top, and on the sides, and on the bottom. Carefully transfer the bread into the mold, and place the mold in a very warm place (at 30-35 degrees) for 2-2.5 hours.
During this time, it should double in volume and let us know that it has reached a peak and is about to decline. It is important to catch this moment, because if the dough is too long, it may become overly sour (although the taste and color...), and its crust will be flat (since it has already begun to decline). And if you stop proofing earlier, the dough will not loosen - and that’s not so bad, and most importantly - it will not leaven, which means you won’t get real and truly healthy bread.
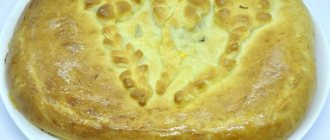
Ossetian sourdough pies
The same daughter-in-law who encouraged me to buy a bread machine taught me Ossetian pies. This is a very tasty pastry. Since we are the North Caucasus - we have many nationalities, we just need to open a separate topic so as to list them all and not offend or forget anyone. Nevertheless, it is Ossetian pies that are very popular here - people make their business on this - there are quite a lot of such pies in Krasnodar. My beloved daughter-in-law is half Ossetian, her Ossetian grandmother taught her this. As her grandmother taught her, this is how they do it in Ossetia. I studied with dry yeast, and now with sourdough - these are my achievements)))
So let's start: Dough Wheat starter - 1 tbsp, take it out of the refrigerator and let it warm up for an hour. Water-100ml-warm Wheat flour 100g Mix everything and put it in a warm place (you can on the radiator, it’s +11 outside now, the radiators are a little warm, if the radiator is very hot, cook the dough, look for some other “warm place” here flight of your imagination
Description of preparation:
The pie filling doesn't have to be fruit - you can make an amazingly delicious pie with the simplest ingredients!
This recipe uses sour cream, cane sugar, butter and egg as the filling. The pie turns out very tasty! It’s worth noting that pies made with sourdough are much healthier than classic yeast pies, so don’t forget to keep a few spoons of sourdough starter on hand so you’re always ready to bake something tasty and healthy. Purpose: For an afternoon snack Main ingredient: Dough / Sugar Dish: Baking / Pies