Among traditional hard cheeses in the CIS, Dutch and Russian are the leaders. Russian cheese is one of the most consumed cheese produced. It belongs to the category of pressed cheeses, and its distinctive feature is an openwork pattern on the cut. This is achieved through production technology: the cheese grain is processed in a special way, due to which pores are formed in the finished product.
A high-quality product has many pores of irregular shape, they are located throughout the entire head of the cheese, not too large and not stuck together. The distinctive characteristics of the cheese are plasticity, moderate fat content (no more than 50%) and pronounced sourness, balanced by a pure cheese taste.
Ingredients
- 10 liters of milk;
- Mesophilic starter (optional): 1/8 tsp. (0.18 g) Danisco Choozit MM 101 / MM 100 (for cheese with eyes) or MA 11 (without eyes);
- 1/8 tsp (0.18 g) Hansen CHN-19;
- 1/32 tsp (0.06 g) Uglich-7K. Or Uglich-4, or Uglich-5A, optionally - Uglich-P (protection), Uglich-K (acceleration of ripening) - on the tip of the knife.
Yield 10% - 1 kg of cheese.
Set for Russian cheese
Homemade Russian cheese
How to make Russian cheese at home? To get a kilogram of cheese, you take 10 liters of cow's milk, dry enzyme and starter - it is thanks to them that the hard cheese acquires its characteristic acidity and ripens correctly. Sourdough is a culture containing mesophilic lactic acid bacteria that stimulate the curdling process and maintain optimal Rh of the cheese material. Homemade cheese recipe and proportions:
- cow's milk (homemade) - 10 l;
- dry sourdough – 100-200 mg;
- rennet solution – 0.5 teaspoon per 50 ml of water;
- table salt - no more than 3 tablespoons;
- purified boiled water – 50 ml.
Recipe
1. Heat milk to 32C. Sprinkle the dry starter and let it sit for 2 minutes so that the powder absorbs moisture.
2. Mix well and leave to ripen for 30-40 minutes.
3. Dissolve a 10% solution of calcium chloride in 30 ml of water and add to milk, mix.
4. Dissolve rennet in 50 ml of water at a temperature of 30-35C, leave for 20 minutes.
5. Add rennet solution and mix well.
6. Leave to form a clot for 30-40 minutes, maintaining the temperature at 30-32C.
7. The clot should become dense, cut into cubes with a side of 1 cm. If the clot is not dense, then leave it for another 10 minutes.
8. Stir for 10 minutes, maintaining the temperature at 32-33C.
9. Drain off 30% of the whey (3 l).
10. Stir the milk with a large slotted spoon, cutting at the same time, for 5 minutes.
11. Add 2 liters of water at 42C to reduce acidity.
12. Heat and knead the grain for 25 minutes to a temperature of 42C.
13. Place a drainage bag or cheesecloth in the cheese mold.
14. Using a slotted spoon, transfer the grain to the pan, shaking to drain the whey. Do not compact the grain in the mold; on the contrary, try to make the mass more airy by crumbling the pieces.
15. Cover with a lid and leave to self-press for 30 minutes. Turn the cheese once during this time (after 15 minutes) so that it self-presses in the opposite direction.
16. Place the mold with the cheese under the press and press for 3 hours: 1 hour - 2 kg (the weight of the load is 2 times the weight of the head of cheese), 1 hour - 3 kg (the weight of the load is 3 times the weight of the head of cheese), 2 hours - 4 kg (the weight of the load is 4 times the weight of the head of cheese). Each time you increase the weight of the load, you need to re-wrap the cheese, straightening out the folds in the fabric.
17. Salting in 20% brine. The salting time is calculated: 0.5 kg of cheese for 3 hours of salting). The cheese floats in the brine for 6 hours, so to ensure even salting, turn the cheese over once every 3 hours.
18. Drying at a temperature of 10-13C for 5-6 days. You need to get a dry crust.
19. Cover the cheese with a latex coating (or wax, or seal it in a shrink bag).
20. Maintain for 60 days at a temperature of 10-13C. To speed up ripening, you can add Uglich-K starter along with the main starter, then the ripening time is reduced to 40 days (if you use Uglich-7K, then acceleration is not required).
21. Cheese can be stored after ripening for 4-6 months at a temperature of 6-8C.
How to make Russian cheese at home correctly
How to make homemade cheese yourself? Delicious milk cheese can be made at home, but the process is long and complicated. If milk and fermented milk products are used when cooking soft cheeses, then to make hard cheese it is impossible to do without lactic acid bacteria and enzymes. Proper fermentation of milk occurs on the basis of powdered enzymes.
An important condition for the production of hard cheese at this stage is the correct temperature and acidity. The maturation of the cheese material lasts from 4 weeks to 2-3 months.
Formation process
After the heat treatment is completed, all the whey should be drained from the pan. To do this, you can use a colander with gauze. Next, the product needs to be salted and placed in a round shape with holes at the bottom (to remove excess liquid). Having covered the cheese with a saucer, it must be pressed using a press, using any heavy object.
It is advisable to keep the milk ingredient in this state for 3-4 hours. After the specified time, the cheese must be carefully removed from the container and wiped dry with paper towels. Next, the product should be placed in a dry cotton cloth and sent to the refrigerator. Hard cheese should ripen in this form for about 3 weeks. In this case, every 3-4 days it must be turned over and the fabric wrapper replaced with a dry one.
During this time, the cheese will become yellowish in color, acquire a dry crust, a sour taste and the correct structure.
You can consume a ready-made dairy product made at home, just like that or using it to create sandwiches. This ingredient can also be used for preparing salads, main hot dishes, and sauces.
Molding
When preparing Russian cheese, the molding method is used in bulk .
The cheese grain is freed from whey by draining it. The resulting grain is shaken thoroughly and air voids are formed between the cheese grains. This air is not removed during further pressing and forms an unsurpassed mechanical pattern characteristic of this type of cheese.
The cheese grain is laid out in sterilized molds into cheese cloth.
Other recipes
Homemade “Russian” cheese, the recipe of which has several variations, is popular. Depending on the chosen production method, the taste may acquire a peculiar bouquet, but it invariably remains magnificent.
Russian cheese at home, recipe from cottage cheese.
Several modifications of the classic recipe for making Russian cheese yourself:
| Type of cheese | Ingredients | Cooking steps |
| From cottage cheese | Cottage cheese - 1.5 kg; milk - 1.5 l; butter - 75 g; large egg - 1 pc.; fine salt - 1.5 tsp; soda - 1.5 tsp. | 1. Pour milk into a saucepan and bring to a boil at medium temperature. 2. Add cottage cheese to the milk, and then cook the mixture for 10 minutes with continuous stirring. 3. The gauze is spread in a colander. Pour the mixture onto it, gently squeezing out excess moisture. 4. Transfer the curd mass into a saucepan. Pour in soda and salt, add butter and egg. 5. Continue cooking, stirring constantly until the mixture acquires a uniform, viscous consistency. 6. Transfer the mass to a plate. After cooling, place in the refrigerator for a week. |
| With pepsin | Homemade milk - 4 l; filtered water - 35 ml; pepsin (beef) - 0.04 g; salt - 1 tbsp. l. | 1. Milk in an enamel pan is heated to 32-34 °C. 2. Pepsin is thoroughly diluted in water. Add the solution to the milk while gently stirring. 3. Leave the contents of the pan at rest for 45 minutes. 4. The resulting clot is cut. The pieces are made in the form of cubes with sides no longer than 20 mm. 5. After 15 minutes, the whey is drained. 6. The cheese mass is left for 2 hours in a colander. Then turn the formed head over and keep it in a colander for another 2 hours. 7. Rub the cheese with salt, place it on a plate and place it in the refrigerator. 8. It can be eaten fresh, soft, or aged for 30-40 days. |
Only high quality products should be used. If you purchase homemade milk, it should be pasteurized before starting the cheese making process. For this purpose, in a wide enamel pan, milk is heated at high temperature to 71-73 °C. Pour it into a container set on crushed ice so that the liquid cools quickly. The milk is stirred several times. The product is kept in glass jars in the refrigerator for 24 hours. After such preparation, the milk is used as a raw material for homemade Russian cheese.
Housewives enhance the flavor bouquet of homemade cheese by rubbing it with their favorite spices, garlic, and herbs. After ripening, the product acquires a pleasant piquant aroma. It should be borne in mind that homemade cheese does not contain preservatives, so it can be stored for no longer than 6 months if it has a wax coating. In its absence, products can be kept in the refrigerator for 2-3 months. “Russian” cheese gets a characteristic sour taste when made at home, if the recipe is carefully selected and useful recommendations are taken into account.
Heat treatment
By leaving the resulting mass aside for 1-2 hours, you should end up with a clot in the form of a dense and elastic jelly. After cutting it into small squares with a knife, you should wait until the base begins to release whey.
After the described steps, the dishes need to be placed in a water bath and slowly heated to a temperature of 40 degrees. In this case, the mass should be stirred regularly with a large spoon. This process may take you about 45-60 minutes. During this time, the cheese grain should boil down a little and decrease in volume.
The readiness of the product can be determined as follows: the flakes settle to the bottom of the pan, and when consumed, they creak on the teeth.
Making Russian cheese
Homemade cheese differs from store-bought cheese in that it is made only from natural ingredients. That is why it is recommended to make such a product only yourself. To do this we may need:
- rennet enzyme (for example, milk-clotting "Meito") - about 0.4 g;
- cow's milk, homemade - approximately 12 liters;
- medium-sized table salt (in no case iodized) - 3 large spoons;
- fat sour cream - 200 g.
Russian cheese based on sour cream: step-by-step recipe
How to prepare Russian cheese with the addition of sour cream and Meito enzyme at home? To make cheese according to an alternative recipe you will need:
- cow's milk (homemade) – 12 l;
- milk-clotting enzyme "Meito" - 0.5 g;
- homemade sour cream - 1 glass;
- table salt – 3 tbsp. l.
How to make homemade Russian cheese with your own hands:
In our city, of course, there are still no special stores where you can buy various starter cultures and enzymes for making hard cheeses. But this didn’t stop me at all and I made an order via the Internet, looking at how my friends from online correspondence were busy preparing homemade cheeses and feeding their loved ones with real, natural cheeses! I purchased a mold for cheese in the online store, Mesophilic starter BK-UGLICH-No. 7K 1EA, for 40-50 l of milk (LKDPk), Rennet Extra A, 10 g for 200 l of milk, measuring spoon, made in Russia (ZAO ZEF) , as well as latex coating for cheeses. Homemade milk - I bought it from a time-tested man and his cow. And so my cheesemaking began.
And so, I will tell you how to make delicious homemade cheese. To do this, you first need to pasteurize the milk if you are not 100% sure of its quality. To pasteurize, strain the milk through 2-3 layers of gauze and heat to 70-72 degrees. Then place the pan in a bowl of cold water and ice and quickly cool the milk. Place the cooled milk in the refrigerator for a day. You can pasteurize milk in batches, for example, dividing it into 3-4 parts of 3.3 or 2.5 liters. this way it will cool much faster.
I did not pasteurize the milk, because I am 100% sure of the owner. I just let it sit for a day in the refrigerator at a temperature of 10-12 degrees to increase its acidity. This will make the cheese much tastier.
I’ll say right away about sourdough and enzyme. On them you can immediately read how to properly breed them and how much milk to add and what to add. My starter (bag) is designed for 40-50 liters. milk. So I separated 1/4 of it and used it for 10 liters of starter. milk. I have the enzyme with a measuring spoon, which indicates that it is added at the rate of 1 heaped spoon per 5 liters. milk. I added 2 heaped scoops to my milk volume.
Activation of the starter:
In 200-250 ml. milk heated to 35 degrees, add the starter, mix and leave for 40 minutes in a warm place. It is important that the temperature of the milk does not drop.
Pour the rest of the milk into a saucepan and place on low heat, heating it to 32-33 degrees. Turn off the burner.
Milk curdling:
After 40 minutes have passed since the activation of the starter, add it to milk heated to 32-33 degrees and mix with a slotted spoon for 10 seconds.
Separately, dilute the enzyme in boiled cold water (50 ml.). The enzyme is highly soluble in water. If you use the enzyme in liquid form, you will not need to dilute it.
And immediately add it to the warm milk with the starter.
Stir with a slotted spoon for 10 seconds and cover the pan with a lid. Leave the milk to ferment for 40-50 minutes. The temperature of the milk should not fall below 32 degrees.
Cutting the clot:
After 45 minutes, I looked into the pan and, using a long skewer, found that the milk had turned into a dense curd (like jelly).
Using a skewer, cut the curd into 1.5/2 cm squares. Do not forget to cut the curd horizontally, dividing it into squares.
When we have cut the curd, leave it covered with a lid for 10 minutes. During this time, the cheese cubes should settle (sink).
Like this.
After 10 minutes, drain 100 ml. serum. Don’t pour out the whey; you can use it to make excellent pancakes, just drink it, or use it to spray your garden.
Place the pan over low heat and stir, cutting large pieces of cheese into pieces if necessary. Bring the serum to 36-38 degrees for 10 minutes.
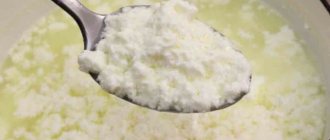
After 10 minutes the result was a grain of cheese like this. It has decreased. It should be 7-8 mm in size.
Draining the whey and adding water:
Drain off 3.5 liters of whey.
And add 2.6 liters. cold boiled water at a temperature of 40 degrees.
Now heat the cheese grain to 38-40 degrees for 15 minutes over low heat. Slowly stir the cheese grains throughout the heating.
You see how the cheese grain has decreased in size.
Check the cheese grain for readiness. Just take a handful of grains and squeeze a little.
When squeezed, the cheese grain should break down into grains on its own.
Salt the cheese grain:
When we have heated the whey with the grain to 40 degrees, we strain the whey to the maximum and salt the cheese grain. Just sprinkle salt (2 grams) on the grain and stir for 10 seconds. At this stage, it is up to you to decide whether to salt the cheese grain or soak the cheese wheel in a salt solution after self-pressing. At this stage, I did not salt the grain, but I kept the cheese wheel in a salt solution for 8 hours. As a result, the sy turned out to be quite salty to taste. I really liked it, as I prefer salty cheeses. If you like cheese with almost no salt (taste), add a little salt to the grain of cheese at this stage and do not soak the head in salt solution, just immediately after self-pressing, put the head of the resulting cheese to dry and then to age. In general, do according to your taste.
All that remains is to place the cheese grain in the prepared form and leave it to self-press for 30 minutes. I have a 1.3 liter mold. It turned out to be a slide. It's okay, the cheese grain will settle during pressing.
After 30 minutes, the cheese grain was sufficiently compressed.
Now it’s time to put a weight of 0.5 kg on the future cheese. for 2-5 minutes.
This is what happened.
After 5 minutes, take out the head of cheese and turn it over in the mold. This is the head of compressed cheese grain I got.
Place the mold with cheese in a container where excess whey will drain.
Add a weight of 2-3 kg on top. within 3 hours. I increased the load to 2, then 2.5 and 3 kg. every hour.
The result was a fairly dense cheese, weighing 1 kg.
Salting cheese:
Now we need to send the cheese head to salt in a brine solution for 12 hours, prepared from 2 liters. water and 400 gr. salt. Be sure to strain the solution through gauze folded in 4 layers. You can prepare a saline solution from one liter of water and 200 g. salt. I needed more fluid.
After the cheese has been salted, dry it a little with a napkin and put it out to dry for 2-3 days in a cool place (in the refrigerator).
Once 2-3 days have passed and the cheese has dried well, we leave it to age for 14 or more days. The head of cheese can be covered with a special storage bag or latex. But I wanted to try for the first time to age the cheese without any application. The longer the cheese matures, the brighter, denser and richer in taste it will be.
Of course, I couldn’t resist and decided to cut my first hard cheese after 1 week of aging. My husband and I just had our wedding anniversary (15 years!). This is the cross-section of Russian cheese aged for a week (7 days + 3 days drying).
Well, what I want to say is that the cheese turned out to be quite tasty, one might say the same as what was sold back then in the USSR. We still captured the period when there was practically nothing in stores, but there were quality products on store shelves, albeit in small quantities.
And so, I advise everyone not to spare their time and effort and be sure to at least once make their own delicious homemade cheese from natural milk.
But I got this Russian beauty after 2 weeks of aging. I have already covered it with 3 layers of latex. The weight of the cheese certainly decreased after aging. There is only 900 grams left in the head of cheese.
We cut it specially to see if there would be a significant difference. And I no longer salted this Russian cheese in brine, but only salted the cheese grain. The cheese turned out to be mild in taste, barely salty. After all, in this matter you are guided by your taste and the taste of your family.
Beautiful, spongy Russian cheese captivated us all. Naturally, the longer the cheese is aged, the tastier it will be, with a pronounced taste.
Svetlana and my home kulinarochka2013.ru wish you all a bon appetit!
Step-by-step instruction
Making homemade Russian cheese is a labor-intensive task and takes a lot of time, so to understand the features of the process, it is better to break it down into several stages.
- The process of pasteurization and further maturation of milk or, in other words, reservation. Homemade cow's milk must be pasteurized at a temperature of +70...+72 °C, after which it is kept for 24 hours at +10 °C.
- Preparing the starter followed by curdling the milk. You will need a glass of heated milk (no more than 35°C) and 0.1-0.5 mg of starter. The starter is poured into the milk, the mixture is carefully stirred and placed in a warm place for 35 minutes. In the meantime, the milk is prepared - in an 11-liter saucepan it is heated to +32 ° C, after which a glass of starter is added. Half a teaspoon of enzyme is dissolved in warm water and added to a saucepan with milk and enzyme. The milk with additives is mixed again and infused for 40-50 minutes at a temperature of +32 °C.
- Receipt and processing of cheese material. After infusing in the pan, you should get a clot similar in density to cottage cheese. A sign of high-quality fermented cheese material is the resulting jelly-like substance that lags behind the walls of the container. Using a knife or skewer, cut the cheese curd into cubes with a side of up to 2 cm, after which the cheese material should stand for another 10-15 minutes. The next stage is decanting the resulting whey and heating the curds over low heat. With constant stirring, the mass must be cooked at +38 ° C, the cheese curds will decrease and enter the granulation stage. At this stage, the remaining whey is drained, and the cheese grain is filled with hot boiled water (+40 ° C) in a volume of 3 liters. Then the cheese grains are heated again for about 15 minutes to a temperature of +42 ° C, strained using a sieve, sprinkled with 0.5 tsp. salt and allow to drain for 30-40 minutes.
- Shaping, pressing and salting cheese. As soon as the excess whey is drained, a 0.5 kg load is placed on top of the caked lump for 25 minutes. Then the lump is turned over and again under the load, but this time 2.5-3 kg and for at least 3 hours. While the cheese is getting rid of excess moisture, a brine is prepared from 1 liter of hot water and 3 tbsp. l. table salt. The resulting head of cheese is immersed in brine and left to salt for 12 hours. At this stage, it is recommended to periodically turn the cheese over to ensure even salting.
- Aging. The cheese is removed from the brine and dried, placed on the lower tier of the refrigerator and ripened for another 3 days at +10...+12 °C. As soon as the crust on the cheese wheel has dried, it can be placed in a thermal shell and allowed to ripen in the refrigerator for another 3-4 weeks, remembering to turn it over a couple of times a day.