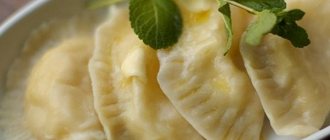
Hello everyone, Olga is with you as always, perhaps you will need information on storing food and various things and I will tell you about Suluguni Cheese: a recipe for cooking at home. Maybe some details may differ, as was the case with you. Attention, always read the instructions of the things you buy for cleaning the house or the chemicals that help to store them. I answer the simplest questions. Write your questions/wishes and secrets in the comments, and together we will improve and supplement the quality of the material provided.
Ingredients required for cooking:
- Milk – 1000 milliliters;
- Sour cream – 100 grams;
- Chicken eggs – 2 pieces;
- Salt – 1 tbsp;
- Dill – 1 bunch;
- Parsley – 1 bunch.
Spring suluguni cheese: recipe
Ingredients required for cooking:
- Milk – 1500 milliliters;
- Cottage cheese – 1500 grams;
- Chicken egg – 5 pieces;
- Butter – 160 grams;
- Salt – 8 grams;
- Soda – 4 grams.
Curd suluguni: recipe
Curd suluguni: recipe
One of the simplest cooking options, it does not require any special ingredients, since the entire necessary set is often in the refrigerator.
The active cooking time of suluguni takes only one hour, but how much pleasure will the final result bring.
Do you use expired food for cooking at home?
Yes, the main thing is to process it if it is meat or expired kefir for pancakes.
27.04%
No, it is very dangerous and not useful.
37.6%
If the products have fungus or mold, then we throw them away; if they are a couple of days past their expiration date, we use them for food, even without heat or other treatment.
35.36%
Voted: 1694
Suluguni is a soft, fresh Georgian cheese, moderately salty and elastic, which can be added either to prepared dishes or eaten on its own. It is actively gaining popularity, but it is not always possible to find a high-quality, tasty, and most importantly natural product on sale. Suluguni cheese can also be made at home, because the recipe is quite simple and does not require a lot of effort. The most important thing is to show willpower and let the suluguni brew.
How to soak salted cheese correctly
from Lidia Khabibova
Usually cheeses like feta cheese are very salty and such cheese is harmful to eat. Salt can retain fluid in the body, leading to swelling. It is better to soak it in water or milk. This will still make it tasty, but the salt will go away.
1 - Make slits in the cheese or cut into 4-6 pieces.
2 - Place them in a container (pan, jar), pour cold boiled water or milk to cover.
3 - Keep in the refrigerator or cool place for 3-4 hours. Check from time to time, otherwise the salt may come out completely.
from Lidia Khabibova
Under what conditions should it be stored?
Storage of dairy products occurs under standard conditions and does not require additional explanation. However, there are rules for keeping certain types of products together. If they are not followed, the shelf life, including cheeses, can be significantly reduced.
- Please note that dairy and raw smoked cheeses should be kept separately. In addition, they are isolated from any strong aromas and perishable products.
- Suluguni should be stored in the refrigerator exclusively in brine; the cheese should be completely in the liquid. It is best to use a glass container and cover it with cling film.
- Sudden temperature changes are unacceptable for this product. The optimal storage temperature for Suluguni cheese is 6°C. If it turns out to be lower, the product will lose its original quality. That is why it is not advisable to place it in the freezer.
What is suluguni cheese
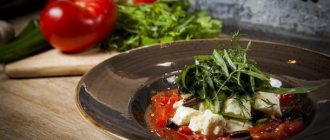
Suluguni cheese is classified as a lightly salted brine cheese. Properly cooked, it has a restrained fermented milk aroma. The color of the cheese varies from pure white to yellowish cream. On the surface of the head of cheese there may be traces from the mesh - serpyanka, into which the future cheese is placed during preparation. It is plastic, slightly springy on the teeth. Shouldn't crumble. Features of the smoked variety - it looks darkish, has an appetizing crust, and a piquant aroma.
History and region of origin
This Georgian variety of cheese belongs to the group of pickled cheeses that have become widespread throughout the Eurasian continent. This cheese group, in addition to suluguni, also includes feta cheese, the only representative of lightly salted rennet-free cheeses of Slavic origin. This group also includes the famous Greek feta, Armenian chechil and Adyghe cheese. These varieties of cheese products are similar, but differ in their regions of origin.
The region of Samegrelo in Georgia is the recognized homeland of the Suluguni. The very etymology of the name of the variety is a mixture of words from the Mingrelian language: “sele” - mix, “gin” - cattle.
How to prepare suluguni
This product is made from a mixture of cow, sheep, goat and even buffalo milk. When preparing, you can combine 2 - 3 types of milk. The raw materials are used both fresh and pasteurized.
In the hot climate of the Caucasus Mountains, milk quickly ferments. This “lack” of milk was the impetus for the creation of brine cheese – a food product that is easy to prepare and can be stored for a long time.
At the beginning of the process, the milk is heated to 30-35 degrees. Afterwards, the warm milk is curdled with bacterial starters and calcium chloride is added. The resulting cheese mass is crushed into pieces and lightly pressed. A small amount of whey remains in the cheese “blank”. From this mass, ropes are pulled out, which are simmered in a boiler at a temperature of 80 degrees. After melting, the cheese curd is divided and portioned balls are formed. They are placed in cylinder molds and lowered into a cold mold to allow the cheese to cool. After cooling, the cheese is transferred, sprinkled with salt, and aged. Lightly salted cheese is ready in 3-4 days. If it is necessary to preserve the product longer, suluguni is kept in brine. This requires a period of up to 1 month. After salting, the cheese can be slightly smoked on alder or mulberry chips at a temperature of 50 degrees for no longer than 10-15 minutes.
On a production scale, suluguni is prepared according to the requirements of quality standards - GOST R 53437-2021 “Sulguni and Layered cheeses. Technical conditions". If the long-term brine storage technology is violated, mucus will form on the suluguni. This slippery substance is the result of milk protein watering and calcium leaching. The cheese literally begins to dissolve in the liquid. Mucus appears when cheese is soaked in a brine consisting only of table salt and water.
In order to avoid sliminess of the cheese head, you need to prepare the correct brine (brine). In order to salt and protect 1 kilogram of suluguni from mucus, you need:
- Clean drinking water – 3-4 liters
- Table salt – 1 kilogram
- Table vinegar 5% or white wine vinegar – 1 teaspoon. It should bring the acidity of the brine to pH = 5.0. Acidity can be measured with a pH meter
- Calcium chloride – 1 tablespoon
We recommend reading: How to Store Garlic Before Planting in Autumn
Preparing the brine is simple:
- Heat the water. Don't boil!
- Add vinegar, calcium chloride and salt. Mix everything until dissolved.
- Allow the brine to cool to room temperature.
In this brine you can store the product for a long time without fear of its delamination and the appearance of mucus. To ensure even salting, the cheese head needs to be turned over.
Subtleties of cooking
How to cook suluguni at home without special equipment? There are many nuances in the cooking process, from utensils and utensils to technology. Let's look at some of them:
- For real suluguni, you can take homemade milk: cow's, goat's, or a mixture of both. Traditionally, this Georgian cheese was made from buffalo milk . Store-bought pasteurized milk is not suitable for preparation
- Starters should be taken only thermophilic or mesophilic-thermophilic. In the production of suluguni, water heated to 80°C . will not survive in this environment .
- When making your own at home, it may be necessary to pasteurize cow's or goat's milk. This can be done at home by heating the milk to a temperature of 85°C . But pasteurized milk does not curdle well, so you will additionally need calcium chloride, which is sold in pharmacies or specialty stores. For 10 liters of milk you need to take half a teaspoon of powder. Calcium chloride is diluted in water heated to 38°C (30-50 ml) and poured into milk along with diluted pepsin or rennet.
To make cheese at home you will need the following equipment:
- Kitchen scales.
- A small measuring spoon that is sold along with the starters.
- Clean glass. Before cooking, you need to prepare 2-3 cups, depending on whether calcium chloride will be used. There should be a separate container for each powder.
- Thermometer. In cooking and when making cheese, a special thermometer is used. You can’t take regular household appliances . If it is not in the store, then for the first time you can do without it, using the old method when measuring temperature.
- A thick-bottomed saucepan in which the milk will be heated before fermenting.
- Wooden spoons or spatulas with long handles.
- A long knife or lyre , a special device for cutting calla . You can do it yourself at home.
- Form or colander.
- When preparing suluguni from cheese dough, you will need thick gloves that do not feel hot. It is convenient to use latex ones with cotton lining on the inside.
Be sure to read:
Exquisite taste of Fetax cream cheese: calorie content, benefits and cooking secret
Making real Georgian cheese at home is a difficult, but interesting and exciting activity.
The nutritional value
Brine suluguni has:
- Low calorie content - 253 kilocalories per 100 grams of product.
- The carbon content of cheese is 0%.
- Fat content is no more than 18.8 grams per 100 grams of cheese – 47.2%.
- Protein component – 19.5 grams per 100 grams of cheese – 48.9%.
- The amount of proteins needed by the body is replenished with 100 grams of suluguni by 29% of the daily intake, the amount of fat - by 25% of the daily intake per person.
- Vitamin and mineral group presented in cheese – A, B 1, B 2, E, C, PP
When consumed in moderation, Suluguni can be presented as a dietary product with low energy value and a complete absence of carbohydrates. It must be taken into account that, as a fermented milk product, it is contraindicated for people with lactose intolerance; smoked varieties should not be eaten by people with peptic ulcers and gastritis. And for those who suffer from diseases of the gastrointestinal tract with low acidity, this nutritious snack can be eaten as a preventive measure. Pregnant and lactating women will also benefit from suluguni - it improves the formation of mother's milk (lactation).
How to choose the right suluguni
Price is the primary reason for choice. Suluguni prepared in compliance with technology and quality requirements cannot cost less than 400 - 500 rubles per kilogram. Otherwise, it will be dry, crumbly cheese, and also over-salted. The product purchased from the market will meet the quality criteria. The cheese was brought from Georgia or made in Russia according to a traditional recipe from farm milk. The cheese should be immersed in brine and float in it. What awaits the buyer in vacuum packaging is not suluguni at all.
The cheese shouldn't look too much like a flatbread. The thicker the piece you choose, the tastier it is. When choosing a cheese, you need to press down on the cut head with your fingers. The whey oozing from the cut will tell you that this suluguni is of the first freshness.
The cheese piece may be too salty. For long-term storage this is a plus, but many will not like eating such a product. Excess salt is harmful, as salt retains water in the body. This can lead to swelling and excess weight gain. What to do if you have very salty suluguni cheese in front of you:
- Cut the cheese head into 3-4 large pieces.
- Place the pieces in a bowl and cover with cold water or milk.
- Place the bowl of cheese in a cool place, refrigerator for 2-4 hours.
- While soaking, taste the cheese once every 2 hours. This is necessary in order to drain the liquid in time, avoiding excessive salt removal. The cheese may become bland and tasteless.
Homemade cheese
Suluguni ripens in brine. This process must be kept under control. It is necessary to constantly check the condition of the cheese and the quality of the brine itself. If the surface of the liquid begins to form a film and an unpleasant odor appears, the brine will need to be immediately replaced with fresh one.
Homemade suluguni, like factory-made ones, should be transported in wooden boxes. The inside of the boxes should be lined with parchment or similar material. This product should be consumed no later than 5 days from the date of manufacture.
Brine cheeses: feta, feta cheese, suluguni, chechil (it is often confused with suluguni) must be stored according to certain rules. Like all dairy products, they have a very short shelf life and can spoil within a short period of time. Therefore, it is advisable not only for those who produce it, but also for consumers of this product to understand the issue of how to store Suluguni cheese.
Tags: pickle, suluguni
- Related Posts
- Mate tea taste
- How to get rid of ink on a shirt
- How to extract juice from radish
« Previous entry
Cooking suluguni at home
In Russia, you can enjoy this Georgian delicacy by tasting it in a national restaurant or purchasing it in the dairy section of a supermarket. But home-grown chefs can prepare a delicacy in their kitchen that is as similar as possible to suluguni.
Home Recipe No. 1
For this simple recipe you need:
- 1 liter of whole cow's milk with a high percentage of fat content, can be mixed in a 1:2 ratio of cow and goat milk, preferably purchased in rural areas
- 1 kilogram of low-fat village cottage cheese
- 100 grams of butter
- 3 chicken eggs
- 1 teaspoon table salt
How to make suluguni correctly:
- Pour the milk into an enamel pan and bring to a boil. Next, add cottage cheese, cook, stirring, for 40 minutes over low heat.
- Place a large sieve on another pan, and place sterile gauze in 2 layers.
- Strain the resulting cheese mass.
- Place the warm lump of cheese “blank” into a saucepan, add eggs and salt.
- Boil the resulting clot over medium heat for 15 minutes.
- Grease the mold in which the cheese will be placed with butter, make a ball out of the curd, place it in the mold, and level it with your hands.
- Once cooled, store the cheese in the refrigerator.
We recommend reading: How to Store Caramel So It Doesn’t Spoil
Home Recipe No. 2
If you have certain cooking skills, you can try to create real suluguni at home. To get 1 kilogram of sulguni, you will have to stock up on:
- Village whole milk in the amount of 10 liters, you can also mix goat and cow milk in a 1:1 ratio
- Salt
- Pepsin. It is sold on cheese-making forums, in pharmacy kiosks, and online stores. Beef pepsin SF 10 is an enzyme. It is used in the production of pickled cheeses. You will need 3 milliliters of liquid pepsin.
- Pour the milk mixture into an enamel bowl, heat to 30 - 35 degrees, add pepsin to the milk and put the mixture in a warm place for half an hour.
- After the time has passed, light a small fire under the pan with the milk mixture. Observing the process of curdling the cheese mass, push the cheese clots towards the wall of the pan for 5-7 minutes.
- Without draining the whey, remove the curdled mass from the lumps, place them in a sieve/colander lined with double-layer gauze, and strain the mass.
- Leave the hand-formed cheese ball in the whey for 3 to 4 hours for fermentation and fermentation. You can check the cheese for the end of the fermentation process like this: tear off a small piece from the head of cheese and throw it into hot water for 2 minutes. If after this the piece easily tears or flakes, the cheese has not fermented. The wheel of cheese continues to gain strength in the whey.
- If the control piece becomes elastic and stretches after hot water, boil water in a saucepan and let it cool to 70 degrees.
- Divide the cheese into strips no larger than 2 centimeters and place them in water. Stir constantly. The cheese should melt, giving a layered mass.
- Remove the cheese mass, cut into pieces, form into a ball, put in a mold and let cool and finish.
- Prepare a whey-based brine in a ratio of 1 part salt/5 parts liquid.
That's it, homemade fresh suluguni is ready. You can cut it into large slices, sprinkle it with herbs, add fried vegetables and mushrooms, and various combinations of meat dishes. Including fatty kebab. Serve with a glass of cool Tsinandali wine. Bon appetit!
- Heat the water. Don't boil!
- Add vinegar, calcium chloride and salt. Mix everything until dissolved.
- Allow the brine to cool to room temperature.
Classic recipe for making suluguni at home
Cooking suluguni is a simple, but quite lengthy process that will take some time. The process consists of 2 significant stages. First, Imeretian cheese is prepared, it must ripen and obtain the necessary acidity.
In production, the intermediate product is molded. But this is done solely for convenience. At home, the mass can be left without self-pressing . Cooking and stretching the cheese dough usually begins after a few hours or a day later.
It is folded and pulled several times to form characteristic layers. The more carefully you perform this operation, the better the structure of suluguni cheese at home.
Homemade cheese differs from the industrial version in its quality. To prepare it, we select whole, unpasteurized milk from a reliable manufacturer. You will also need industrial starter cultures or natural sour cream. If the milk is pasteurized, you will additionally need calcium chloride.
How to cook suluguni at home: recipe with photos
Products:
- 5 liters of homemade whole milk;
- ¼ teaspoon pepsin (you can use any rennet);
- 1/8 tsp thermophilic starter.
Preparation:
- First, rennet must be added . But for it to start working, heat the milk to a temperature of 34-38°C . It is at this temperature that enzymes and starter cultures begin to activate and multiply. It is strictly forbidden to exceed it. If you are not sure about the quality of milk and want to pasteurize it, then you need to heat it until small bubbles appear (85°C) and quickly cool it (37-38°C). In this case, you will have to use calcium chloride . Only with it will the milk curdle.
- Before adding rennet to heated milk, it is necessary to dilute it in water at the same temperature. It is necessary to dilute even when liquid enzyme is used. The amount of water is 40-50 ml.
- Thermophilic starter is not mixed immediately with milk or water. It is poured onto the surface of the milk and left for 5 minutes so that the powder particles swell. Gently stir the starter into the milk. Stir with smooth circular movements, but no more than a minute.
- Cover the pan with a lid or a clean cloth to protect it from dust. The formation of calla (curdled curd, the base of the cheese) lasts approximately 40-60 minutes , depending on the amount of milk, room temperature, freshness of the enzyme or starter and other factors. You need to start cutting cheese not according to time, but depending on its readiness.
- Calle is considered ready when the whey acquires a characteristic greenish tint , and when cut with a knife there are no traces of a clot left on it. If it sticks to the knife, then you need to wait. This type of test is called “clean fracture”. The knife for cutting must be large, with a long, wide blade.
- The curd is cut into pieces as follows: first, strips are cut lengthwise, then crosswise, and finally horizontally. The resulting cubes should have a side of 2 cm. You can take a special tool for this purpose - a lyre .
- Now the crucial stage: the formation of the cheese grain. The cut kale is stirred for 10-15 minutes , maintaining an average temperature of 35°C , until grain is formed. As soon as it has formed, stirring must be stopped.
- Now the grain needs to be left so that it is better separated from the whey. Once all the curd has fallen to the bottom, most of the whey can be poured off.
- The remaining curd is placed in a colander for self-pressing. As soon as the liquid has drained, it is turned over. The result is Imereti cheese, which should gain the necessary acidity. It is necessary so that when lowered into hot water the cheese begins to stretch. This is how you get the cheese dough for suluguni.
- The acidity level to obtain an elastic dough is needed within the range of 4.5-5 pH . For this to happen, at least half a day must pass. Time depends on humidity, temperature and other factors. It’s easier for those who have a special device. Those who don’t have one have to regularly dip a small piece of cheese into hot water to check . As soon as the mass begins to stretch, they begin to prepare the suluguni.
- To do this, the cheese is cut into pieces approximately 3*3*3 cm in size. This way the cheese will melt better . Now you can put on gloves to avoid burning your hands.
- In a large saucepan, heat water to a temperature of 75-85°C . Place the cheese in a colander. Remove, stir, put back in. It is more convenient to mix with two wooden spoons or spatulas. Repeat the manipulation until the mass becomes like a soft, elastic dough that does not tear, but stretches.
- Now you need to put the resulting mass on the table and use gloved hands to stretch out the dough and fold it. The procedure is repeated many times . In this case, the dough turns out to be layered when cut.
- Then you need to roll all the dough into a ball and put it in the mold.
- You need to turn it every half hour or hour to drain the whey.
- Now the finished suluguni needs to be salted: 60 g of salt dissolves in a liter of water . The head is placed in this solution and salted according to the time: 1 kg - 6 hours, 2 kg - 12 hours, 0.5 kg - 3 hours. During the salting process, the cheese head must be turned over .
Be sure to read:
Belper Knolle: cheese balls from Switzerland
As you can see, the process is quite labor-intensive and time-consuming, but the result is worth it. The result is a very tasty cheese with a delicate milky smell. The section reveals numerous thin layers.
How to remove excess salt from lard?
They treated us to salted lard. They salted it for future use in the tank. By rolling in salt. It is very salty. Is it possible to make lard less salty and more tasty?
If there is a lot, then I take a knife and scrape it off from the top of the fat. But it happens that the salt has already saturated the lard, and it needs to be removed from the inside. Then immerse the salt in water and place a piece of rice in gauze there. The rice will quickly absorb the excess salt.
I remember my parents salted lard in three-liter jars and sprinkled the pieces with salt very well.
Interestingly, when they pulled it out after a while, it was enough to scrape off the salt with a knife and the lard could be consumed.
It has the property of not taking in excess salt, only as much as is necessary for salting.
But if there is lard with a cut of meat, then in my practice it was the meat layer that was over-salted.
You can, of course, soak it in water, but we didn’t have time - so we ate it.
It has always been believed that lard cannot be over-salted by simply sprinkling it with salt. It has a layer of meat - yes.
But if you are not a fan of highly salted lard, then choose a few pieces for yourself, scrape the salt from them with a knife, put them in a saucepan, fill with water up to the level of the lard itself and boil.
A couple of minutes is enough, turn it off and add crushed garlic. Once it cools down, put it in the refrigerator along with the brine. This lard turns out tender, soft and not so salty - you should like it.
Usually lard does not absorb much salt. Only as much as needed for salting. If you still have too much salt, then simply remove it with a knife (just “scrape” it off) and rinse off the remaining salt a little with cold water. Usually this is enough. If the lard has a layer and it is very salty, then such lard can be soaked a little in cold water. To improve the taste, roll/stuff with garlic and spices, let it brew for 2-3 hours (minimum) and put it in the freezer. Then eat it, cutting it thinly.
It has always been believed that lard cannot be over-salted by simply sprinkling it with salt. It has a layer of meat - yes.
Instructions Suluguni Article: 1623
Instructions for the kit for learning cheese making at home.
Suluguni
History of creation There are several versions of where the name of the cheese came from. The first is Georgian: “suli” (which means “soul”) and “guli” (which means “heart”). The second is Ossetian: (Digor dialect): sulu - whey + gun “made from whey”. And another version, also from Ossetian, but from a different dialect - Alan: Sulu - whey, and Hun - circle, i.e. The literal translation is a whey circle.
About the recipe and starters The technology for preparing suluguni goes back centuries. Every Caucasian family makes cheese according to its own recipe. In a modern kitchen, having the necessary starters, you can easily make tasty and healthy young pickled cheese yourself.
Characteristics of the finished product Fresh suluguni has a pure milky taste with a slight sour note and a corresponding aroma. As the cheese remains in strong brine, the salinity of the cheese increases, but the taste of suluguni can be softened by immersing it in fresh milk or whey for a while. The consistency of high-quality cheese is quite dense and elastic. Eyes are acceptable in cheese dough, but more often suluguni has a smooth cut without cavities or cracks. A characteristic feature of the cheese is its layering and the complete absence of a compacted rind. The exception is smoked cheese, on the surface of which an appetizing golden brown and completely edible crust is formed. The taste of the sharp cheese is softened and enriched with the aroma of wood smoking.
Materials and tools Container - enamel or stainless steel bucket for 10-12 liters - 2 pieces Bowl of water (water bath) for slowly heating milk Plastic ladle Colander Napkin for cheese making or gauze Skimmer Thermometer Long knife or lyre Table salt, not iodized
Raw materials and consumption rates Milk: whole ripened, not subjected to separation and heat treatment From 10 liters of cow's milk of average fat content and average protein content, about 1 kg of Suluguni is obtained
Operating procedure
Preparing milk. To prepare Suluguni, use whole, ripened (kept at a temperature of +8°C...+12°C for 12-16 hours after milking) cow's milk. It is recommended to carry out pasteurization: quickly heat the milk to a temperature of +73ºС, with vigorous stirring, wait for 30 seconds. Cool to a temperature of +32ºС…+34 ºС.
Add starter art. 1593 from the kit to the cooled milk. Following the rules of asepsis and antiseptics, scatter the culture over the surface of the milk and leave for a while. Thoroughly mix the starter with the milk, avoiding the milk from foaming.
A mandatory process is adding calcium! Art. 1560 (calcium chloride) dissolve in 50 ml of boiled drinking water at room temperature and add to milk with thorough mixing.
Adding milk-clotting enzyme Important! The dose of milk-clotting enzyme may differ several times depending on the properties of the milk. We recommend that you always carry out a clotting test and calculate the dose of the enzyme individually for each specific case. You can find out more about this on the website zdoroveevo.rf in the “Articles” section
Pepsin-renin Meito is added at the rate of 0.04 - 0.14 g per 10 liters of milk (1 - 2 level measuring spoons). First dissolve the enzyme in a tablespoon of boiled drinking water at room temperature. Add the enzyme solution to the milk and mix thoroughly*. *stirring is carried out intensively, without creating flows circulating in a circle, evenly throughout the entire volume, for 5-7 seconds. Stop the flow of milk. In moving milk streams, the curd does not form correctly.
Checking the formation of a curd and its processing Milk begins to curdle after 12-15 minutes, but it can take from 30 to 35 minutes for the curd to gain density and the desired acidity. You can find out more about this on the website zdoroveevo.rf in the “Articles” section. Do not forget to maintain the temperature around +32 ºС ... +34 ºС. Clean separation of the curd from the whey must be achieved.
There are many methods for checking the readiness of a clot for cutting. For example, you can place a slotted spoon on the surface of the clot - if rolled correctly, transparent whey will pass through its holes, and the clot, under the influence of the weight of the slotted spoon, will elastically bend a few millimeters. If this has not happened yet, leave the clot for a while longer.
Cut the curd with a knife or lyre vertically and then horizontally into pieces with a side of 6-10 cm. The softer the cheese you want, the larger the size of the pieces. Leave for 10 minutes so that the cut curd thickens a little and settles, and the whey separates.
Second heating. Next, heat the cheese mass for 20 minutes to +38 ºС with constant stirring. You need to stir throughout the entire volume from bottom to top, reaching to the bottom of the pan. Monitor the temperature of the cheese mass using a thermometer.
As a result of kneading, the so-called “closure” of the cheese grain occurs, which is necessary for the proper separation of the whey. The cheese grain will decrease in size, become elastic and sticky. When squeezed in your hand, the grain should stick together, and when rubbed between your palms, it should break up into individual grains.
Scoop out most of the whey. Place the cheese grain on a napkin in a colander, squeeze with your hands to compact the mass. Place the colander with the resulting mixture in a water bath. Maintain at a temperature of +38ºС for 1.5...3 hours to achieve the desired acidity. The achievement of the desired acidity by the cheese mass is checked as early as possible - already 1.5 hours after placing the cheese grain in a colander.
To determine the readiness of the cheese mass for melting and molding, a melting test .
Separate a small piece from the cheese mass, dip it in heated (+85... +90 °C) whey for 1-2 minutes, then try to stretch it into thin long threads. If the cheese stretches, move on to stretching and shaping. If the threads break, wait for a sufficient increase in acidity.
While the cheese is “ripening”, you can prepare an 18% brine solution for storing Suluguni. Heat part of the whey to +65ºС…+75ºС, dissolve the salt, cool to a temperature of +8ºС…+12ºС. Heat the remaining whey to +85 ºС…+90 ºС (if there is little whey, you can use plain water).
Forming cheese and salting. Cut pieces of cheese mass 1 - 1.5 cm thick and up to 3 cm in width and length. Place the pieces in hot whey and soak until softened. Since the serum is quite hot, wear gloves. Take part of the mass in your hands and turn the inner layers outward in a circle several times, forming a spherical head of cheese. Smooth the seam. We recommend that you watch the video on the YouTube channel “How to cook Suluguni”. Place the cheese balls in cold salt brine for 6 – 48 hours. After salting, the cheese is ready to eat.
Conditions for ripening and storage of the finished product
Storage Due to the release of calcium into the brine, fresh suluguni will differ from week-old cheese. Fresh cheese is elastic, smooth and easily cut into thin slices, but at the same time it releases quite a lot of moisture when preparing hot dishes. Cheese aged for a week releases almost no moisture when heated in the oven, becomes less smooth, more sticky, slightly reminiscent of plasticine in structure. At the temperature treatment mode specified in the recipe, the activity of the thermophilic starter is partially preserved.
The shelf life of cheese in brine can reach 1.5 – 2 months. When stored without brine (in the refrigerator), the shelf life is no more than 5 days. To extend the shelf life, you can use smoking.
Section for experienced cheese makers
Features of the recipe. Attention! To properly prepare stretch cheeses and cheeses with cheddarization (Suluguni, Mozzarella, Chechil, Cheddar), it is necessary to achieve the correct combination of 3 interdependent factors:
1. Humidity before cheddarization – at least 50% by weight. The ability of cheese to retain moisture depends on the content of insoluble calcium phosphate in the protein fibers.
2. The calcium phosphate content before cheddarization is reduced compared to the moment of coagulation. With a high content of calcium phosphate, the cheese is hard and the fibers are inelastic. Calcium phosphate is converted into soluble forms under the influence of acids. This process is reversible, and if there is a large amount of calcium ions in milk, it slows down even with high acidity.
3. Acidity before cheddarization is increased compared to the moment of curdling, due to acidification with lactic acid starter. If at the time of curdling the acidity is high, then the curd will be loose, but if the acidity does not increase during the ripening of the cheese mass to the required level, then the cheese will not stretch in hot water.
In this recipe, calcium chloride is added to pasteurized milk for better properties and faster formation of a clot with characteristics characteristic of rennet coagulation. If the calcium content is initially low, the curd will be loose and will not contain enough moisture (less than 50%) for plastic stretching. On the other hand, the high content of undissolved calcium phosphate in the fibers at the time of cheddarization makes the cheese hard and non-plastic, and for cheeses with cheddarization, the opposite is required, high plasticity. Therefore, at different stages, it is necessary to properly manage the acidification process of the cheese and regulate the calcium content by changing the holding time of different stages, temperature, calcium addition, enzymes and sourdough.
Some important points: 1. Milk for curdling must have the required acidity (pH = 6.5...6.7). High acidity causes more calcium to pass into the whey than required. The acidity of milk is due to the development of lactic acid microflora, so use fresh milk. 2. Pasteurization enhances the transition of calcium from phosphates into solution. To enhance the reverse process of calcium transfer from whey to phosphates after pasteurization, calcium chloride is added to milk. For unpasteurized milk, calcium chloride is not always necessary. 3. Suluguni requires at least 50% water content in the cheese mass before cheddarization. The moisture content directly depends on the amount of undissolved calcium phosphate in the structure of the curdled milk fibers formed in the milk curd. Cheese gives up moisture during “syneresis” - the process of separating whey, this process is also called “drying” (“closing”) the grain. This means that the calcium content at this stage should be quite high. 4. Cheddaring requires the right combination of calcium and acidity in the cheese. The high calcium content requires high acidity for the required elasticity when stretching the fibers. The low calcium content allows cheddaring to be carried out even at low acidity. It is always necessary to allow sufficient time for “ripening” - the development of thermophilic starter culture in the cheese mass. 5. The cheese obtained after curdling and separating the whey has low acidity. Once the curd has reached the desired acidity, it is checked for readiness for cheddaring as early as possible. The duration of ripening of the cheese mass is 2-3 hours, taking into account the increase in acidity to 140-160°T, active acidity within the pH range of 4.9-5.1. 6. When processing cheese mass with an acidity higher than required, the cheese turns out to be of low quality (crumbly or coarse consistency, with a sour taste). To prevent this from happening, the readiness of the cheese mass for melting and molding is checked in a timely manner using a melting test.
Try also making other cheeses with our sets: Homemade goat cheese, Gouda, Camembert, Cachotta, Maasdam, Mozzarella, Roquefort, Russian, Tilsiter, Feta, Cheddar, Chechil, Edam, Emmental.
You can purchase all components from the set separately in our store.
what to do if suluguni cheese is very salty?
RPI.su is the largest Russian-language database of questions and answers. Our project was implemented as a continuation of the popular service otvety.google.ru, which was closed and deleted on April 30, 2021. We decided to resurrect the useful Google Answers service so that anyone can publicly find out the answer to their question from the Internet community.
We recommend reading: Boiled mushrooms are foaming, what to do
All questions added to the Google Answers site have been copied and stored here. Old usernames are also displayed as they previously existed. You just need to register again to be able to ask questions or answer others.
To contact us with any questions ABOUT THE SITE (advertising, cooperation, feedback about the service), write to . Only post all general questions on the site; they will not be answered by mail.
All questions added to the Google Answers site have been copied and stored here. Old usernames are also displayed as they previously existed. You just need to register again to be able to ask questions or answer others.
Container for storing suluguni in the refrigerator
The packaging (it must be airtight) for storing suluguni in a refrigerator can be:
- a regular container with a lid;
- parchment or special paper for cheese;
- foil.
It is not advisable to pack cheese in a plastic bag or cling film, because it may “suffocate.” There is another interesting trick to extend the shelf life of suluguni by several days. It consists of placing a piece of refined sugar in a container with cheese, which will absorb excess moisture.
Methods for soaking over-salted herring
If store-bought or homemade herring tastes too salty, this is not a reason to refuse a tasty snack. There are many options for how to restore a pleasant taste to fish, turning it from heavily salted to medium and lightly salted in a few hours.
Text: Irina Brusnika · May 10, 2021
The content of the article:
Before processing fish, it must be washed. If the herring is not gutted, remove the scales, head and entrails. Fish that are too large can be cut into pieces.
It is believed that herring should be soaked for exactly the same number of hours as it was salted for days. However, it is quite difficult to determine the salting period from store-bought herring, so it should be soaked for 12 to 20 hours.
The packaging of industrially produced herring indicates: 14% salt - strongly salted fish, 9–14% - medium salted, below 9% - lightly salted
Soaking in water
The fish is immersed only in cold water. If it is hot outside, it is advisable to keep a container of water in the refrigerator. The liquid that has absorbed salt should be changed every 2-3 hours. If in summer it is not possible to put the fish in water in a cold place, then try to change the water every 1.5–2 hours, or even more often, otherwise the herring will quickly spoil.
To speed up the soaking process, add 70% table vinegar to the water in a ratio of 10 parts water to 1 part vinegar.
If the salted fish floats up, then it has lost enough salt. Its taste has become much more pleasant and tender. When left in water for a long time, the pulp will absorb liquid, increasing the weight of the product by 5–20%.
Alternatively, slightly salted herring can be placed in a colander and placed under running tap water. This will prevent it from absorbing a lot of water. Rinse it for about an hour, turning it over periodically.
Melted suluguni at home
Prepare melted suluguni at home. Real Georgian cheese is stored in brine in the refrigerator. Homemade suluguni is stored for 1-2 weeks . Without brine, it will not spoil within 2-3 days. And if necessary, it can be fried, like halloumi with mint. To prepare suluguni based on lemon juice, you need to have the following ingredients:
- homemade whole milk - 3 liters;
- lemon - 1-2 pieces (depending on size);
- salt 2-3 tablespoons.
Additionally, to prepare cheese similar to Suluguni, you will need a saucepan or other container with a thick bottom, a juicer or fork, and a fine sieve.
Recipe:
- The milk is heated in a saucepan to 80-85°C . It needs to be stirred constantly to prevent it from burning. The temperature is measured with a thermometer or at home: numerous small bubbles appear on the surface of the milk.
- lemon juice diluted in half a glass of water along the edges , which is previously squeezed out.
- At this point you need to continue stirring the milk. Gradually, the curdled mass begins to separate from the whey. As soon as the whey begins to clear, you need to turn off the gas and continue stirring until it becomes almost transparent.
- The resulting mass is poured onto a sieve.
- Every half hour it needs to be turned over to form a neat head .
- When turning over, sprinkle the head with salt .
Soaking in tea or milk
- strong tea
- sugar
- milk
- salted herring
In the old days, herring was salted very heavily so that it could be stored longer, and was soaked before eating in strong sweet tea or fresh, unboiled milk. This significantly affects the final quality of the product and adds a sweetish or milky taste to the herring. So, cut the fish along the back into two parts. There is no need to remove the skin. Immerse it completely in cooled tea with sugar or milk. Tea, thanks to tannins, will prevent the pulp from becoming soggy and blurry, and milk, on the contrary, will give the herring tenderness and airiness.
Express method
An emergency option for getting rid of salt is to immerse low-fat herring in hot, but not boiling, water for 1–2 minutes. Then hold under running water for 5-10 minutes. This will soften the taste somewhat.
By reducing the salt level by soaking, you wash out proteins, essential mineral salts and nitrogenous substances from the fish. This devalues the product in terms of benefits and may negatively affect the taste.
In the old days, herring was salted very heavily so that it could be stored longer, and was soaked before eating in strong sweet tea or fresh, unboiled milk. This significantly affects the final quality of the product and adds a sweetish or milky taste to the herring. So, cut the fish along the back into two parts. There is no need to remove the skin. Immerse it completely in cooled tea with sugar or milk. Tea, thanks to tannins, will prevent the pulp from becoming soggy and blurry, and milk, on the contrary, will give the herring tenderness and airiness.