4 servings
2 hours 30 minutes
152 kcal
No rating
- Ingredients
- Filling options
Placinda is a special type of Moldavian pie that is known and loved far beyond the borders of sunny Moldova. My dear grandmother baked a stack of fragrant and tasty placintas every Sunday, because preparing such a wonderful dish is very simple, and is eaten quickly and with pleasure.
There are many options for filling and preparing this wonderful dish, but I will share with you the traditional recipe for Moldovan placindas with pumpkin. This recipe is time-tested and has been used in my family for many years, and I am happy to share it with all fans of this wonderful dish.
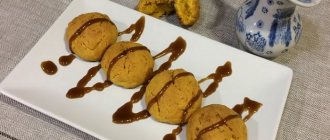
Placindas in the oven
This is a classic way of preparing placintas, because the baking process in the oven is similar to baking in an oven, and the most delicious placindas are obtained in it. Of course, no oven can replicate that amazing smell and delicate taste of a dish from the oven, but in urban conditions you don’t have to choose.
Kitchen utensils: grater; rolling pin; bowl for kneading dough; baking tray; parchment paper; oven.
Ingredients
| Kefir | 400 ml |
| Egg | 1 PC. |
| Soda | 1 tsp. |
| Sugar | 1 tbsp. l. |
| Salt | 1/2 tsp. |
| Flour | 4 glasses |
| Pumpkin | 1.5 kg |
| Vegetable oil | 15 ml |
| Sugar | taste |
| Butter | 100 g |
| Vinegar for extinguishing soda |
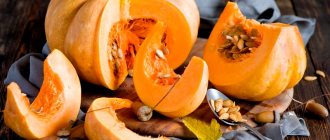
- The classic filling for placinda consists of pumpkin, so choose the appropriate vegetable in advance. Give preference to nutmeg varieties, because the pulp of such a pumpkin is more aromatic and softer, and is also easier to peel from the hard skin.
- Pay attention to the amount of flour: its quality varies from manufacturer to manufacturer, so you may need less or more flour than indicated in the table.
- I also draw your attention to the fact that the volume of the glass in this recipe is equal to the standard 200 ml. This is exactly how much an ordinary faceted glass can hold.
Preparation
Knead the dough
- Traditional pumpkin placindas are prepared with kefir, so pour room temperature kefir into a deep bowl and add soda slaked with vinegar;
- Add sugar and salt, beaten egg to kefir and mix well;
- Kneading thoroughly, add flour to kefir and knead into a thick dough;
- Add vegetable oil to the dough, knead thoroughly again and leave to “rest” under a clean, dry towel for 10-20 minutes.
Prepare the filling
- Cut the pumpkin and remove the skin and seeds;
- Grate the pumpkin on a coarse grater.
Form placintas
- Divide the dough into 4 equal parts;
- Take 1 piece of dough and roll it into a round layer 3-5 mm thick;
- Place 1/4 of the grated pumpkin in the center and sprinkle with sugar to taste;
- Cover the filling with the edges of the dough and form a placinda;
- Repeat these manipulations with other parts of the dough and form 3 more placindas.
Bake a placinda
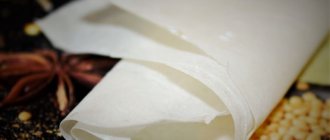
- Cover the baking sheet with parchment paper and place the formed placinda on it;
- Bake the placinda for 30 minutes at 180 degrees;
- Thickly grease a large sheet of clean parchment paper with butter and transfer the finished hot placinta onto it. Grease the crust of the placinta with oil.
- Wrap with parchment paper and cover the placinda with a towel for 10-15 minutes.
Bake the remaining 3 placintas.
Ready!
Video recipe
In this wonderful detailed video tutorial you can see how to properly knead the dough and form the placinda in the traditional way.
Recipes of traditional Russian cuisineHow to cook placindas with pumpkin
It's no secret that pumpkin is an amazing vegetable. It is not difficult to grow, and it can be stored for a long time. As for taste characteristics, they are at their best. In the cold season, when fresh vegetables and fruits are in short supply, you can cook something from pumpkin. There are many dishes based on it, including pumpkin dumplings.
First of all, you need to cut the pumpkin into slices and peel it. However, you should not throw away pumpkin seeds. They need to be roasted in the oven. The result is a tasty treat that helps normalize blood pressure.
After this, the pumpkin should be grated, placed in a frying pan and simmered with the addition of a small amount of margarine or vegetable oil. After the moisture evaporates, the pumpkin will become soft. At this point you need to add salt and remove the pan from the stove.
Now you need to make regular, yeast or any other dough. Everything else is simple. A piece of dough needs to be rolled out so that you end up with a circle twice the size of a baking sheet or frying pan. Place the filling on top. If you want a sweet dish, add sugar. You can add salt and pepper instead if desired.
https://youtube.com/watch?v=5V030hWKWhU%3Ffeature%3Doembed
Then you need to roll the dough into an envelope and wrap all the remaining corners. To make the placinda flatter, it must be slightly rolled out with a rolling pin. Now it needs to be baked in the oven or fried on both sides in a frying pan. In the case of an oven, grease the baking sheet with margarine, make several punctures in the dough with a fork and bake at a temperature of 200 degrees.
The finished dish must be removed from the oven and thoroughly grease its surface with butter. As a result, the crust will be juicy and soft. If you are preparing this culinary masterpiece in a frying pan, you should not grease it, since this pumpkin treat will already be well saturated with fat. After cooling, you can begin tasting.
If you have some culinary imagination, you can safely add additional ingredients or additives to the dish. As a result, you will be able to create a real work of culinary art based on the basic recipe.
Many people know about the existence of pumpkin, but for one reason or another they have never bought it or prepared any dishes from it. But in vain, dear readers. This vegetable is extremely healthy and allows you to prepare simply mind-blowing treats. For example, you can bake a pumpkin, make a wonderful porridge out of it, or prepare excellent placindas. Each of these culinary delights is good, unique and healthy in its own way.
You might be interested in:
Source:
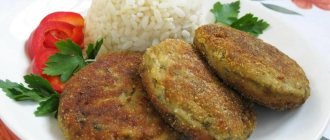
Placindas in a frying pan
The recipe for placinda with pumpkin in a frying pan is not much different from the recipe for the oven, but it cooks faster.
Kitchen utensils: grater; bowl for kneading dough; rolling pin; frying pan.
Ingredients
| Kefir | 500 ml |
| Egg | 1 PC. |
| Salt | 0.5 tsp. |
| Sugar | 0.5 tsp. |
| Baking powder | 1 tsp. |
| Butter | 80 g |
| Pumpkin | 1 kg |
| Flour | 2-3 glasses |
| Sugar for pumpkin | taste |
| Vegetable oil for frying |
Preparation
- Cut the pumpkin, peel and remove seeds. Grate the pulp on a coarse grater.
- Add egg, baking powder, softened butter to warm kefir and mix until smooth.
- Sift the required amount of flour into kefir and knead the dough. The correct dough will be soft and elastic.
- Knead the dough on a smooth surface until smooth.
- Form the dough into a sausage and divide it into 6 parts.
- Roll each part into a thin layer, place 1/6 of the grated pumpkin in the center, sprinkle with sugar to taste and form a placinda.
- Fry each placinta on both sides until crispy.
Video recipe
In this wonderful video you will see a visual recipe for placinda with pumpkin in a frying pan.
Ingredients
For a dozen small placintas or 3-4 large ones: For the dough:
- 1 cup flour;
- 4 tablespoons of water;
- 1/6 cup sunflower oil;
- A pinch of salt.
For the pumpkin filling:
- Sweet pumpkin;
- Sugar and cinnamon to taste.
How to cook placintas with pumpkin in a frying pan:
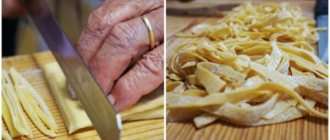
Previously, I made the dough for placindas the same as for dumplings and dumplings - custard. But after trying to make strudel dough, I realized that this option is even better. Strudel dough rolls out even easier and thinner, and this is exactly what you need for placindas in a frying pan.
Pour water and oil into the flour, add salt and knead the dough thoroughly for 5 minutes. If it's a little dry, you can add a little water and oil. Cover the dough with a plastic bag and leave it warm for half an hour.
I have already told you how to prepare pumpkin filling. Pumpkin filling is universal, it is suitable for placintas, pies, and vertuta. I cut the pumpkin into cubes, add sugar and a little water, and then simmer under the lid until soft, drain the water and add cinnamon. You can mash the filling with a masher or fork. Place in a wide plate to allow the filling to cool: if you put it hot on the dough, it will tear.
Now the filling has cooled and the dough is ready to roll out! There is no need to sprinkle the table with flour: the dough does not stick, which I really like. We roll out the dough as for strudel: as thin as possible so that it “glows” and the pattern of the tabletop is visible! The thinner the dough, the tastier the fried placintas. And if you roll it out thickly, you can get the effect of “raw” dough, like undercooked dumplings. Roll out in the middle and along the edges, turn the dough over, roll out again, and so on several times. You can try to gently stretch the dough with your hands.
Cut the rolled out dough into squares. My placindas are small, in the classic version they need to be made larger.
But the principle is the same: we cut the dough into squares, put the filling in the middle and wrap it like an “envelope”: first two corners diagonally, then the other two, and seal it slightly.
Heat the vegetable oil well in a frying pan and place the placintas on the hot frying pan - first with the sealed side up, so that the filling does not let in the juice, which will begin to burn.
Fry the placintas over high heat until golden brown: if they are rolled out thinly and the heat is sufficient, the dough turns out crispy, with appetizing “bubbles”, like deep-fried brushwood.
Turn the placintas over with a fork and fry on the second side until golden brown, and then remove with a spatula onto a plate.
Pumpkin dumplings are ready! But don’t rush, they taste better cold :)
You can use this dough to make pumpkin strudel! And if the strudel is rolled not only into a roll, but also into a spiral, then it will turn out to be a twist. There are so many variations!
- 5
- 4
- 3
- 2
- 1
(55 votes, average: 3 out of 5)
Post tags: placindas,
Adviсe
- Moldavian placintas will be a wonderful addition to your autumn table, because pumpkin season falls exactly at this time. This vegetable is very healthy and stores well, so dishes from it can be prepared until spring.
- Fans of oriental cuisine will definitely love the delicious samsa with pumpkin; pumpkin is also good in pies, porridges and baked with honey or sugar. Its aromatic orange pulp is useful for adding raw to vegetable salads, and also for preparing amazing hot dishes, for example, manti with pumpkin.
- It is best to eat ready-made placintas hot, but they can be prepared for future use and eaten cold or reheated. Moldavian placindas are good on their own and do not need to be supplemented with other dishes or sauce, although many people like to eat this pumpkin pie with sour cream or honey.
Filling options
Pumpkin is the traditional filling for placintas, but in Moldavian cuisine there are many other recipes for making this delicious pie. You can add any spices to your taste to the grated pumpkin for filling: cinnamon, ginger, cloves and orange zest. Grated apples, carrots and raisins are also good in placinda. My family also loves placintas with potatoes, cabbage, cheese and herbs.
The filling of eggs and fried onions is very good, and lovers of dairy products will definitely appreciate the placintas with salty and sweet cottage cheese. Use your imagination and prepare the fillings to your liking!
I’m sure you will definitely like my recipe for placindas today. I look forward to your feedback and comments, friends. And bon appetit everyone!
Placindas with pumpkin. Recipe for those who are too lazy to make pies
Okay, we have cleaned the pumpkin, now we need to grate it and simmer it in a frying pan with a small amount of vegetable oil or margarine. As soon as the moisture has evaporated and the pumpkin becomes soft, add a little salt and you can remove the pan from the heat.
While our pumpkin is stewing over low heat, prepare the dough. Anything is suitable here: regular, sour milk or yeast, basically the same as you usually make for pies.
The next step is quite simple: roll out a piece of dough to make a circle approximately 2 times larger than the frying pan or baking sheet on which you will prepare the placinda. By the way, the placinda can be fried and baked in the oven.
Place our filling on the rolled out dough. A little more detail and filling. Placindas with pumpkin can be made either sweet or salty with pepper. My boys love both, so we will make 2 types. To do this, add black pepper to one part of the stewed pumpkin and sugar to the other. Some especially hard-working people can put the filling into 2 different dishes and add the necessary ingredients there.
But adherents of a healthy lifestyle, that is, lazy people, will not waste precious time washing two more dirty dishes, so they will do everything much simpler and easier, like me.
https://youtube.com/watch?v=8yygOEJRBQI%3Ffeature%3Doembed
We spread the filling on the dough directly from the same frying pan where we stewed it (remember that we already slightly salted it at the end of cooking?) So, now for the placinda with pepper, add a little more salt to the filling and sprinkle generously with black pepper. The abundance is consistent with your own taste and the supply of pepper in the house.
After this, we roll the dough into an envelope, then fold the remaining corners in the same way, and lightly roll out our placinda with a rolling pin to make it flatter. Now you can either fry it in vegetable oil (but turning it over is a fun activity :)), or bake it in the oven. In the second case, grease the baking sheet with margarine or butter and make several punctures with a fork and place in an oven preheated to 200 degrees.
While our first placinda is being prepared, we are making the second one - this time sweet. I think everyone guessed that instead of pepper you need to sprinkle the filling with sugar? Well, that’s great: we fold it in the same way as the first one. Let it sit for now, and in the meantime we take the first placinta out of the oven.
While still hot, it is advisable to generously grease it with butter: then the crust will be soft and juicy. If you fried it in a frying pan, you don’t have to grease it: it’s already saturated with fat.
When all the placintas are ready, you can start tasting
CAREFULLY!!! If you leave the finished placintas unattended, family members can taste the dish long before you decide that the placindas have cooled down enough! In this case, I advise you to lock yourself with it in the bathroom or toilet without removing the placinta from the baking sheet and without greasing it with oil - in short, where the lock is stronger.
Bon appetit!
Source:
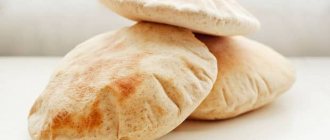
Moldavian flatbreads
No matter what cuisine you look into in the world, you can find flatbreads almost everywhere - round and flat dough products, but national characteristics make them unique. Thus, the Moldavian flatbread - placinda - differs from similar products in that it has a filling inside, like a pie, but at the same time retains a rounded flat shape and is fried in a frying pan.
The most popular fillings for placindas are cheese with herbs or pumpkin. Previously, placindas were made from unleavened dough such as dumplings; now they use different types of dough, sometimes even yeast dough. In this recipe, the dough is prepared using kefir in a special way, which allows you to get a puff pastry in cross section.
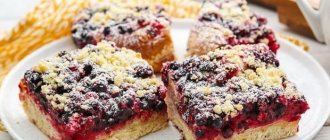
Moldavian flatbread with apples
Another delicious and budget-friendly recipe for making flatbreads is Moldovan placinda in the oven with apple filling. You can choose both sour and sweet apples, but sour ones go much better with sugar and will have a pleasant aftertaste!
To prepare the dough:
- flour – 1 glass;
- soda – 1 tsp;
- salt – 1 tsp;
- vegetable oil – 2 tbsp. l.;
- hot water - 1 glass.
To prepare the filling you will need:
- green apples – 3-4 pcs.;
- sugar – 1 tbsp. l.;
- pumpkin – 300 g;
- spices, cinnamon, herbs - to choose from.
The dish is prepared in the following order:
- First, wash the apples well, peel them, and grate them. At the same stage, add spices and sugar to the filling.
- To keep the apple filling soft and juicy, fry it. And for dietary dishes, stewing with less sugar is suitable.
- Form a flat cake in a separate container. To do this, add salt, soda and hot water, as well as oil, to a bowl. Stir and add flour. To begin, beat the dough with a whisk and then with your hands.
- Since the water is hot, the dough will be the same. Let it cool for 15-30 minutes.
- Place the cooled filling in the middle of the flatbread; you can make cuts along the edges. Form “envelopes” by placing layers on top of each other, and fry the tortillas evenly on both sides.
Pumpkin combined with green apples gives an excellent taste; you can cook with these ingredients separately.
Preparation
- First of all, let's prepare the pumpkin for the filling. We clean the ripe bright orange pumpkin from the peel and internal fibers. We grate it on a coarse grater and set it aside so that it releases a little juice.
- Meanwhile, knead the dough. Beat the egg into the flour, add sour cream and soda, first quenching it in half a glass of water with a spoonful of vinegar. We knead a strong dough, it should be elastic, and for this it needs to be kneaded well. Divide the resulting dough into four even parts and, rolling into balls, leave to rise slightly.
- Roll out each piece of dough into a round cake 5 mm thick. Cover with a damp cloth and leave to rise again for 10-15 minutes. It is necessary to let the dough rest so that it stretches well.
- Now take one of the rolled out cakes and leave the rest covered for now. Place the pumpkin on it in a layer of about 1 cm, leaving empty space around the edges. Be sure to squeeze out excess juice from the pumpkin. Sprinkle the pumpkin with sugar on top; 2 teaspoons of sugar is enough for one medium platinum, but more is possible if the pumpkin itself is not very sweet.
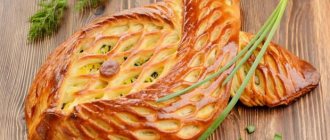
- Then we move on to the formation of products. On one side, carefully stretch the dough; you need to stretch it carefully, moving it with your fingers so as not to tear it. We wrap the resulting wing upward.
- We stretch the second side in the same way, and also wrap it so that the edges lie on top of each other. There is no need to warm them; they will hold up well during baking.
- When all four sides are stretched and wrapped, we have a square, now we stretch its corners. We pull each corner well until the dough begins to show through and also wrap it towards the middle. You should get a cross-shaped pattern.
- Carefully transfer the placinda onto a baking sheet greased with vegetable oil and place it in the oven, preheating it to 180 degrees. Bake for about 10-15 minutes. The baking time depends on how thin your cake is and how much filling it contains. Immediately after removing the finished product from the baking sheet, grease the top with butter. So, one after another, we bake all the placintas in turn. Tip: Do not try to form all the placindas at once and then bake. Pumpkin sprinkled with sugar gives juice and they will simply disperse, so we form and bake one at a time.
- We serve delicious aromatic pastries with sour cream, both hot and cold.
- You can also make the following baked goods with pumpkin:
- samsa with pumpkin, to which you can add minced meat if desired;
- pumpkin and butternut cupcake;
- .