8
Prepared by: Dasha Petrova
11/28/2015 Cooking time: 2 hours 0 minutes
| Save | I cooked) | Estimate |
I want to tell you how to make a “Beer Mug” cake at home. In general, this is the best option for a birthday gift for a friend or girlfriend who will appreciate your sense of humor!
Main Ingredients
There are many recipes according to which the Beer Mug cake is prepared. The main task of the pastry chef is to decide on the original decoration of the cake. And as a base, you can use the recipe for a cake with Guinness and currants. Your guests will be surprised by the taste of chocolate pie or original cheesecake. A wonderful decoration for a delicious dessert will be Baileys cream, which will give it airiness and a hint of unique aroma.
To prepare this delicious cake, for example, in honor of a birthday or other celebration, you need to prepare:
- butter - 150 g;
- granulated sugar - 150 g;
- milk - 100 ml;
- cocoa powder - 5 tbsp. l.;
- 2 chicken eggs;
- 2 tsp baking powder for dough preparation;
- 1 cup flour.
Making a beer cake
Option with two tiers and a single pallet with strapping
When time is running out or if there are only a minimum of materials available, you can create a composition simply but tastefully. Consumables:
- Beer in an aluminum can – 25 pcs., in a glass bottle – 1 pc.
- Double-sided tape.
- Colored tape.
- Crepe paper.
- Satin ribbon.
- Foil.
- Cardboard.
- Wire.
- Postcards.
To make a beer cake in cans with your own hands, you need to follow simple step-by-step instructions:
- First, two circles are cut out of cardboard, their diameter determines the diameter of the product. This should be done with an eye to the number of cans that should fit on them, provided that they are glued together. That is, only one circle provides usable area. The denser the cardboard, the better; material from the bottoms of boxes for equipment is excellent.
- The cut circles are glued together; you can use glue or double-sided tape. If you use double-sided tape, just cut out two long strips and stick them in parallel at the maximum distance from each other.
Important! To carry a beer can cake, you should use a tray or other solid support, since few cardboard can support such a weight.
- The glued circle is wrapped in foil around the circumference, after which the foil is carefully folded so as not to create large folds.
- First, seven cans are installed in a tight circle to secure them: one in the center and six around it.
- Next, they need to be carefully wrapped so that at this moment no gaps form between them, otherwise, as the diameter increases, they will become more impressive, and the structure will begin to wobble.
- Now the first circle of cans is surrounded by the next, wider circle.
- Next, you need to carefully, so that the cans remain standing tightly, secure them by wrapping them with tape in a circle.
- A belt is cut out of crepe paper, perhaps not a whole one, but from several pieces, which will fit all the cans along the outer radius. Its height should be 2/3 of the height of the beer container. It is better to secure the belt with double-sided tape. After its arrangement, the belt is tied with a strip of satin ribbon.
- The second tier begins with placing a glass bottle in the very center. Six aluminum containers are placed around it, after which they need to be tied with tape.
- The outside of the top row is also covered with crepe paper and tied with ribbon, just like the bottom row.
- Using two different colors of ribbon can make a pretty bow, although you can do without it.
- One or more postcards will be needed to enhance the design's aesthetics. To install them on the wire, its lower end must be secured to the ring on the valve.
- Fish bouquets are perfect as an additional decoration, as well as a very appropriate edible addition. For this you will need any paper and tape.
Mini option with pizza and snacks
If the recipient of the gift not only loves foam, but also likes to eat well, you can make a simple and very tasty beer cake in cans with your own hands with plenty of treats.
Consumables:
- Beer in cans – 7 pcs.
- Purchased semi-finished pizza – 1 pc. If you have the appropriate culinary skills and a stove, you can make pizza yourself; fortunately, there are countless recipes on the Internet.
- Snacks. Depending on the size of the paper “sockets” in the ring, there will be from 8 to 10 of them, respectively, they can be filled with each unique snack or partially repeating ones. For example, you can use salted peanuts and pistachios, dried fish, beef, pork or squid, hunting sausages, chips and anything that goes with foam.
- Ribbon.
In order to make a cake from beer bottles with your own hands, you need to follow the step-by-step instructions, as described below:
- A can of beer is placed in the center of the dish, with 6 more around it. They are all tied with ribbon. It is needed not only as a decoration, but also as an element that holds the jars.
- A plate of pizza is placed on top.
- After filling with snacks, paper rosettes are placed along the edge of the plate in a circle.
- In addition, if there are candles, they can be placed on top of the pizza, which will add additional charm to the children's holiday, which each of us looked forward to in childhood, as a bonus for the New Year.
Cooking algorithm
A master class from the best confectioners will help you make a Mug of Beer cake:
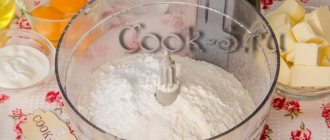
- You need to take a small saucepan and place the butter in it along with sugar, milk, cocoa powder, and then stir.
- Place the pan over low heat and begin to gradually bring to a boil, stirring the mixture regularly. It is important to avoid active boiling, which can ruin the dish.
- After this, the pan must be removed from the stove and the resulting mass must be cooled.
- Add eggs to the main mixture, and then add baking powder and flour. All ingredients are mixed to obtain a homogeneous mass.
- Original small cupcakes should be baked using special molds. You can also use glass glasses, similar to a beer mug. To better remove the finished cakes from the molds, it is advisable to thoroughly treat them with butter.
- The dough is poured into each mold so that it takes up a little more than 1/2 the size in height. During the baking process, the dough will begin to rise, taking up the free space inside the pan.
- Preheat the oven and place the dough pans in it. Bake at 180 degrees for 20 minutes. To check if the cake is ready, carefully pierce it with a toothpick.
- It is advisable to leave the finished muffins in the pan for 10 minutes, after which they are taken out and allowed to cool.
Beer cake for men on February 23
Make an unusual cake not only from beer cans, but also from glass bottles. You'll get a nice variety to eat.
Master Class
1. To assemble the beer cake, sit comfortably on the kitchen table. Place 6 pieces of beer in metal cans on a flat glass tray. Arrange the jars so that you can also place a beautiful beer mug next to them. Secure the walls of the jars together with pieces of double-sided tape.
2. To ensure that the mug stands stable next to the jars, connect its bottom to the glass tray also with pieces of double-sided tape.
3. At the top edges, connect the cans together with additional pieces of tape. This will give them greater stability.
4. Prepare another round tray with a smaller diameter than the lower (glass) tray. Place pieces of double-sided tape on the bottom of the second tray and place it on top of the jars. He must hold on tight. Check it out.
5. Connect the bottom of three glass beer bottles with tape, as in the photo. Attach pieces of tape to the bottom of the glass bottles to securely place them on the second tray.
6. Wrap glass and metal beer containers with blue satin ribbon. Connect the ends of the ribbons with tape.
7. Make 4 bows from a satin ribbon. Use a stapler to secure the bow to the bottom tier of the cake where the ends of the ribbon meet.
8. On the second tier of the cake, attach 3 bows at the junctions of the bottles.
How to decorate a beer cake with snacks
9. Start filling the cake with beer snacks. First pour peanuts into half the mug, and then add crackers.
10. Wrap two large dry-salted fish in transparent wrapping paper and place on both sides of the mug.
11. Use some cute flower-shaped cupcake liners. Pour crackers of a different configuration into them and cover with cling film. Secure the ends of the film on the other side with tape or a stapler. Make the number of flowers as desired. In this example there are 5 of them. Secure the formed flowers with the snack to the tray with tape.
12. The gift cake from beer cans is assembled and all that remains is to wrap it in wide transparent wrapping film. Buy the written words “Congratulations” from a craft store. They are sold on a stand that you place in the cake. Connect the ends of the film at the top of the cake with a beautiful double bow.
13. It’s so easy to put together an exciting man’s gift on the kitchen table.
14. The gift for a man is ready and all that remains is to complement it with pleasant words and feminine tenderness.
How to make cream
A beer-shaped cake requires the preparation of a special aromatic cream. For it you should prepare the following ingredients:
- finely chopped dark chocolate – 145 g;
- heavy cream – 1/2 cup;
- powdered sugar – 2 tbsp. l.;
- Baileys liqueur – 2 tbsp. l.
First, take the crushed mass of chocolate and mix it with powdered sugar. The mixture should be microwaved for 30 seconds at high power, and then 3 minutes. – in the off state.
After the specified time, remove the chocolate mixture from the microwave and mix the components to obtain a homogeneous consistency. The chocolate should melt completely. If this does not happen, then put the mixture in the microwave for another 10 seconds. Then it is mixed again. Baileys liqueur is poured into a homogeneous mass.
After the cream is completely ready, you need to take the cupcakes and cut off the tops. Such cakes should be the same in height. Using a knife, carefully cut out the middle. This must be done carefully, avoiding damage to the bottom of the cupcakes. Cream is poured into the resulting holes. This delicious mixture, infused with Baileys liqueur, should fill all the space in the cupcakes.
Ideas for cakes for men made from beer cans in pictures
Check out the different ways you can decorate a beer can cake. The main thing is to submit an idea to do the same or even better.
A review of beer can assembly examples will help you make the right choice.
Cake decoration
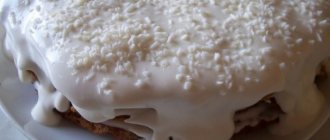
You need to decorate the cake with fondant. White mastic - 850 g, yellow food coloring, and whipped cream will help you create a mass for decoration. First you need to mix white mastic (600 g) with food coloring. The resulting mass should be rolled out to form a structure 30 mm thick. A strip 20 cm long and 8 cm wide is cut out of it. Then you need to retreat 5 mm from one side of the strip. This will be the place for the bottom of the mug. A wooden stick is moved along the strips to create longitudinal lines.
Use the prepared strips to wrap all the cupcakes. In this case, the excess part is cut off. The remaining white mastic is used to make a handle for a mug. The cake design is ready. The final decoration is made with whipped cream or liqueur-cream mass. This decoration will play the role of beer foam. Ready-made cupcakes can be placed on the table and treated to your loved ones and guests.
How to make your own birthday cake from beer cans
Make a similar gift for a man with your own hands. The gift is practical and will be used immediately for its intended purpose.
Master Class
1. Cut out the sides (strips) for two parts from regular cardboard. That is, to create a bottom and a lid. The width of the strips is 4.5 cm.
2. Make circles from the strips and glue the ends together. Glue the circles to the cardboard to create a lid and bottom.
3. Cut the glued cardboard along the sides and place the cans. They must come in. The top cover should be slightly larger in diameter than the bottom.
4. Decorate the inside surface of the lids with glued kraft paper. Cover the outer surface of the sides with burlap.
5. Glue circles from birch branches onto the burlap along the entire circumference of the sides.
6. Make an additional round container with a rim from soft cardboard. Cover the bottom with transparent film.
7 Place chips and nuts in a container. Cover the top with transparent cling film. Insert the snack container into the top lid. Place the formed cake lid or second tier on the jars.
8. Secure the jars around the circumference with a strip of burlap with a bow glued on.
9. The result is a cake made from beer cans with a masculine character.
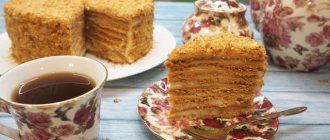
Cake "Napoleon" with beer
Perhaps the most popular of all cakes can be called “Napoleon”. There are many recipes for its preparation, but most housewives prefer the classic version of making a cake and are in no hurry to experiment. However, sometimes it’s still worth taking a risk and not being afraid to try making a dessert using a new recipe. For example, Napoleon cake on beer with custard. Making such a cake is not difficult, and the end result will pleasantly surprise and delight you and your guests.
Required Ingredients
To prepare the cakes:
- 3.5 cups flour;
- 200 grams of any light beer;
- 250 grams of butter, you can replace it with margarine.
To prepare the cream:
- 3 tablespoons flour;
- 1 packet of vanilla sugar;
- 1 liter of milk;
- 1 glass of sugar, sweet lovers may increase the amount slightly;
- 250 grams of butter;
- 5 large eggs.
Beer cake with cream cheese cream
An incredibly tasty and elegant cake made with beer and cream cheese cream will decorate any holiday table. Let's try to cook it with our own hands at home.
Ingredients needed to make the cake:
- 125 ml light beer;
- 125 gr. Sahara;
- 110 gr. drain oils;
- 75 gr. Brown sugar;
- 1 egg;
- 100 gr. Cocoa powder;
- 75gr. Sour cream;
- 225gr. flour;
- ¼ teaspoon of soda.
To prepare the cream:
- 400 gr. drain cheese;
- 100 gr. heavy cream;
- 60 gr. powdered sugar.
Step-by-step preparation:
- Take a small saucepan, pour the required amount of beer into it, add butter to it. Place the saucepan over low heat and heat until the butter melts.
- In a suitable container, beat the eggs.
- Carefully, in small portions, add sour cream to the egg mixture. Beat the mass.
- Add sugar and cocoa powder to beer. Mix the mixture thoroughly.
- Gradually add the beaten egg-sour cream mixture into the resulting mass in small portions. Mix carefully.
- Next, add flour mixed with soda in a thin stream and knead the dough.
- Divide the finished dough into three equal parts.
- Bake the cakes for 30 minutes at 180 degrees.
- Cool the finished cakes.
While the cakes are cooling, prepare the cream. Combine all the ingredients in a suitable container and beat until the mixture becomes thick and very dense. For this we need a blender. All components are ready, you can assemble the cake.
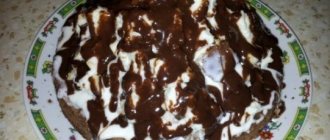
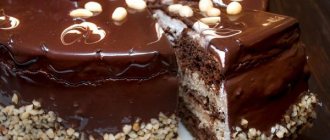
Place the cakes on a tray, brushing each of them with cream. We grease the last, final cake with creamy mixture, decorate with chopped nuts, grated chocolate, and so on. It all depends only on your imagination.
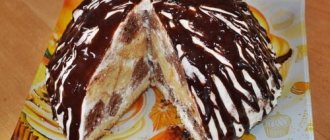
Step-by-step recipe with photos
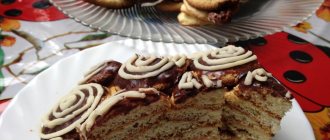
The other day it was a friend of our family's birthday. For dessert, I was assigned to make a cake. I didn't have to think long about the design. For a man who loves a foamy drink, I prepared a “barrel of beer.” Under the sensitive gaze and tips of my husband, such a brutal barrel came out, the husband noticed: “Viking barrel”)). The gift created delight and a storm of emotions. The effect has been achieved.
Making such a cake is not very difficult. The size of the barrel can be changed and the wood imitation can be different.
You can complement the “Beer Barrel” cake with mastic crayfish.
I first made a sponge cake for 4 eggs, then for another half portion. You can make all the dough at once and bake in one form, or divide the volume into 3 parts and bake in two or three batches.
Beat eggs with sugar until fluffy and white. Add milk and butter, mix with a spatula.
Combine cocoa, flour and baking powder.
Sift into the egg mixture.
Stir with a spatula until smooth.
Line the bottom of the pan with baking paper and lightly grease the pan with vegetable oil. Lay out the dough.
Bake at 180 degrees until done (check with a dry wooden stick). Cool the biscuit.
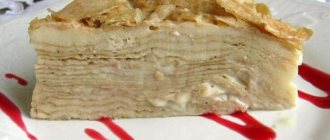
Cut the biscuit into layers. I got 5 pieces. I left the top of the head on the sides of the cake.
For the cream, take chilled cream and powdered sugar.
Whip the cream to soft peaks, add powdered sugar and beat until stiff.
Slice the banana thinly.
Let's start assembling the cake. I did it in a ring. Soak the biscuit in milk and add a layer of banana.
Add cream. I divided the cream into 4 parts and measured it on a scale.
Flatten. Cover with biscuit and soak again.
Alternate biscuit with cream. I only put banana on the first and third biscuits.
Place the cake in the refrigerator for at least an hour. Remove the ring.
Sprinkle the edges with biscuit crumbs to hide the cream.
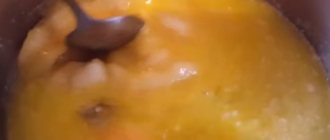
Beat soft butter with powdered sugar. Level the cake with cream.
Now the decoration. Unfortunately, it was not possible to take a photo. Paint the mastic brown. Roll. Cut a circle to fit the diameter of the top of the cake. Place circle on cake.
Measure the height of the cake. Roll out the mastic into a long strip. Measure the size using a ruler and trim off the excess. Wind the strip onto the rolling pin and, gradually unrolling the rolling pin, wrap the cake in a circle.
Apply stripes all over the cake, I also colored it dark.
Make two identical stripes from black mastic, glue them to the bottom and top of the cake, lightly moisten the cake with water. Also make a faucet from mastic, letters and rivets on strips.