Friends, on the night of October 31 to November 1, we will celebrate Halloween - a spooky holiday popular in many countries around the world. For Russia, this holiday is not traditional and widely celebrated. Rather, schoolchildren and students, as well as adults with a good sense of humor, “have a blast” on it.
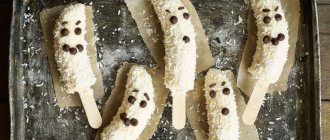
Make some tasty Halloween fingers
If you're planning on having some Halloween fun, here are a few Halloween sweet treat recipes that you can easily make yourself. Make these sweets together with children - the main fans of the holiday.
Halloween food is scary and sometimes macabre. I chose not the most terrible recipes. But still, those who see them for the first time may be shocked. I hope you will be reasonable and not scare your friends and family to death. And, of course, they themselves will be able to calmly eat what they have prepared. I wish you a happy Halloween!
Cake pops “Red Velvet”: composition, calorie content and nutritional value per 100 g
| Proteins 6.46 g Fat 19.66 g Carbohydrates 44.7 g Find out more More detailed information about the composition and calorie content of dishes is available in the Patee app. Recipes for iPhone, iPad and Android | 377 kilocalories |
Step 1:
To prepare Red Velvet cake pops we will need the following ingredients: wheat flour, baking powder, chicken eggs, butter, sugar, white chocolate (or glaze), 10% cream, red food gel coloring, confectionery sprinkles.
Step 2:
| Butter |
Place the butter in a bowl and heat it slightly in the microwave.
Step 3:
| Granulated sugar |
Pour sugar into a bowl with butter.
Step 4:
| Chicken egg |
Beat the butter and sugar until creamy and, without stopping beating, add two eggs one at a time.
Step 5:
| Wheat flour |
Add a couple of drops of red gel food coloring to the resulting dough. If you use dry dye, you will first need to dilute it with a small amount of boiled water.
Step 7:
Mix the dough until it acquires a uniform color.
Step 8:
Place the cake pop batter into a piping bag fitted with a round tip. You don’t have to use a pastry bag, but I find it much more convenient to place the dough into the cells of the mold this way.
Step 9:
So, we pipe (or spread out with a spoon) the dough into hemispheres on the tablet. From the amount of ingredients suggested in the recipe, you will end up with 20 cake pops, just enough for one mold with twenty recesses measuring 4 cm each.
Step 10:
Cover the form with the dough with the other half, the one with holes in each ball. Bake the balls in an oven preheated to 180 degrees for 25 minutes. Open the mold with the prepared cake pop balls and leave the balls to cool right in the mold.
Step 11:
| Chocolate white |
For the glaze, grind the white chocolate into coarse crumbs and place in a convenient container (glass bowl, bowl, glass).
Step 12:
| Cream 10-12% |
Pour cream into the chocolate or add a small piece of butter, 20 grams.
Step 13:
In a microwave oven or in a water bath, melt the chocolate and cream.
Step 14:
Also, for cake pops, we will need sticks 15 cm long. Dip the tip of the stick into chocolate. Then immediately insert the chocolate shelf at the end into the baked ball. Thus we string all the balls onto sticks. Place the mold in the refrigerator so that the chocolate hardens and the stick is securely attached to the ball.
Step 15:
When the sticks with the dough balls are securely fixed, dip the ball into the chocolate glaze, which should be melted again to the desired consistency. Dip the ball on a stick into the glaze, lift it, rotate it so that the glaze covers the surface evenly and the remaining chocolate drips into the container.
Step 16:
| Confectionery sprinkles |
Immediately sprinkle the chocolate covered balls with confectionery sprinkles. I used small red balls and regular granulated sugar.
Step 17:
After the ball of chocolate-covered dough has been sprinkled with sugar decorations, we place it vertically on a piece of thick foam or in a bowl with sprinkled cereal for stability, stick it into a large apple or use a special stand for cake pops.
Step 18:
As you prepare other cake pops, we also place them here so that the products do not touch, and let the chocolate harden completely.
Step 19:
Red Velvet cake pops are ready.
Step 20:
Cake pops “Red Velvet” are delicious and elegant; mini cakes on a stick in this version will be a wonderful dessert for Valentine’s Day. Bon appetit!
Easy Halloween Food Recipes: DIY Recipes
It is quite possible to prepare delicious and original dishes for your family and guests yourself. Unusual ideas for “scary” dishes will help you diversify your holiday table and set the “mood” for the whole Halloween.
Recipes:
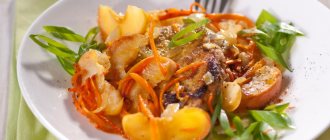
Dish "Human Guts"
You will need:
- Sausages for grilling
- Vegetable oil (for lubrication)
- Ketchup (or any red sauce)
Preparation:
- Choose a pretty casserole dish to serve it on.
- Grease the dish with vegetable oil
- Sausages for grilling should be laid out like a snake
- Spread the sauce at the junctions of the sausages and between the sausages
- The dish should be placed in the oven for 30 minutes at a temperature of 200 degrees
Dish “Human Guts”
Dish “Witch’s Fingers”
You will need:
- Sausages – one kilogram of good quality sausages
- Almonds – a few nuts for decoration (you need as many as there will be sausages)
- Ketchup or red sauce
Preparation:
- Boil the sausages until cooked, remove the packaging
- Sausages are laid out on a serving dish. An almond nut is inserted into each end of the sausage (it acts as a nail).
- Red sauce should be used to decorate the second end of the sausage.
Dish “Witch Fingers”
Dish “Hot Eyes”
You will need:
- Minced chicken – one kilogram (can be replaced with any other minced meat)
- Black olives (for decorating the dish)
- Tomato sauce (you can use ketchup)
- Spices to taste
Preparation:
- Form the minced chicken into balls approximately 5 centimeters in diameter.
- Heat the sauce in a frying pan with a wide side. If using ketchup, add water
- The balls should be gradually dipped into the boiling sauce and simmered for half an hour.
- When serving, finished chicken balls should be decorated with olives
Dish “Hot Eyes”
Dish “Hairy Sausages”
- Sausages – half a kilo of good quality sausages
- Spaghetti – 100 g long spaghetti
Preparation:
- Sausages are cut into three centimeter cubes
- Several spaghetti are inserted into each
- Sausages are boiled with spaghetti
- Boiled sausages can be served with your favorite sauce
Dish “Hairy sausages”
Halloween treats for children: cookies, sweets
Children are huge fans of Halloween . In addition to the opportunity to dress in bright colorful costumes, the holiday “treats” them with a huge amount of sweets. Some of them are “cute”, others are “scary”.
Even ordinary desserts can be presented in an unusual way or decorated in an original way. For this you will need chocolate, cream, candies, syrup, nuts and your imagination. It’s a pleasure to treat and surprise children with such desserts.
Options for “scary” desserts for Halloween:
Apples in caramel
Cupcakes "Scary Stories"
Cupcakes "Pumpkins"
Gingerbread for Halloween
Sweet cockroaches
On Halloween, all kinds of insects are held in high esteem. We have already used worms in the recipe. Now I propose to make a dish with our pets - cockroaches. You can make several types of sweet cockroaches for Halloween. Choose the option you like.
Sweet chocolate and stuffed cockroaches for Halloween
Ingredients for chocolate cockroaches:
- Dates – 700 g
- Chocolate – 2 bars
Ingredients for stuffed cockroaches:
- Dates – 700 g
- Soft cream cheese - 230 g
- Walnuts, chopped - 1 cup (optional)
- Cuttings from berries (cherries, cherries, etc.) - a few pieces (optional)
- Make “cockroach” preparations from dates. To do this, use a sharp knife to cut one side of the date lengthwise and carefully remove the pit through the cut. Cover the date and press it down a little to make it flat. Process all the dates in a similar manner.
- Melt the chocolate (dark or milk) in a water bath. Dip each date halfway into the liquid chocolate and place on a plate lined with parchment paper.
- Place the dish with sweets in the refrigerator until the chocolate has completely hardened.
- When serving, decorate the dish with chocolate cockroaches with plastic cockroach figures.
- Remove the pits from the dates.
- Mix cream cheese with chopped walnuts. But you can use just cheese, without nuts.
- Using a pastry bag, fill the “cockroaches” with filling. Press the dates down to make them flatter.
- Place the stuffed prussians on a plate, cut side down. If possible, decorate several date cockroaches with antennae from berry cuttings, and also place plastic insect figurines on a plate.
Best articles Baking with bananas
Sweet “Witches’ Brooms”
A witch can do without fingers, but not without a broom. Witches' brooms, in both sweet and savory forms, are a Halloween menu item. I suggest you make sweet and salty witches brooms.
Sweet “Witches’ Brooms”
The main ingredient of sweets are small candies - chocolate, fudge, toffee, jelly, etc. in the form of a truncated cone or hemisphere with a ribbed surface.
Ingredients:
- Salty straw
- Candies with ribbed surface
How to make the sweet “Witch’s Broom”:
- Using a stick or toothpick, make a hole of a suitable diameter in the tops of the candies and insert a salty straw into it. If the candy filling is too liquid, then try not to turn the finished brooms over so as not to get dirty. Warn your guests about this.
- If you are making brooms as gifts or for distributing Halloween candy, then you do not need to remove the wrapper from the candy first.
Dessert “Cemetery land”
it becomes clear: this is what a brutal appetite looks like.
To make vitamin critters you will need apples, strawberries, marshmallows, chocolate dragees and sunflower seeds.
Glaze and culinary mastic with food coloring can change gingerbread men and any cookies beyond recognition.
The only thing simpler than jam is powdered sugar. We cut out biscuit circles and squares, put stencils with holiday paraphernalia on them, sprinkle with powder and remove the stencils. Ready!
Manic-depressive shortcrust pastry fingers with almonds look creepy, but it doesn’t affect the taste, believe me.
And these friendly spiders are made from cake pops, licorice lozenges and dark chocolate with a special black culinary sprinkle. However, lollipops with confectionery poppy seeds will also work.
A Halloween classic: caramel apples. After all, the time of its celebration among the inhabitants of the British Isles coincides with the timing of the harvest.
A delicious and spooky dessert for Halloween. The recipe can be in several versions, choose the one that suits you best.
Halloween dessert “Graveyard Ground”
Ingredients:
- Chocolate pudding or chocolate jelly
- Chocolate cookies (possibly with a milk layer)
- Gummy worms
- Make chocolate pudding from the mixture. You can also make pudding or chocolate jelly according to your own recipe. Pour liquid pudding or jelly into small transparent bowls, bowls or glasses, filling them 1/2 or 2/3 full, and leave to harden.
- If you do not have the opportunity to prepare pudding or jelly, buy the required amount of ready-made chocolate desserts in cups (preferably transparent).
- Grind the chocolate cookies (if you prepared “Eyes of the Monster”, then halves without a layer) into lumps of different sizes to imitate the ground. You can use a bag for grinding. Just put the cookies in there and let your kids smash them into pieces. You can also use a blender. If you have chocolate cookies with a milk layer, then when chopping, add 1-2 pieces to imitate pebbles and other earthy inclusions.
- Sprinkle the prepared pudding with cookie soil on top. Decorate the dessert with gummy worms cut in half and rolled in soil.
Monster Eyes Cookies
Such a small confectionery product is prepared within a few minutes, since it uses ready-made starting products. The basis of the presented dessert will be a round cookie with two shortcakes and a sweet filling between them. The best product is from Oreo.
“Eyes of the monster” can be served on the table as an independent dessert or used to decorate eclairs, cakes and other sweets
Preparation:
- Carefully separate the sweetness and divide it in two. To prepare the dessert, you only need half with a layer.
- Place one M&E's, face down, on top of each cookie.
- When serving, place the cookies in pairs, this will create the effect of looking eyes.
A more complicated and more inventive version of making “Eyes of the Monster” involves the use of a food marker. Draw veins on the whites of the eyes, and decorate the iris by applying multi-colored confectionery gel.
General principles for decorating sweets for Halloween
When pumpkins with shining faces light up near the houses with a soft yellow light, and witches, Freddy Kruegers, Draculas and Frankensteins are walking along the street, and children’s voices are heard everywhere asking “trick or treat,” it means it’s time to set the sweet table for Halloween.
Design ideas and scary names for Halloween sweets are almost inexhaustible, because we are familiar with mysticism firsthand.
The number of literary and cinematic characters, as well as various Gothic paraphernalia, is so large that culinary creativity on this day will certainly go through the roof.
And the pumpkin itself with a candle is an invariable symbol of celebration, like a beacon for spirits - so says the ancient Celtic belief. It is precisely the pumpkin that is becoming one of the most common images and likenesses used to decorate sweets for children on Halloween in England.
Other sweets
Other desserts that are suitable as gifts for Halloween include:
- cake pops in the form of monster heads,
- ghosts made of meringues or marshmallows,
- jelly worms in chocolate cookie soil,
- monsters and jelly eyes.
Even a strawberry dipped in white chocolate with dark chocolate dots instead of eyes and a mouth will look like a ghost. A box of such delicious ghosts will undoubtedly delight both adults and children.
Remember that when you give something, including sweets, the packaging should also look impressive. Especially if it happens on Halloween. There are a lot of possibilities for decorating packaging for this holiday. Even ordinary round candies and popcorn, if you stuff a new plastic glove with them, will look impressive and are suitable as a small Halloween present.
Cookie
Decorating cookies for Halloween is a huge creative activity. Traditionally, delicious gingerbread cookies are decorated with colored icing, drawing cats, bats, pumpkins and ghosts. You can create entire masterpieces (although it is better to entrust this to professional confectioners).
It doesn't have to be complicated. Cute ghosts can be born in the kitchen of any housewife, for example, from ordinary oblong-shaped cookies (even store-bought ones), white icing and melted chocolate.
Bake any shortcrust pastry figures according to your favorite recipe and decorate them with glaze skeletons. You and your guests will love the result.
It’s great if children help create Halloween sweets, because it’s a fun creative process!
Dracula's teeth
You will need:
- shortbread dough according to your favorite recipe
- chocolate chips (or ready-made crisps)
- vanilla frosting
- red food coloring
- marshmallow
- almond
How to cook:
- Prepare the required amount of dough for shortbread cookies according to any favorite recipe. Preheat the oven to 180°C. Line two large baking sheets with parchment paper.
- Then roll the dough into balls for future cookies, level them with a fork on baking paper and stick chocolate drops or dark chocolate chopped into small pieces into them. Bake until golden brown, about 12-15 minutes. Let cool completely and then cut the cookies in half.
- Add a few drops of red food coloring to the vanilla frosting and mix until smooth. Spread a thin layer of red icing on each cookie half.
- Place small marshmallows along the round edges of half the cookies. Cover the top with the other halves and then attach almond slices on each side (as in the picture) to create fangs.
Cookies “Witch's fingers”
To prepare cookies you will need about an hour and a half of your time and a little imagination.
Ingredients (for 60 cookies):
- Flour - about 3 cups (350 g)
- Softened butter - 230 g
- Sugar - 1 glass
- Egg - 1 pc.
- Baking powder for dough - 1 tsp. (can be made from a mixture of soda, flour and citric acid, taken 1/3 tsp each)
- Salt - 1 tsp.
- Vanilla - 0.5-1 packet of vanilla sugar or 0.5-1 tsp. vanilla essence
- Almond essence - 0.5-1 tsp. (not necessary)
- Cinnamon - 0.5-1 tsp. (not necessary)
- Cardamom - 0.5 tsp. (not necessary)
- Green food coloring (optional)
- Raw medium-sized almonds (can be unpeeled) - 100 g
- Red jam (strawberry, lingonberry, red currant, raspberry, cherry, etc.) - 0.5-1 cup
- Cocoa for decoration (optional)
- Beat butter and sugar until fluffy. Add the egg and flavorings (if you have almond essence, then you don’t need to add cinnamon and cardamom), mix everything. Add flour, baking powder and salt and stir until smooth.
- If you want to make your fingers green, add a little green food coloring and mix the dough thoroughly. If the color is too pale, add more dye.
- Cover the bowl with the dough with cling film and put it in the refrigerator for 30-40 minutes.
- Preheat the oven to 165°C. Take a quarter of the dough from the refrigerator and begin to shape the fingers. Focus on your little fingers. Place the finger blank on a baking sheet covered with baking paper. Place an almond on the tip and press down well (you can take peeled or unpeeled almonds, as well as nut halves). If the almonds are too large, then your finger can be made thicker. Form a knuckle by squeezing the dough from the sides below and above the knuckle. Using a knife, make folds of the finger. Repeat the procedure to form the remaining fingers. Place your fingers on the baking sheet at a distance of 1-2 cm from each other.
- Bake the cookies for 15-20 minutes or until lightly golden if your fingers are not green.
- Cool the cookies and start decorating. There are several options here. First, you can lightly dust your white fingers with cocoa using a brush. This will make your fingers look more contrasty and dirty. Secondly, if the almonds separate from the dough, you can pull them out and pour red jam into the hole so that when the almonds are returned, “blood” oozes from the nail bed. If you can't get the almonds out, just pour a little jam around the nail. Thirdly, dip the “cut off” part of your fingers into the jam, and also stain your knuckles with jam.
- You can serve the “Witch’s Fingers” cookies on their own, or you can suggest dipping them into a bowl of “bloody” jam. Bon appetit!
Best articles Chicken “Borodino”
See what else “Witch’s fingers” can look like (the picture is clickable and will open in a new tab).
Variants of “Witch's fingers” cookies
Meringue "Canterville Ghost"
These cakes are a great Halloween treat for the whole family. Even a child can cook it.
It will take you a couple of hours to prepare these cuties, but the results are worth it!
Ingredients:
- 250 g sugar;
- 15 g chocolate;
- 4 egg whites.
Preparation:
- Beat the egg whites with a mixer until fluffy. Add the specified amount of sugar and continue beating until smooth.
- Preheat oven to 100°C. Line a baking tray with parchment paper and place the protein mixture on it in the shape of pyramids using a tablespoon.
- Bake the ghosts for an hour.
- Do not remove the cakes from the oven until they have cooled completely.
- Before serving, draw eyes on the figures with chocolate.
These cakes are easy in every way: they're easy to make and don't pose a danger to weight-watching guests.
Fruits
You can brighten up the cakes and cookies on your holiday table with fruits decorated in the spirit of the holiday.
The easiest way is to use a large pumpkin instead of a fruit skewers stand. Draw a kind face on it - your guests will love it.
Fragrant tangerines can easily be turned into symbols of the holiday if you add a green root (for example, from marmalade), like a pumpkin.
Bright citrus fruits also do an excellent job playing the role of mummies. Use strips of white crepe paper or bandages to transform oranges into mystical characters. You can draw the eyes or buy them at a craft store (they have ready-made eyes for toys in different shapes and sizes).
Delicious sweet kebabs are made from kiwi, marshmallows and tangerines. Chocolate icing and inspiration will make them real “monsters”!
These are the treats you can offer to your Halloween party guests!
However, you need not only to prepare and decorate sweets, but also to select dishes, tablecloths and decor. This is one of the main rules of a candy bar! Here are some tips on how to decorate the sweet table and its details.
- Use black, orange and yellow colors.
— You can make your own containers for candy and other small Halloween treats. Take orange bowls or small buckets, black tape or dark paper and glue. Cut out funny faces and stick them on the dishes.
Such cute mummies will also effectively complement the table. To make them, you need to wrap jars, tall plastic containers, etc. with bandages. Eyes can be cut out of paper, drawn, or bought at a sewing accessories store. You can serve fruits, cookies, and sweets in “mummies.”
Another option for decorating ordinary jars for a “terrible” feast. Colored paper, beads for eyes, glue, ribbons, imagination and exclusive tableware for sweets are ready!
— To decorate the candy bar area, ghosts made of starched gauze, candles in candlesticks decorated with black lace, traditional pumpkins, and paper figures of mystical entities are suitable.
— Is it possible to let guests leave the holiday without small gifts? Prepare everyone with a little sweet surprise in a very original package... a regular latex glove. Fill it with any candies, but be sure to put 5 long bars (like fingers) and tie the makeshift bag with a ribbon. You can decorate your glove finger with a ring. Hang your “hands” near the candy bar, and after the holiday is over, let each guest take such a sweet gift.
Want your sweet Halloween decorations to be professional? Call us, write or leave comments on this article and the best confectioners and designers in the capital will prepare a candy bar for your holiday!
Gift “Monster Hand”
If Halloween is just around the corner, and you have absolutely no time or desire to prepare treats, then I offer you a “quick fix” option - the “Monster’s Hand” gift. It's easy to do it yourself. In addition, you can choose your own filling for each person to whom you will give the “Hand”.
Halloween Gift “Monster Hand”
What is needed for a gift:
- Polyethylene or surgical gloves
- Braid, ropes or threads for ties
- Sweet popcorn, candy, chewy marshmallows, cookies, caramel nuts, chocolates, chewing gum, etc.
- Plastic insect figurines for decoration (optional)
How to make a “Monster Hand” gift:
- Fill the gloves with candy filling. To imitate nails, you can first put a red (or whatever you like) candy into each finger of the glove. To form fingers, you can use long candies or candies packaged in a tube.
- If desired, place plastic insects inside the gloves.
- Twist the bells of the gloves and tie them with braid, string or thread.
- You can also decorate the “Hands” with insects on top.
Friends, I wish you and your loved ones a happy Halloween and delicious treats! If you haven't already learned Halloween songs and created makeup, I suggest you do it right now.
Interesting? Tell your friends!
Easy and quick Halloween recipes with photos
This holiday, which has its roots in the depths of centuries, was practically not popular in our country just a few years ago. But today Halloween is celebrated quite widely. It has become fashionable to organize themed parties on All Hallows Eve, to look for different cool recipes for Halloween with photos so that it is not only tasty, but also interesting.
How to Throw a Halloween Party
On this holiday, it is customary to decorate your homes with jack-o'-lanterns. It is this that is considered the main attribute of the festive decor on this day. In addition to the home, one should not forget about the makeup of the guests. Count Dracula or the Werewolf, the Risen Dead or the Ghost - the most important thing is older and more natural.
Naturally, no party can do without festive decorations. It takes a lot of skill and imagination to put the coolest Halloween food on the table. The recipes for these dishes are often very simple; the main thing is to manage to arrange and serve everything beautifully and stylized.
What to cook for Halloween
So, just a little more time and Halloween 2021 will come. The recipes for appetizers and other dishes that you decide to prepare for the party should be different from the Halloween food recipes that caught your eye last year. After all, in order to surprise guests, you need to try to be as original as possible. Halloween recipes can be scary, but at the same time they should whet your appetite, not disgust you.
Halloween is the best reason to cook something original that can be called both wonderful and disgusting. The format of the holiday is best organized in the form of a buffet table. Down with boring gatherings and long periods of picking at plates with a fork. The Halloween menu should only contain easy recipes! In the intervals between mischievous and creepy competitions, you need to try to implement the most original easy recipes for Halloween, which will also be convenient to use. The menu for this holiday should consist mainly of appetizers and desserts.
The Best Quick Halloween Recipes
We made sure in advance that you already know what to cook for Halloween. Recipes with photos of our chefs will amaze even the avid party-goer in honor of this creepy and fun holiday. Here you will find simply incredible snacks, drinks, desserts, as well as Halloween cookie recipes that will look no less scary than exhibits from the Kunstkamera.
Visit our selection, cook according to our simple step-by-step recipes with photos, and your party is guaranteed to be remembered for a long time!
Best articles Sponge cake with ice cream
When is Halloween celebrated, what date?
Halloween is the holiday of “all the dead.” It has very deep historical roots. Halloween has been celebrated since ancient times on the last day of October, namely the 31st . This day is considered the last date for harvesting. It is believed that after finishing its fertile season , the soil has strength and power.
It is on Halloween that the earth is able to “resurrect” dead ancestors buried in it. In order for ghosts not to disturb the harmony of the world of the living , it was decided to scare them away with all sorts of images. To do this, people dressed up in costumes and put on scary masks that looked like the faces of the dead.
Realizing that among them there were exactly the same creatures, the ghosts did not touch the living. They disappeared when the sun rose on the first of November.
The symbol of the holiday is a pumpkin . This fruit is the last one in the entire harvest and therefore it has a lot of significance for the holiday. Pumpkin is the main decorative element of Halloween and its main ingredient in dishes. Treats can be literally prepared snacks from pumpkin, replicating its external characteristics.
Halloween Treats
Sweet Halloween for the little ones
Well, if there are very little vampires and dracula at your party, then you can prepare cartoon “horror” films for them - colorful, tasty and not at all scary. "Scooby-Doo" and "Monsters on Vacation" are exactly what you need.
The sight of this angry witch evokes nothing but joy and a desire to grab a piece of cake as quickly as possible.
Brownie cakes in bright colors in the form of owls or silly Frankenstein will also cause a storm of positive emotions in the little ones.
...Like a funny pumpkin with a cute black cat.
Sweets for Halloween are an indispensable attribute of All Saints' Day, which will emphasize the theme of the celebration and create the necessary mystical atmosphere.
Scary Halloween Drinks: Recipes
Some drinks can be decorated in interesting ways to make them look scary and attractive.
Drink "Witch's Potion"
- Place green jelly worms on the bottom of the glass.
- Pour regular tonic into a glass
- You can omit the decorative eye (if you can find it)
- Cut the melon pulp into cubes and place in a glass
- The cocktail tube can be decorated with marshmallows in the form of a ghost (cut with a knife)
Drink "Witch's Potion"
Drink "Blood in Test Tube"
- For this you will need a set of test tubes and a holder for them
- Pour any creamy syrup into the bottom of the test tubes.
- Then pour in pomegranate juice in a neat, thin stream.
- The syrup is much “heavier” than the juice and it will remain at the bottom
Drink “Blood in a Test Tube”
Drink “Wunsch Punch”
- Prepare the punch. For adults it can be a mixture of wine and honey, and for children a mixture of red juices
- Peel the apple
- Cut out faces in the pulp
- Dip apples into a dish with a drink
Wunsch Punch drink
How to make sweets for Halloween: “Ghost” cake pops
The mixture for such cakes is made like a classic potato cake - a simple and quick recipe. The only problem that can arise is when working with mastic, and only for those who have never used it to decorate baked goods.
Ingredients
- Butter 82.5% – 35 g;
- Vanilla crackers – 0.1 kg;
- Powdered sugar – 50 g;
- Soft cream cheese – 65 g;
- Confectionery mastic – 0.2 kg;
- Dark chocolate – 1 slice;
- White chocolate – ¼ bar.
How to make candy for Halloween
- Break the crackers into fine, fine crumbs, almost into flour.
- Mix soft butter with cheese and powdered sugar with a mixer. Then gradually add crumbled bread into the mixture.
- The cake mixture should be plastic, like plasticine. Divide the entire volume of the mass into equal pieces and roll into even balls, the size of a lollipop or a little larger. Place the balls in the refrigerator, covered with film for 15 minutes.
- After a quarter of an hour, melt white chocolate in a water bath, dip a wooden skewer into it 1 cm, and then stick the stick into the ball. The chocolate serves as a retainer so that the stick does not fly out of the cake.
- Now we divide the mastic into lumps according to the number of balls and roll each piece into a round cake.
- We throw a mastic “sheet” over the balls, stick it lightly and place the cake pop vertically to dry. To do this, it is best to stick the sticks into a foam stand.
When all the ghosts are ready, use melted dark chocolate to draw eyes and a mouth on them.
Traditional sweets
Although it is not customary to give gifts on this holiday, many exchange goodies, prepared with their own hands or purchased specially for this occasion in confectionery stores. Everyone prefers different sweets, but there are also traditional ones that came with the holiday itself from Britain and Ireland:
- Sweet bread Barmbek. Aka Irish tea cake or bread. It is prepared from barley flour with the addition of raisins, dried apricots or other dried fruits. Cinnamon, ginger, nutmeg, and orange zest help create the warm, fall flavor of this bread.
- Apples in caramel on a stick. This is a bright and aromatic dessert. To prepare it, use sour hard apples, such as Granny Smith. These fabulous apples are very easy to make. Add sugar and citric acid to the pan and put on fire. When the sugar melts and turns into caramel syrup, dip the apples on skewers into it. The finished apple can be placed to harden on a plate greased or lined with parchment.
- "Soul". These are simple shortbread cookies with the addition of cinnamon and ginger. A cross is laid out on it from raisins or dried currants. In Britain there is a tradition of giving such sweets to children and the poor.
- Seasoned caramel. It has a bitter taste and is made from solid molasses.
In America, on Halloween they like to make caramel popcorn and cookies that look like corn kernels. I color the dough with yellow and orange dyes, and then cut out small triangles from it.
Turkey pasta and meatballs - the all-seeing eye
To prepare minced meat you will need:
- minced turkey – 0.5 kg;
- grated cheese – ¼ cup;
- breadcrumbs - ¼ cup;
- ground black pepper – ¼ teaspoon;
- salt.
To prepare the marinade you will need:
- onions – 2 pcs.;
- ripe tomatoes – 1.2 kg;
- celery – 2 stalks;
- garlic – 2 cloves;
- carrots – 2 pcs.;
- olives;
- salt and pepper;
- Bay leaf.
We start cooking with the marinade. To do this, take our ripe juicy tomatoes and remove the skin from them.
You can easily remove the skin from tomatoes by placing them in boiling water for a few minutes, then pouring them over with ice water. Don't forget to make a small cross-shaped cut on the tomato first.
In a frying pan, first fry the garlic and diced onion until transparent. Now add grated carrots and celery. After 10 minutes, you can pour the prepared tomato puree over the vegetables.
Don't forget to season the sauce with salt and pepper and add bay leaf.
Leave the sauce to simmer over low heat until thickened.
This may take a whole hour.
Therefore, let’s not waste time, but move on to preparing the meatballs themselves.
Mix all ingredients for meatballs.
Separately, cut the olives into discs.
These will be the eyes, which need to be carefully placed on each meatball, slightly pressed into the minced meat.
Pour the prepared sauce into a heat-resistant form and carefully place the meatballs in it.
Try to keep all eyes above the sauce level.
Cover the pan with foil and place in the oven for at least half an hour.
After this time, remove the dish and remove the foil. Bring the meatballs to readiness, uncovered, in the oven for another 10 minutes.
Boil the spaghetti and place the turkey meatballs with eyes on top. It is better to serve this dish hot and in portions.
Baked roll - the hand of a vampire
To prepare minced meat you will need:
- minced pork and beef – 700 gr.;
- chicken eggs – 2 pcs.;
- onions – 2 pcs.;
- carrots – 1 pc.;
- hard cheese – 100–150 gr.;
- ketchup;
- greenery;
- salt and pepper.
Prepare the base for meatloaf from ready-made minced meat, adding finely chopped onion, grated carrots, seasonings and herbs.
It is better to prepare the minced meat yourself from pieces of meat - this is a guarantee that the dish will turn out tasty.
We form a hand from the mass, laying out both the wrist itself and all the fingers. Now we cut out nail plates from the second bulb, which we put in their places. Stir the rest of the onion into a bone stump on the back side.
We coat the creepy hand with ketchup, and then cover it with sliced cheese.
The workpiece is ready - it’s time to send it to the oven, where it will spend the next 40 minutes at a temperature of at least 200 degrees.
Adjust the time depending on the capacity of your oven and make sure that the vampire hand roll does not burn.
Place the finished dish on a plate and serve immediately to the table, where hungry zombies and witches are eagerly awaiting treats.
Stuffed Spooky Peppers
To prepare the peppers you will need:
- spaghetti – 750–1000 gr.;
- minced meat – 1 kg;
- bell pepper – 10–15 pieces;
- tomato paste – 100 gr.;
- tomatoes – 2–3 pcs.;
- onion – 1 pc.;
- basil and oregano;
- salt and pepper.
In a heated frying pan, fry finely chopped onion and immediately add minced meat to it. We continue to cook over fairly high heat so that the water from the mass evaporates and the minced meat begins to fry. This will take 5–10 minutes, depending on the quality of the meat product.
Now add chopped tomatoes to the minced meat, from which we first remove the skins.
After frying the minced meat with tomatoes, add tomato paste and about half a liter of boiling water.
Salt, pepper, add all the seasonings and continue to simmer the meat sauce, now over low heat. It will take about another half hour to cook.
At this time, prepare the peppers themselves.
Take the number of peppers no less than the number of guests. Believe me, such a dish will not only be a wonderful decoration for Halloween - every guest will want to try the super scary pepper.
Cut off the tops and stems of the peppers and remove all the seeds. We rinse and use a very sharp knife to make holes in the shape of eyes and a lopsided mouth.
The peppers themselves do not need to be stewed or processed.
They will serve on the table as utensils, and not as an ingredient in the dish.
When the meat sauce is ready, boil the spaghetti in salted water and mix it with the minced meat.
Place the finished pasta with minced meat on the prepared peppers and, using a fork, pull the pasta out through the holes, giving the peppers an even more terrifying appearance.
Add more spaghetti to the peppers and sprinkle cheese on top.
Instead of spaghetti with minced meat, you can use pilaf or another hot dish as a filling for scary peppers.
Mystical mashed potatoes
This is not just a treat, it is a special substance for fortune telling. Mashed potatoes, of course, will be eaten after the ritual. But in order to do this, let’s think about how to combine two goals.
Firstly, we prepare the puree not according to the usual recipe, but add spinach or boiled carrots to the potatoes, which will give it an unnatural color.
Now we are engaged in secret predictions.
You can find food-grade plastic figures and place them in the resulting substance. Or you can cut out figures from raw vegetables yourself.
You can see how to do fortune telling on mashed potatoes and the meaning of the figurines in our article “Halloween: rites, rituals, fortune telling.”
And of course, try to arrange the mystical potatoes in an unusual way. Let it be a volcano with lava or a raging river.
Give your favorite dishes a spooky look. Surprise your guests with unusual Halloween recipes. Experiment with new, albeit creepy at first glance, tastes. And your vampires and witches, ghosts and zombies, Leprechauns and cats will not remain hungry, and will tell their friends for a long time about the most terribly delicious Halloween party.
Cookies for children
Cookies are mostly easy-to-prepare desserts; they are the simplest Halloween sweets. Even children can handle their preparation; they will especially enjoy the creative process of creating funny mummies or pumpkins filled with pumpkin puree.
For the mummy cookies you will need:
- 160 g melted butter;
- 100 g sweet powder;
- a pair of eggs;
- 5 g baking powder;
- up to 400 g of flour;
- 40 g cocoa powder.
Sequence of actions:
- Beat the eggs together with the sweet powder with a mixer at medium speed for no more than three minutes. Then add butter softened to a creamy consistency and half a grain of flour, sifted with baking powder. Mix everything again into a homogeneous mass.
- Next, knead the dough with your hands, adding flour little by little. As soon as the mass comes together, do not add any more flour. Divide the batch into two parts: color 2/3 of the cocoa dark, and leave 1/3 white. Wrap each type of dough in cling film and refrigerate for an hour.
- Divide the chocolate dough into pieces weighing 60 g and form them into rectangular blanks - the bodies of mummies. Roll out the white dough into a flat cake 3 mm thick, which is then cut into noodles 0.5 cm wide.
- Next, all that remains is to “bandage” the mummies with strips of white dough, leaving their faces slightly open. All that remains is to make eyes from small balls of white and chocolate colors. Mummies are baked for about 20 minutes at 180 degrees.
When forming cookies, you do not need to wrap the blanks too tightly with white dough, otherwise the “bandages” will tear during baking.
Pumpkin-shaped cookies are called “Jack Lanterns.” It will definitely require a template, which can be made from thick paper.
It is convenient to use shortbread dough from the previous recipe or make a batch using pumpkin puree:
- 100 g cold butter;
- 120 g brown sugar;
- 100 ml pumpkin puree;
- 3.5 g cinnamon;
- a pinch of fine salt;
- ½ tbsp. l. soda;
- 195 – 260 g flour;
- 100 g of dark chocolate or thick jam without additives.
Progress:
- Beat the sweet sand with butter with a mixer, add pumpkin puree and cinnamon to this mixture, then salt, sifted flour and soda. The dough will come out soft, but not sticky to your palms.
- Roll it out into a layer 3 – 5 mm thick. Using a template, cut out pumpkins, cut out a mouth, nose and eyes from half of the blanks. Bake the pumpkins in an oven preheated to 180°C (approximately 12 - 14 minutes).
- Glue the finished cookies together in pairs with melted chocolate or thick jam.
Alternatively, you can not cut out the faces of the cookies, but simply draw them with melted chocolate.
Preparations for the creepiest party are in full swing. You need to try to scare your avid friends so that the night before All Saints' Day will be remembered for a long time. And it depends only on you how interesting and intriguing Sabantuy will become. It will turn into boring gatherings or become a memorable enchanting event of the year with terrible competitions and magical fortune-telling. And, of course, you can’t pass up the treats. After all, at this holiday of vampires, witches and ghosts, any dish should be symbolic, and serve not only as a usual way to refresh yourself, but also be an addition to the general “disgusting” atmosphere. We bring you a spookily creative menu of Halloween recipes.
Cake pops “Mummies”
You will need (for 8 servings):
- straws or sticks for lollipops – 8 pcs.
- dark chocolate – 300 g
- Peanut sandwich cookies (like Nutter Butters) – 8 pcs.
- butter icing (homemade or store-bought) - 1 tbsp.
- small M&M's for decoration
How to cook:
- Melt the chocolate in a small saucepan.
- Meanwhile, divide the sandwich cookies into halves.
- Lightly dip the straws into the melted chocolate before placing them between the cookie halves. Fold back the cookie sandwiches, then dip them in the melted chocolate until the frosting is completely coated on all sides (let any excess chocolate drip back into the pan).
- Place the chocolate covered cookies on a prepared baking sheet lined with parchment paper and refrigerate for approximately 15-20 minutes.
- Once the frosting on the cake pops has set, fill a piping bag fitted with a straight tip with buttercream and pipe it into mummy strips as shown in the picture above.
- Place small M&M's on almost finished mummies to make eyes. Set the cookies aside for at least 1 hour to allow the icing to completely set.